
Protecting Trees and Landscaping During a Roof Replacement in Halifax, MA: Planning, Barriers, and Contractor Practices
When a Halifax homeowner asks, “How do I protect my yard and trees when my roof is replaced?” they want practical, local advice they can act on. This article explains how contractors and homeowners work together to protect landscaping during a roof replacement in Halifax, MA. We focus on pre-job planning, on-site protection methods (canvas drops, debris-chute placement, root-zone protection, access-route selection, and crane/staging considerations), how different plantings change the risk profile, and clear homeowner responsibilities before and after the work.
why landscape protection matters in halifax
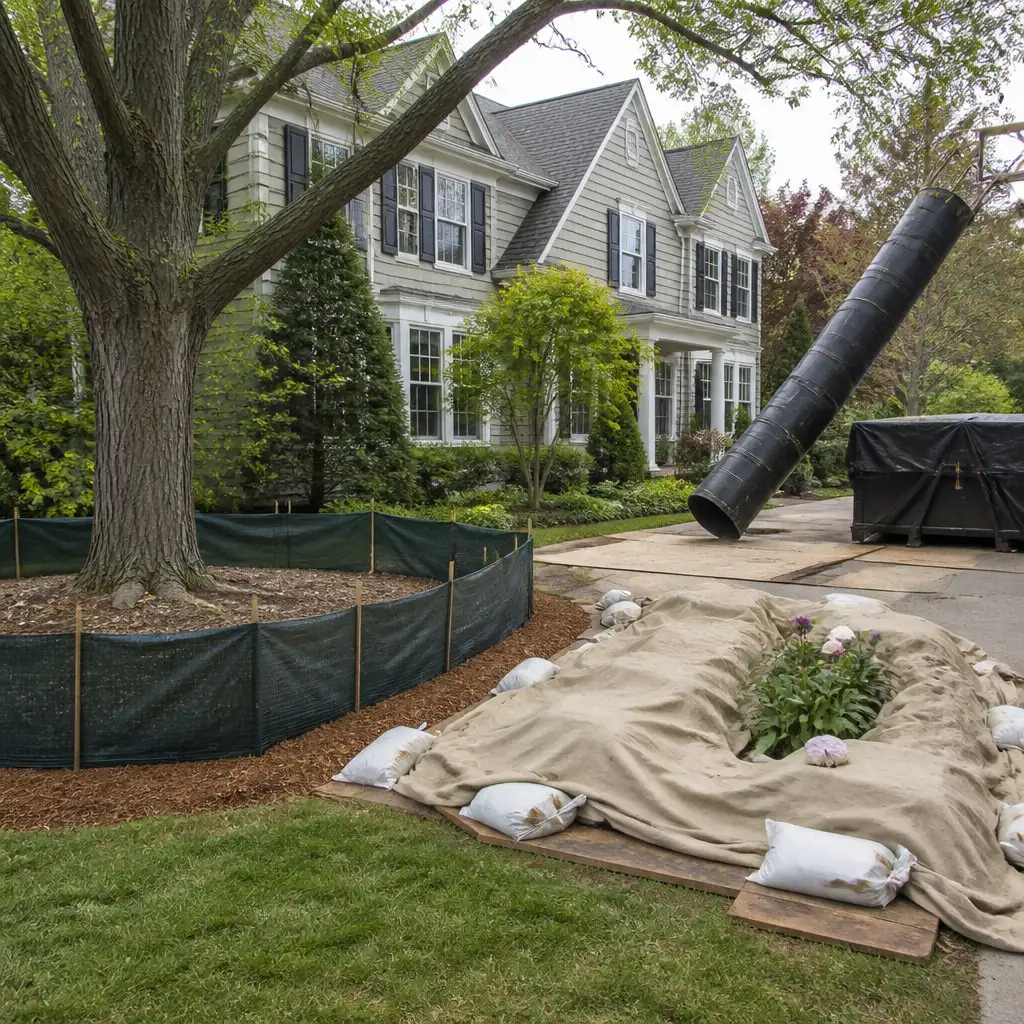
Halifax properties often feature mature trees, foundation plantings, and garden beds that homeowners prize. A roof replacement is intrusive by nature: installers carry bundles of shingles, walk roof planes, remove old roofing and underlayment, and handle waste. Without careful planning and protective measures, this activity can lead to crushed shrubs, torn lawn, compacted root zones, broken branches, and soiled plantings.
Why this matters: landscaping damage can be costly to repair, slow to recover, and emotionally upsetting when specimen trees or long-established beds are affected. In Halifax’s variable spring and summer weather, wet soil under tree canopies dries slowly, increasing risk of compaction and root damage during heavy equipment staging. That seasonal detail matters to how we stage and protect a site.
This article is focused on practical prevention strategies contractors and homeowners should consider when planning a roof replacement in Halifax. It is not a substitute for a site-specific contractor assessment. We encourage homeowners to ask for a written protection plan and to review it with the crew before work begins.
pre-job planning and site survey
Good landscape protection starts long before the first shingle is lifted. A thorough site survey identifies sensitive areas, safe access routes, staging areas, and potential pinch points. This phase should produce a simple protection plan listing where canvas drops, plywood walkways, debris chutes, and root-zone barriers will be placed.
Key items in the pre-job survey:
- Tree and root mapping: note the location and drip lines of large trees, the presence of multiple trunks, and any visible shallow roots near foundation planting beds. Trees influence debris-chute placement and crane lift paths.
- Slope and soil moisture: identify low spots and areas that remain wet longer under shade. These areas are more prone to compaction from foot traffic and staging.
- Planting types and specimen value: flag specimen shrubs and perennials that the homeowner wants prioritized for protection or temporary relocation.
- Access limitations: locate driveways, narrow streets, overhead wires, and septic or utility markers so equipment and material delivery can be planned safely.
- Staging and dumpster placement: select a spot that minimizes travel over planted areas; when possible use paved surfaces or lay protective track to reduce ground disturbance.
A contractor’s site survey also informs scheduling decisions. For example, scheduling roof work for a drier window can reduce soil damage; coordinating pruning or landscape relocation ahead of roofing can keep fragile plants safe.
canvas drops and ground-cover systems
Canvas drops (also called tarps or drop cloths) are the frontline defense for beds, shrubs, and lawn near the house. Properly deployed, they prevent shards of slate, nails, and roofing granules from embedding in soil and plant tissues.
Best practices for canvas drops:
- Overlap and secure: use heavy-duty contractor canvas, overlap sheets by at least 12 inches, and weight the edges with sandbags, plywood, or concrete blocks so wind and crew traffic don’t displace them.
- Protect the soil surface: when covering flower beds, leave enough breathing room to avoid smothering plants for long periods. For multi-day projects, choose breathable cloths rather than plastic sheeting to reduce heat buildup and suffocation risk for sensitive perennials.
- Edge control: tuck canvas under low branches carefully and protect mulch lines; avoid dragging sheets across delicate plantings.
- Granule collection: place canvas drops near gutters and eaves where most shingle grit accumulates. After each day’s work, the crew should fold and remove concentrated granules rather than sweep them into beds.
For areas with high aesthetic value, contractors often complement canvas with plywood panels laid across lawn or narrow beds to distribute weight from foot traffic and wheelbarrows. This is essential where crews must traverse turf to reach dumps or staging zones.
debris-chutes placement and debris management
Debris chutes dramatically reduce the chance of falling material striking landscaping. But their placement matters. A chute dropped directly onto a narrow bed or under a low branch can channel a concentrated stream of heavy material into root zones. Thoughtful positioning and padding are required.
What a contractor should do when placing chutes:
- Choose a clear landing area: place the chute over a paved surface, driveway, or a temporary dumpster location. If a driveway is not available, an area protected with structural plywood and wheel mats reduces soil crushing.
- Pad the impact zone: under the chute, lay heavy plywood on compacted fill or protective pallets, and add a 2–3 inch layer of coarse mulch or rubber mats to cushion impacts and prevent concentrated root damage from shock loads.
- Leave clearance for tree canopies: avoid abutting chutes against low branches. If needed, adjust chute angle or staging to keep falling debris well clear of trunks and roots.
- Routine debris clearing: chutes should be swept and inspected daily to prevent overflow and accidental discharges.
In some Halifax yards with limited hard-surface access, contractors use staged manual removal—hand-carrying bundles down ladders and walkways—paired with small debris platforms to protect nearby plantings.
root-zone protection for trees and shrubs
Root zones are often the most vulnerable part of a landscape during construction. Compaction and root severing can have delayed but permanent impacts on trees and larger shrubs. Contractors need to plan staged protection that respects the tree’s critical root zone (CRZ).
Principles and options for root-zone protection:
- Identify the CRZ: this is roughly the area under a tree’s drip line but varies by species and age. On site, mark a protective perimeter with flagging or temporary fencing that keeps foot traffic, equipment, and material stacks clear.
- Temporary fencing and signage: low-profile orange construction fencing, staked around the root zone, deters crews and delivery drivers from cutting through a root area.
- Structural protection: when access is required over a root zone—e.g., to place a dumpster—install a load-distribution system: plywood supported on pressure-treated sleepers or temporary galvanized track mats spread the load and reduce compaction.
- Mulch and aeration: prior to heavy work, apply a 2–3 inch layer of coarse bark mulch to the outer root zone to protect soil structure and reduce surface erosion. Avoid deep, wet mulch that can encourage root rot against the trunk.
- Tree-care coordination: for high-value trees, involve an ISA-certified arborist where pruning, heavy equipment lift paths, or potential root cutting is required. An arborist can recommend pruning that reduces risk and prescribes root-protection measures tailored to the species.
Important caution: do not assume short-term obstruction is harmless. Even a single heavy compacting event over roots can cause stress that manifests later as decline. When in doubt, ask for structural plywood, fences, or an arborist recommendation.
access routes, staging, and crane considerations
How crews get material on and off a property is a major driver of landscaping impact. Access-route selection should prioritize paved surfaces and the least-damaging path from curb to roof. When that is not possible, temporary measures protect soft landscaping.
Key planning steps:
- Prefer paved access: schedule dumpster and material delivery to use driveways or municipal curb cuts when possible. If the driveway is inadequate, specify a temporary track-out mat or plywood path.
- Crane use and lift placement: cranes minimize rooftop walking and reduce the time crews spend on roofs, but they require clear setdown areas. Crane pads must be selected to avoid root zones; if pads overlap sensitive areas, use engineered cribbing or steel plates to distribute loads.
- Staging area selection: choose a staging area with hard surface or install a temporary work platform. Keep materials off grass for extended periods; stacked shingles, bundles, and tools crush turf quickly.
- Traffic management: plan routes for wheelbarrows, lifts, and waste carts that avoid beds and ornamental plantings. Use signage and supervisory checks to ensure crews adhere to the plan.
Crane operations can be particularly useful where trees limit roof access. A crane can place a shingle bundle on the roof directly, eliminating repeated foot traffic. However, the crane setdown location must be sited to avoid damaging root zones; this is another instance where an arborist or civil engineer’s advice may be appropriate for large trees.
how planting type affects risk
Understanding how different plantings respond to disturbance helps prioritize protection and repair decisions. Below are common Halifax site planting types and the typical risks each faces during roof work.
Lawns and turf
Lawns tolerate moderate temporary disturbance but are vulnerable to compaction, which reduces aeration and can cause thinning. Heavy loads concentrated in a small area—dumpsters parked on turf, repeated wheelbarrow traffic—lead to lasting damage and rutting. Protective plywood and minimal direct load time mitigate this risk.
Shallow-rooted ornamental shrubs
Many foundation shrubs have roots close to the surface. They are at high risk of branch breakage from falling debris and root damage from compaction. Canvas drops, protective branching frames, and temporary removal of small shrubs are common solutions.
Perennial and herbaceous beds
Perennials are often resilient to being temporarily covered by canvas for a day or two, but long smothering (plastic sheeting left for a week or more) can kill herbaceous plants. If staging will last longer, consider temporary removal or protection that allows airflow.
Specimen trees
Large trees are the highest-value landscape elements. They can tolerate some crown pruning but are most vulnerable to root compaction and trunk injuries from falling debris. Keep cranes and dumpsters away from the root zone and avoid leaning ladders or scaffolding against trunks.
Container plants and potted specimens
Potted plants should be moved off-site or to a protected hard surface. They are easy to relocate but often overlooked; the stress of dust, asphalt granules, and contact damage can kill sensitive specimens quickly.
homeowner tasks before work
Homeowners play a vital role in minimizing landscape damage. Some tasks are simple and low-cost but make a big difference to crew efficiency and plant health.
Recommended homeowner actions:
- Communicate priorities: make a visible list or map for the contractor showing which plants are most important to preserve and which areas may be used for staging if needed.
- Move containers and vulnerable pots: relocate potted plants to a garage, paved patio, or off-site storage. This prevents accidental breakage and dirt contamination.
- Prune low branches where instructed: remove or temporarily tie back low branches that could obstruct material lifts or pose a hazard. Do this only if you or a hired arborist know safe pruning practices.
- Flag sprinklers, shallow utilities, and hidden features: mark irrigation heads, underground dog fences, and drip lines. This prevents accidental breaks that can be inconvenient and costly.
- Pre-emptive watering: in dry conditions, a moderate watering the day before work helps lawns and roots recover from light compaction; conversely, avoid scheduling heavy equipment in saturated yards where compaction risk is greatest.
- Clear valuables and decorations: remove garden furniture, trellises, birdbaths, and loose ornaments that could be broken by crew movement.
Discuss these tasks during the estimate and planning phase so the crew knows what to expect on site the first morning.
post-job-care-and-restoration
After the roof replacement is complete, the site needs careful inspection and a prioritized restoration plan. Immediate steps are often different from longer-term remediation.
Immediate post-job steps:
- Remove debris and granules: a timely sweep of canvas drops and paved areas recovers roofing granules. Granule buildup left on soil can alter pH and texture and should be removed from planting surfaces where possible.
- Assess visible plant damage: note broken branches, crushed shrubs, and torn roots. For minor pruning, remove torn branches cleanly; for larger wounds, consult an arborist.
- Aerate compacted soil: for small lawn areas that were compacted, core aeration within a few weeks helps restore oxygen diffusion and water infiltration. For larger areas, consider vertical mulching or professional aeration approaches.
- Top-dress and seed turf: where ruts or thinning occurred, top-dress with an appropriate soil mix and overseed with a regionally suited grass blend. Protect new seedings with temporary fencing until established.
- Replace or rehabilitate soil in beds: if mulch or soil was contaminated, remove the top layer and replace with clean compost or mulch to re-establish soil health.
Longer-term care:
- Monitor specimen trees: watch for signs of decline over the first 12–24 months after compaction or trunk injury—reduced leaf size, premature leaf drop, and dieback. In cases of suspected root damage, professional evaluation is prudent.
- Schedule corrective pruning: a skilled arborist can recommend corrective pruning to improve structure and reduce stress on damaged trees.
- Soil testing: if large volumes of roofing granules or debris reached beds, a simple soil test can identify pH shifts or contaminant issues and guide amendments.
questions to ask your contractor
Before hiring or scheduling, ask specific, job-focused questions that reveal how a contractor plans to protect your landscape. A contractor who has thought through protection will answer these clearly and include them in a written plan.
- What will you use to protect beds and shrubs? Ask about canvas types, plywood placements, and daily clean-up routines.
- Where will the dumpster and material staging be placed? A good contractor will prefer paved areas and explain any temporary protection for turf or root zones.
- How will you protect large trees and their roots? Expect specifics: marked off limits, fencing, or load-distribution pads when necessary.
- Will you use a crane or lift, and where will it set down? If a crane is necessary, ask about cribbing or plates to protect the ground and whether an arborist review is recommended.
- Who is responsible for post-job cleanup and landscape restoration? Clarify whether your estimate includes grout/granule removal, rake-out of beds, and basic lawn repair or whether those are additional services.
- Can you provide references or photos of similar protection work? Look for examples of how crews handled tight or tree-rich yards; the roofing project gallery is a useful place to browse prior work for comparable staging and protection approaches: https://bossservicesinc.com/gallery-roofing/.
We also encourage homeowners to review the roofing scope on our service page to make sure the protection plan aligns with the roofing system details: https://bossservicesinc.com/roofing-contractor/.
project sequencing examples
Below are two hypothetical but realistic sequencing examples showing how protection choices change with site constraints. These are illustrative and not descriptions of an actual Boss Services job.
Example A: Halifax suburban lot with driveway access and mature shade trees
Situation: a colonial home with a full-width driveway, a large oak at the front yard edge, and foundation plantings along the front porch.
Sequence:
- Pre-job survey marks the oak’s critical root zone; driveway selected for dumpster and staging.
- Canvas drops cover foundation beds; plywood perimeter protects the base of the porch plants.
- Debris chutes are angled to land over the driveway and into the dumpster; impact padding placed under chute where it meets pavement to reduce noise and shock to the dumpster.
- Crane is not required; crews use roof jacks. Daily cleanup collects granules and folds canvas drops to prevent wind displacement.
- Post-job, crew aerates small compressed lawn patches and rakes out any granular debris; homeowner overseeds thin turf in autumn for best establishment.
Example B: Halifax lot with narrow side access, limited hardscape, and specimen shrubs
Situation: a small lot where the driveway is detached; the best access is a narrow side yard between fences. Several specimen rhododendrons line the foundation.
Sequence:
- Site survey recommends temporary removal of potted plants and a staged plywood walkway down the side yard. Specimen shrubs are flagged for the highest protection priority.
- Contractor arranges a small crane setdown on the street with permit coordination so bundles are set directly on the roof, reducing foot traffic under the rhododendrons.
- Where chutes are unavoidable for tear-off, engineer a protected chute landing on plywood and decked mats to disperse loads and avoid the root zone.
- After the roof is finished, a restoration plan includes careful raking of mulch, hand-cleaning delicate plants, and monitoring shrub health over the next growing season.
These examples show how access and planting types drive choices. A one-size-fits-all protection plan rarely works; coordination between homeowner and contractor yields the best outcomes.
faq
Q: How long will landscape protection measures stay in place during a typical roof replacement?
A: Protection timelines depend on project size and weather. Canvas drops and chutes are used during active tear-off and shingle installation; plywood walkways and fencing may remain until final cleanup. Expect active protection for the duration of the job, with staged removal and inspection at the end of each workday.
Q: Can large trees survive having equipment nearby for a few days?
A: Many trees tolerate nearby activity if their root zones and trunks are protected from crushing and impact. The highest risk is soil compaction and root cutting, which can cause delayed decline. For high-value trees, consider arborist input and load-distribution pads when cranes or heavy staging are necessary.
Q: What should I expect in terms of cleanup and lawn repair after roofing?
A: A professional crew should remove debris, collect granules from paved and planted areas, and tidy beds and walkways. Lawn repair typically includes light top-dressing, overseeding where thin, and monitoring for compaction. Discuss specific cleanup responsibilities before signing a contract so expectations are clear.
Have questions about your home’s exterior? Boss Services, Inc. can help you consider the next step. Contact our team, call 508-297-0635, or email bossservicesinc@comcast.net.