
Hidden Decking Damage After Storms: A Mansfield, MA Homeowner’s Roof-Inspection Guide
After a heavy storm many Mansfield homeowners ask the same practical question: Did the recent weather damage my roof decking, and will a shingle replacement be enough? This article explains how storms and older roof systems can hide rot or soft spots in roof sheathing, what safe, non-invasive signs you can look for from the ground and attic, what a professional moisture probe and a roof tear-off typically reveal, and how to weigh repairs against full sheathing replacement. We also cover the consequences for underlayment, ventilation, and typical warranty concerns so you can plan a sensible next step.
How storms and aging roof systems hide decking issues
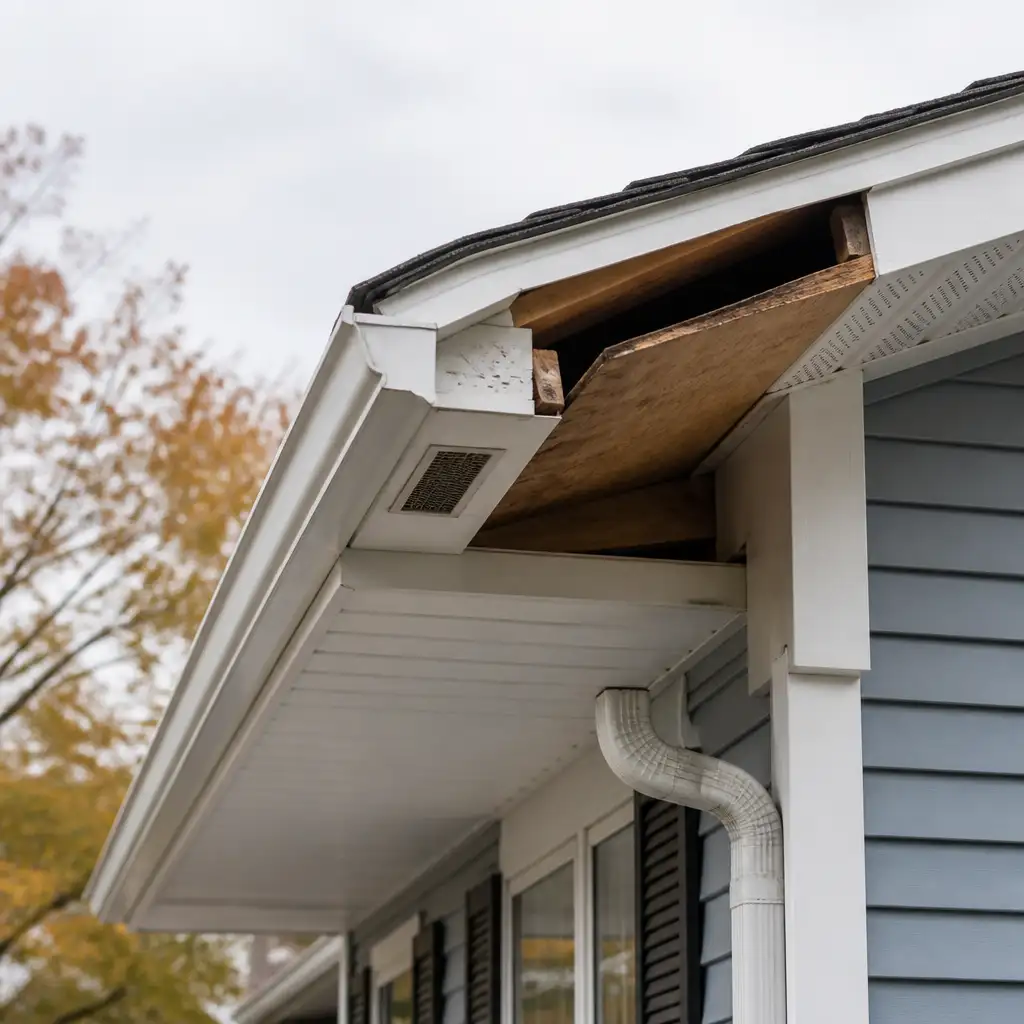
Roof decking (also called sheathing) is the board or plywood layer beneath shingles that gives the roof structural support and a substrate for roofing underlayment and shingles. Decking problems are often hidden because the visible surface—the shingles—can remain largely intact while the material below softens, rots, or delaminates from accumulated moisture. Several storm- and age-related mechanisms make this possible:
1. Intermittent leaks and slow migration. A storm can introduce water through a single flash or penetration. That moisture may travel along the underside of shingles or through a layered underlayment before pooling on the decking. Because the top layers shed water again, visible leaks inside the home may be delayed while the decking is slowly damaged.
2. Wind-driven rain and flashing compromise. High wind and driving rain can bypass shingles at vulnerable transitions—dormers, valleys, chimneys, and roof-to-wall junctions—allowing localized wetting of sheathing that remains unnoticed until the decking softens.
3. Ice dams and repeated melt-freeze cycles. In our region, winter storms and ice dams can cause pockets of concentrated moisture that soak decking material at eaves or in valleys. Repeated freeze-thaw cycles accelerate splitting and delamination of plywood sheathing.
4. Older roof systems and layered materials. Homes with multiple overlay layers, aging underlayment, or historic sheathing can hide failure. When new shingles are applied over old materials without removing weak sheathing, moisture problems can persist under the surface and expand undetected.
5. Ventilation and attic moisture. Poor attic ventilation or interior moisture sources (bath or kitchen exhausts not vented correctly) increase humidity and condensation that may accelerate decking decay from the underside rather than from direct roof penetration.
Because these pathways can be subtle, visible shingle condition alone is not a reliable indicator of decking health. That is why targeted inspection steps are necessary after storms—particularly for older roofs or roofs with known vulnerabilities.
Non-invasive signs homeowners can observe safely
Homeowners should avoid climbing onto the roof or doing inspections that could risk falls. Instead, use safe, non-invasive observations you can make from the ground, a downstairs window, or inside the attic. These are practical first checks that help decide whether to call a professional for a closer look.
Exterior, ground-level observations
- Shingle disturbances: Look for clusters of loose or missing shingles after a storm. While isolated cosmetic shingle loss does not always mean decking damage, multiple missing patches concentrated near a valley, ridge, or penetration may indicate a problem area where water reached the sheathing.
- Granule loss and bare spots: Significant granule loss that leaves dark felt exposed can shorten shingle life and permit more water ingress during heavy storms. Concentrated granule loss along a slope or near a penetration merits further investigation.
- Shingle buckling or sagging roofline: Visible sag in the roofline from the ground can indicate structural or decking issues. Small localized sagging above a ceiling stain is especially concerning.
- Stains and streaking on the exterior walls or soffits: New discoloration near roof-wall junctions or eaves may trace a water path that reached the sheathing edge.
- Debris in gutters or valleys: Examine gutters for asphalt grit, blackened fibers, or rotted wood particles. Debris that looks like shredded wood can be a sign of decking breakdown near eaves.
Interior and attic observations (safe, no roof access required)
If you have a safe attic hatch and room to move, visual attic checks are extremely helpful and are recommended before arranging a professional roof inspection. Do not walk on the ceiling; step only on joists or installed walkways.
- Active or recent stains on the attic sheathing: Dark, wet-looking patches on the underside of the roof decking—especially around vents, chimneys, and valleys—are strong indications that water has breached the roofing layers and reached the sheathing.
- Soft spots at the eaves or along seams: Gently press accessible edges of sheathing where it overhangs or at the attic access if reachable without stepping on unsupported areas. Any give or crumbling at the edges signals decay. If you cannot access safely, skip this and call a pro.
- Musty or moldy smells: Persistent mildew or musty odors in the attic suggest chronic moisture that can weaken sheathing over time, even where visible stains are minimal.
- Condensation on rafters or insulation: Heavy surface condensation after storms points to ventilation or humidity problems that will affect decking longevity.
- Interior ceiling stains or bulging: Fresh ceiling stains, blistering, or soft spots on the ceiling below the attic are late-stage signs that water has penetrated far enough to compromise the roof deck and interior finishes.
What not to do
Do not climb ladders without experience, do not walk on the roof unless you are trained and equipped, and do not remove shingles or flashing yourself. These actions risk falls and may worsen an existing leak or void warranty coverage. Use the safe checks above to decide whether to proceed to a professional inspection.
What a professional moisture probe and attic inspection reveal
When an initial homeowner check suggests a concern, the next reasonable step is a targeted professional inspection. A qualified roofer brings the tools and protocol to identify concealed decking damage without committing to a tear-off right away. Two common diagnostic steps are a thorough attic inspection and the use of a moisture probe.
Attic inspection: scope and value
A professional attic inspection goes beyond a quick look. A roofer or building scientist will:
- Systematically examine the underside of decking across suspected areas and compare it with unaffected areas.
- Check for stains, rot at framing seams, softened sheathing edges, and signs of insulation saturation.
- Look for ventilation effectiveness, blocked vents, or interior moisture sources that could be causing or worsening the problem.
- Document findings with photos and notes to help decide on a repair strategy and to provide evidence for insurance if appropriate.
Moisture probe (meter) testing
Moisture meters are portable tools that measure the moisture content of wood and sheathing surfaces. There are two common types: surface (pin) meters and non-invasive (pinless) meters. A qualified technician uses them thoughtfully:
- Pin meters read moisture at specific drilled points and are useful for confirming wet spots through the thickness of wood.
- Pinless meters scan areas without piercing the material and are useful for mapping moisture trends across broad surfaces quickly.
Used together with visual inspection, moisture meters help determine whether sheathing is currently wet, drying, or chronically high in moisture content. Importantly, a meter alone does not show structural integrity; it clarifies whether pockets of moisture require immediate action.
Limitations of probes and inspections
Even with a detailed attic inspection and moisture readings, some decking damage remains hidden on the exterior face, under layered roofing, or within fastener lines. A roof system with multiple overlays, thick underlayment, or inaccessible valleys can prevent a definitive assessment until part of the roofing is removed. A good inspection will, however, narrow the likely scope and help plan the next step.
What a roof tear-off reveals
A partial or full roof tear-off is the most conclusive diagnostic method because it exposes the decking directly. Contractors commonly perform a tear-off when inspections suggest the decking may be compromised or when the roof is near the end of its useful life and replacement is already on the table.
What professionals look for when decking is exposed
- Delamination: Plywood may separate in layers under moisture stress, visible as flaking or gaps in the face veneer.
- Soft spots and structural decay: Walking the exposed sheathing (safely) allows technicians to detect deflection, sponginess, or rot that was not evident from below.
- Edge rot near eaves: Decking edges along eaves and rake boards are common rot locations because they receive moisture from gutters and ice dams.
- Fastener pull-through and nail pops: Corroded or loosened fasteners are signs the sheathing has lost its gripping capacity.
- Hidden water paths: Exposed decking reveals flashing failures, underlayment tears, or improperly integrated materials that guided water to the deck.
Partial vs. full tear-off
A partial tear-off removes roofing down only to the immediate problem area. It is less disruptive and may be an economical way to repair a localized decking issue. A full tear-off removes all roofing layers down to the deck across the entire roof. Full tear-offs are common when decking shows extensive failure, when multiple layers need removal, or when a homeowner prefers a complete warranty-backed replacement.
Why a tear-off changes the decision
Because a tear-off exposes the substrate, it can reveal larger-than-expected failures. A small attic stain may correspond to a larger area of delaminated sheathing once the shingles are removed. Conversely, some observed attic moisture may be confined and easily repaired once the damaged area is exposed. The tear-off therefore determines whether a repair patch or broader sheathing replacement is necessary.
Repair versus sheathing replacement: tradeoffs to consider
Choosing between localized repair and full sheathing replacement is a key decision. Both options have pros and cons, and the right choice depends on the condition of the decking, the remaining life of the shingles and underlayment, and long-term moisture-management goals.
Localized repair (patching and targeted replacement)
Pros:
- Lower immediate cost and less disruption.
- Faster turnaround; only a small area of roofing is disturbed.
- Useful when damage is clearly limited to a compact area and the rest of the deck is sound.
Cons:
- Potential for future problems if the root cause (ventilation, flashing, interior moisture) is not addressed.
- Risk of mismatched materials and slightly different shingle appearance at repair areas.
- May complicate future full replacements if multiple repairs over time leave a patchwork deck.
Full sheathing replacement (decking replacement across all or large roof areas)
Pros:
- Creates a uniform, stable substrate for underlayment and shingles and simplifies future maintenance.
- Enables a full, code-compliant roofing system replacement including modern underlayment and flashing integration.
- Reduces the chance of near-term repeat repairs in older roofs with systemic problems.
Cons:
- Higher upfront cost and longer project time.
- Requires more demolition, disposal, and temporary exposure of the attic to weather during the work.
Decision factors to weigh
- Extent of visible or measured moisture: Widespread moisture readings or multiple attic stains usually favor larger replacement.
- Age and condition of the existing roof: If shingles and underlayment are near end-of-life, combining decking replacement with a full reroof is often efficient.
- Cause of the moisture: If the problem stems from poor ventilation or failed flashing that can be corrected, a targeted approach may suffice after fixes are installed.
- Long-term ownership plans: If you expect to stay in the house long-term, investing in a full durable system reduces recurring disruption.
An experienced contractor will document the deck condition during a tear-off and present clear options with pros and cons for your specific home. Make sure those choices are described in writing so you can compare scope and cost fairly.
Implications for underlayment, ventilation, and warranties
Decking decisions cascade into related roofing components. Replacing or repairing the deck often requires attention to underlayment, flashing, ventilation, and possible warranty impacts.
Underlayment
Underlayment is the layer between the shingles and the deck that provides secondary water protection. If decking shows moisture damage, the underlayment directly above it is likely compromised or missing in places. When sheathing is replaced, contractors normally install fresh underlayment across the affected area or the whole roof to ensure consistent performance and proper flashing adhesion. Using high-quality underlayment improves water resistance during wind-driven events and gives better protection while the shingles serve as the primary weather barrier.
Ventilation
Ventilation affects attic moisture levels and the drying capacity of roofing components. If inspections reveal condensation, blocked vents, or insufficient intake at the eaves, correcting ventilation should be part of the repair strategy. Improving airflow reduces future risk of underside decking moisture that can mimic storm damage over time. Vent corrections also help shingles and underlayment to dry after storms and warm-season wetting.
Flashing and transitions
Many concealed leaks originate at flashing details—step flashing at walls, counterflashing at chimneys, vent and pipe penetrations, and valley intersection work. When decking is replaced, renovators typically rework flashing details to ensure tight integration with the new underlayment and shingles. Poorly integrated flashing left unaddressed will likely permit return of the issue even after deck repairs.
Warranties and documentation
Homeowners should understand how repairs affect product and workmanship warranties. Manufacturer shingle warranties often require correct installation on sound decking; performing a partial repair without addressing widespread decking issues can complicate future warranty claims. Additionally, workmanship or contractor warranties differ in scope and duration. Always ask your contractor to document findings and the work performed, and keep those records along with photos—this documentation helps with any future warranty or insurance discussions.
Inspection planning and questions to ask your contractor
Selecting the right contractor and framing the inspection are important. A clear scope saves time and reduces surprises. Below are practical points to include when you contact a roofer and during the inspection.
Before the visit
- Gather notes about what you observed: attic stains, exterior shingle loss, when the issues appeared, and whether the home has had prior roof overlays or repairs.
- Have basic home information ready: roof slope, known past repairs, and attic access location. These details help prepare the inspection team.
Questions to ask during the inspection
- What are the likely sources of moisture in this area, and which diagnostic steps will you perform?
- Will you inspect from the attic and use moisture meters? Which type of meter and testing protocol will you use?
- If a tear-off is needed, will you start with a partial test tear-off or proceed to a full removal? What criteria do you use to decide?
- What are the realistic repair options and the expected life of each option?
- How will you address ventilation and flashing if we proceed with repairs or replacement?
- Can you document findings with photos and a written summary suitable for insurance review?
Contract and estimates
Ask for a written estimate that separates inspection diagnostics, repair scope, materials, and labor. Clear line items for decking replacement, underlayment, flashing upgrades, and ventilation work help you compare quotes. If the contractor recommends a full reroof because of widespread decking issues, request a description of why a localized repair is insufficient in this case.
Project sequencing and realistic timelines
Understanding the typical sequence of work helps homeowners plan around the disruption and weather. A common path for suspected decking damage looks like this:
- Initial consultation and attic inspection: A technician documents attic conditions and performs moisture readings.
- Diagnostic tear-off if needed: A small test area may be removed to assess deck condition. If damage is limited, the contractor may proceed with a targeted repair.
- Decision and written scope: Based on the exposed deck, the contractor provides a final proposal for repair or replacement.
- Permitting and materials scheduling (if required): For larger jobs, contractors may pull local permits and schedule material deliveries.
- Repair or full deck replacement: Technicians remove damaged decking, replace or reinforce framing as required, install new sheathing, underlayment, flashing, and shingles (or continue with the original shingle application plan).
- Cleanup and final inspection: The crew cleans the site, and the contractor performs a final quality check with the homeowner or an inspector.
Smaller localized repairs may be completed in a day or two once the scope is agreed. Full decking replacement and reroof projects commonly take several days to a week depending on roof size, complexity, and weather. Discuss scheduling with your contractor and ask about contingency plans for weather delays.
Making the decision: practical next steps
After inspections you will typically face one of three outcomes: repair-only, partial decking replacement with localized reroof, or full decking replacement with full reroof. Use this checklist to guide a rational decision.
Checklist for homeowners
- Review the inspection report and confirm the observed scope of decking damage in writing.
- Get two or three written estimates that describe the same scope to compare methods and materials.
- Ask each contractor how they will integrate underlayment, flashing, and ventilation changes into the work.
- Request photos of the exposed decking during tear-off so you have documentation of the condition before and after.
- Confirm waste disposal and site protection plans to limit disruption to landscaping and gutters.
- Discuss warranty coverage for workmanship and how manufacturer warranties may be affected by the chosen scope.
Insurance and storm claims
If storm damage appears evident—wind damage, widespread shingle loss, or tree impact—contact your insurer to understand coverage. Documentation from a contractor (inspection notes, photos, and moisture readings) is often necessary when filing a claim. Do not permanently repair or replace components before your insurer inspects the damage unless repairs are required to prevent further water entry; document the need for emergency measures with photos and contractor notes.
When to move ahead without delay
If you observe active interior leaks, sagging roofline, or widespread attic saturation, prioritize scheduling a professional inspection quickly. Delaying can allow moisture to spread, increasing repair scope and cost. For minor, non-active conditions, you may plan follow-up during the next available project window with your contractor.
Local context: Mansfield, MA
Mansfield’s mix of older suburban homes and seasonal storms means many local roofs face combined age and storm exposure. If you live in Mansfield and suspect decking issues after a storm, start with a safe attic check and contact a reputable roofer who can perform moisture testing and a careful diagnostic tear-off if necessary. Our roofing technicians regularly evaluate roof systems across the region and can help explain findings and options in clear, written form. Browse examples in our roofing project gallery and learn about our roof services at the roofing contractor page for more context on typical replacement work.
FAQ
Q: I only see one small ceiling stain—does that always mean the decking is damaged?
A: Not always. A single stain can result from a localized leak through flashing or a penetration with minimal decking damage. However, stains are a sign that water reached interior finishes and that a prompt professional attic inspection is warranted to measure moisture and check the decking condition.
Q: Can moisture meters give false readings that lead to unnecessary tear-offs?
A: Moisture meters are diagnostic tools that indicate where moisture is present, but they are not a substitute for visual inspection. Used properly—alongside attic photos and context about the roof—a meter helps prioritize where to examine further. A small test tear-off can confirm the meter’s finding before larger work proceeds.
Q: If my decking is replaced, will the new roof require a full re-roof to maintain warranty?
A: Decking replacement is often paired with underlayment and shingle replacement to ensure proper adhesion and system performance. Manufacturer warranties typically assume correct installation on sound decking, so discuss warranty implications with your contractor. They should document the work and explain how warranties apply to the replaced portions.
Have questions about your home’s exterior? Boss Services, Inc. can help you consider the next step. Contact our team, call 508-297-0635, or email bossservicesinc@comcast.net.