
Evaluating Moisture at Trim and Window Openings Behind Vinyl Siding in North Attleboro, MA
As a North Attleboro homeowner asking, “Is moisture near my windows coming from siding or trim, and what should I do?” this guide walks you through practical, non-destructive checks, plausible causes, and a diagnostic sequence you can follow before accepting a full-wall replacement. The primary focus is moisture at trim and window openings behind vinyl siding — the small, often overlooked intersections where water intrusion commonly begins. We describe what to observe, how to test and document conditions safely, when a small inspection port makes sense, and how to prioritise repairs so you get the best long-term protection for your home.
Common observable signs of moisture at trim and windows
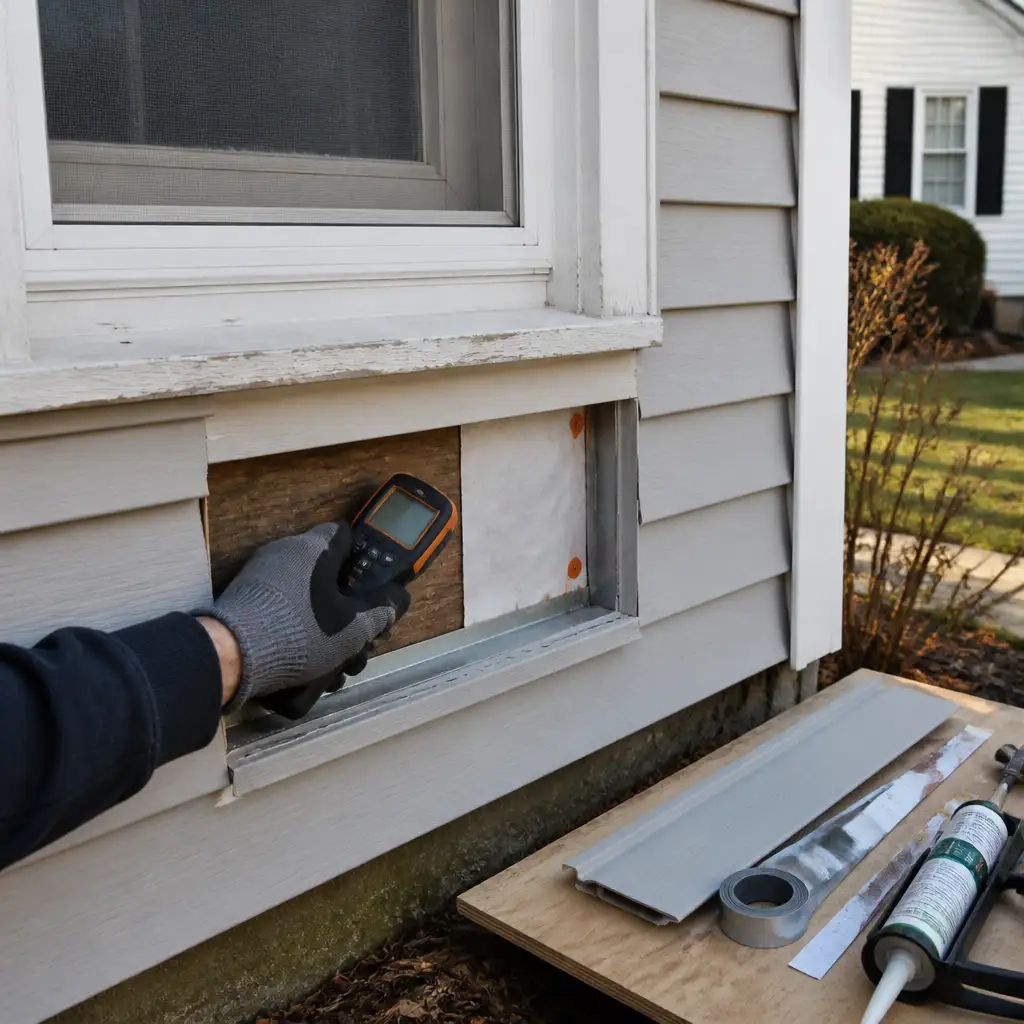
Before any invasive work, collect observable evidence. Many moisture problems near windows and trim show visible clues on the interior and exterior that can narrow the likely causes.
Exterior signs
- Staining on siding or trim below a window or at a corner—brown or dark streaks indicate recurring water contact.
- Soft, sagging, or split trim pieces where the trim meets the siding or window frame.
- Loose or missing caulk in corner joints, along the window head, sill, or in the J-channel that secures the vinyl siding edge.
- Ice dams or recurring icicles in winter that concentrate meltwater over openings (seasonal conditions are especially relevant in North Attleboro).
- Peeling paint on adjacent wood trim (if trim was painted) or distorted vinyl panels near openings.
Interior signs
- Staining or soft drywall near a window head or sill; small bulges or paint blistering are early signs.
- Musty odour or elevated humidity in a room adjacent to the affected window, sometimes worse after storms.
- Visible mould growth along the window casing or top of the drywall (note: mould appearance alone does not identify the entry point).
- Condensation between panes of insulated glass indicates a window seal failure, which can be a separate but coexisting issue.
Observations should be recorded carefully. Even without invasive work, a combination of exterior staining, soft trim, and interior discolouration gives a strong indication that water has been reaching the wall or trim junction repeatedly.
Why trim and window openings are common moisture weak points
Trim and window openings are intentional interruptions in the building envelope: penetrations, material transitions, and fastener rows concentrate potential failure points.
Key vulnerabilities
- Material transitions: vinyl siding meets painted wood trim or factory-finished window frames. Each material has a different expansion rate and water-resistance detail.
- Seams and fasteners: nail holes, butt joints, and caulked corners depend on proper flashing and seasonal maintenance to remain watertight.
- Flashing complexity: to keep water out, a proper drainage plane relies on sill pans, head flashing, and shingle/step flashings at roof-wall intersections. Installed incorrectly, these components allow water to track behind siding.
- Poor drainage paths: water that hits a window head or siding course needs a clear path out. Blocked or inverted flashing can force water inward toward trim and framing.
In Southeastern Massachusetts, freeze-thaw cycles and heavy downpours can accelerate small defects into recurring leaks. That doesn’t mean every North Attleboro home with older siding has hidden moisture; it means openings deserve targeted attention during inspections.
Non-destructive checks you can perform first
Start with careful visual inspection and simple tests before cutting into siding or trim. These steps are safe, do not require removal of structural materials, and often identify the most likely causes.
1. Exterior visual sweep
Walk the house at close range after a dry period, then again after a rain. Look for the signs listed above and note whether staining or wetness appears only after precipitation. Pay special attention to:
- The top and sides of window casings for gaps, split sealant, or misaligned J-channel
- Corner trim terminations where water can run behind siding laps
- Areas under roof overhangs or adjacent roofs where flashing should divert run-off
2. Interior inspection
Check the interior finishes around the affected window or trim:
- Look at the ceiling/wall intersection above the opening and the cut or paint lines where the trim meets the drywall.
- Use a low-power flashlight and your eye to look for grain swelling or soft spots in trim or window stool — these are early signs of prolonged moisture contact.
- Smell for musty odours and note whether they intensify after rain.
3. Use a handheld moisture meter
A non-invasive pinless moisture meter reads moisture content through the surface without penetrating material. On exterior trim and siding, a meter can quickly show high readings near joints or along the sill line. Record readings at multiple points: outside trim, immediately inside the trim (if accessible at the sill), and higher up the wall as controls.
4. Check window operation and seals
Open and close the window. Is the sash binding? Does the frame look warped or separated from the trim? Condensation between panes suggests an insulating glass seal failure — a separate but complementary issue to water intrusion from the wall.
5. Examine caulk and paint
Look closely at caulk joints. Old, cracked caulk is a common path for water. Caulk condition alone does not prove a flashing failure, but it is a low-cost fix if the underlying flashing is sound.
6. Follow the water path
Think like water: where would rain run if it passed the siding or top of the window? Look uphill for roof edges, gutters, or chimney transitions that shed water toward the opening.
These non-destructive checks usually identify whether the problem is local to the window/trim or likely the symptom of a larger wall or roof flashing issue. They also provide clear data for a contractor to propose a focused diagnostic step.
When to open a small inspection port
When non-destructive checks leave uncertainty, a small inspection port is a conservative next step. A port lets a qualified contractor confirm whether moisture has reached sheathing, reveal the condition of sill pans, and locate the entry path — without removing large sections of siding or complete wall assemblies.
When it’s appropriate
- Moisture meter readings are elevated at the trim or a consistent staining pattern exists, but you cannot see the flashing or sill condition.
- Interior finish damage is local to one window or a small cluster of openings, suggesting a targeted problem rather than generalized wall failure.
- Homeowners prefer a conservative, staged approach to repairs to manage cost and disruption.
How an inspection port is made
A typical exterior inspection port is a small, discreet cut below the sill or within a siding course that can be resealed. A contractor will:
- Remove the lower course of vinyl siding in a short length (often 6–12 inches), or cut a small rectangular port in the siding where it is concealable.
- Fold back the siding to expose the J-channel, trim, and the top edge of the sheathing or housewrap.
- Use a flashlight and mirror to inspect the sill area and flashing. If necessary, a borescope camera may be used to look into cavities without wider removal.
- Take moisture meter readings on sheathing and framing visible through the port, and photograph the findings.
Risks and limitations
An inspection port is minimally invasive but not risk-free. If carelessly executed, it can damage siding or create a poor seam when reinstalled. It only samples a small area; a dry port does not guarantee the whole assembly is dry. Still, when combined with exterior and interior observations, a port often clarifies whether repairs can be localised to window/trim flashing and trim replacement or whether broader siding removal is warranted.
Diagnostic sequencing: inspection port first vs full removal
Deciding whether to open a small port or remove a full siding section depends on the scope of signs, the homeowner’s risk tolerance, and the contractor’s judgment. Below is a practical decision sequence to help you discuss options with a professional.
Start with non-destructive checks
Always begin with the exterior and interior visual inspection, moisture meter scans, and window operation checks described earlier. Those findings will often determine whether a port is likely to yield useful information.
Choose an inspection port when
- The problem is limited to a single opening or narrow area, and you want a targeted diagnosis before committing to larger removal.
- Moisture meter readings are inconsistent but indicate a suspect zone near trim.
- The homeowner prefers staged work to limit upfront cost and disruption.
Choose full removal when
- Multiple openings show similar damage across an elevation — this suggests a systemic problem with the drainage plane or flashing that requires broader inspection.
- Extensive interior damage or structural concerns such as widespread rot or mould are already evident.
- Previous repairs have failed repeatedly and you need to verify housewrap, sheathing, and flashing continuity across a wider area.
A middle-ground approach
Contractors often use a hybrid strategy: open ports at several representative locations across an affected wall. If those ports reveal localized trim/flashings problems, repairs can be limited. If ports reveal wet sheathing or missing sill pans in multiple spots, the contractor can recommend larger removal with a clearer scope and cost estimate.
Interpreting findings and forming sensible hypotheses
After inspection, you’ll need to interpret what you see. Findings often point to one or more of these common causes:
1. Missing or failed sill pan / head flashing
If the inspection port shows no sill pan or the head flashing is absent or installed behind the window flange rather than over it, water that reaches that joint will find a way into the sheathing. In many vinyl-clad homes, a missing sill pan is a frequent source of localized moisture at the window sill.
2. Compromised trim or J-channel termination
Vinyl siding relies on J-channel and trim pieces to guide water away. If the J-channel is not lapped correctly or terminates into a gap at the corner, water can wick behind the siding and reach the trim. Rot or soft trim along the termination point supports this hypothesis.
3. Failed caulk and sealant
Caulk that has pulled away from the trim or windowsill allows periodic direct entry. This is common and often straightforward to correct — but only if the underlying flashing and drainage plane are intact. Caulk over a failed flashing is a temporary fix.
4. Window unit leak (glass or frame)
Condensation between panes or wetness inside the jamb, despite intact exterior trim, suggests a window unit failure. A separate window repair or replacement may be needed even if the siding and flashing are sound.
5. Bulk water from roof or gutter overflow
Sometimes the apparent window leak is actually water running from an adjacent roof edge, chimney, or clogged gutter. Look for high-volume staining paths that match roof shed paths rather than a short-term capillary effect.
Good contractors present these hypotheses with their supporting observations (photos, meter readings, exact port locations) so you can see why they recommend a given repair sequence. Keep in mind that more than one issue can coexist: a capillary entry at the J-channel plus a leaky window sash, for example.
Repair priorities and what to fix first
Once you have a diagnosis, repairs should follow the most likely water path and prioritise long-term moisture management. Typical priorities are:
1. Restore the drainage plane and flashing
Fixing missing or incorrectly installed flashing is usually the primary priority. That includes installing a proper sill pan, correctly lapping head flashing over the housewrap, and ensuring side flashings and step flashing are continuous where a roof intersects a wall. Addressing flashing corrects the underlying path that allows water to reach trim and sheathing.
2. Replace or repair damaged trim and stop interior moisture sources
Remove and replace rotten trim, replace water-damaged window stool and casing, and repair interior drywall as required. Ensure the new trim is installed in a way that provides a clear drainage path and permits regular expansion of materials without stress on caulk joints.
3. Re-seat or replace the window if necessary
Repair or replace the window unit if it shows seal failure or frame distortion that allows water entry independent of the siding details. Coordinate window repairs with flashing work so that the window is integrated into the repaired drainage plane.
4. Reseal joints and re-install siding properly
After flashing and trim work, reinstall siding courses carefully. Do not rely solely on caulk to stop water; siding must allow water that gets behind it to escape and flashing must guide it clear of framing.
5. Address secondary issues: insulation, mould remediation, finishes
If the sheathing and framing show prolonged moisture exposure, contractors will recommend drying, insulation replacement, and any necessary mould remediation before closing the wall. These tasks are important for indoor air quality and the durability of the repaired assembly.
Prioritising repairs by water path first and finishes last protects the envelope and reduces the chance of repeat failures that waste money.
Documenting conditions for repair proposals
When soliciting proposals, document the problem carefully so bids are comparable and you can evaluate the scope precisely. Contractors who provide clear documentation reduce surprises during work.
What to record
- Photos: exterior wide shots showing the overall location (house elevation), medium shots of the window or trim in context, and close-ups of stains, trim damage, or caulk gaps. Include a photo of each inspection port with a scale reference such as a ruler.
- Moisture readings: record pinless readings at each measured location with date and weather conditions noted.
- Measurements: note window dimensions, height above grade, and the distance to the nearest roof edge or downspout that might affect water flow.
- Conditions timeline: when did the homeowner first observe the issue, and how does it relate to storms, heavy snow, or seasonal cycling?
- Contractor notes: have each bidder describe the diagnostic steps they will take and include a line-item for permitting any further exploratory removal needed if initial ports are inconclusive.
Compare proposals on scope, not just price
A lower bid that simply caulks the area without addressing missing flashing is likely a short-term solution. Ask each contractor to describe the materials and methods for flashing, sill pans, trim replacement, and how they will protect adjacent landscaping during work. Using the same set of photos and findings for each bidder improves apples-to-apples comparisons.
Planning repairs and minimising cost
There are practical strategies to reduce cost without sacrificing long-term performance.
1. Staged repairs
Begin with targeted flashing and trim repairs at the worst openings. If those measures stop new moisture and interior finishes dry, broader work may be unnecessary. This approach spreads cost and reduces unnecessary replacement.
2. Bundle related work
When several windows show similar issues, bundling them into a single mobilised job reduces per-unit costs because contractors can work more efficiently. If the siding needs partial removal for flashing repair, doing several windows at once is often more cost-effective than repeating mobilisation for each.
3. Use documented findings to avoid over-insurance claims complications
If you suspect storm damage is the cause and consider an insurance claim, keep your own documented observations and get professional estimates before filing. Don’t assume insurance will cover gradual maintenance-related failures; documentation helps clarify causation when adjusters inspect.
4. Consider coordination with other exterior work
If you’re already planning siding replacement or window upgrades for other reasons, coordinate moisture repairs so flashing and window installation follow best-practice sequencing. Boss Services, Inc. routinely coordinates siding and window details to restore the drainage plane across an elevation; see our siding and windows pages for more on integrated work.
Helpful links: siding repair, replacement and installation, window and door installation and replacement.
When to request a professional evaluation
Request a contractor evaluation when non-destructive checks show consistent signs of moisture, interior finishes are affected, or you prefer an expert to make the judgement about ports versus full removal. A qualified contractor will:
- Review your photos and meter readings, then perform a focused exterior and interior inspection.
- Recommend a diagnostic sequence (ports, borescope, or larger removal) and explain the reasons.
- Provide a written scope and line-item estimate, including repair sequencing, material specifications, protection plans for landscaping, and how they will document progress.
In North Attleboro, a contractor familiar with local seasonal patterns can interpret how freeze-thaw cycling and typical roof shedding behaviors affect water entry. If you want to learn more about Boss Services, Inc.’s approach to siding and window work in the area, see our North Attleboro town page for local context and service information.
Local reference: North Attleboro.
Realistic examples and hypothetical scenarios
Below are three hypothetical scenarios to illustrate how the diagnostic and repair sequencing works in practice. These are not Boss projects; they are examples to clarify decision-making.
Scenario A — Small, isolated sill leak
Observations: Interior staining limited to the bottom corner of one bedroom window. Exterior shows a small dark streak beneath the window sill. A pinless moisture meter shows slightly elevated readings along the sill, but readings drop 6–8 inches away.
Diagnostic sequence: Non-destructive checks followed by an inspection port below the sill reveal a missing sill pan but dry sheathing. Moisture was entering during heavy rains but the exposure was recent.
Repair: Install a proper sill pan, replace the lower trim, reseal the J-channel termination, and reinstall the siding section. Dry and repair the interior drywall and repaint. Because the damage was local, full siding removal was unnecessary.
Scenario B — Repeated leaks across multiple windows
Observations: Staining and soft trim around three windows on the same elevation. Moisture meter indicates elevated readings at multiple openings. Exterior flashing details look inconsistent and some siding courses show loose attachment.
Diagnostic sequence: Port inspections at two locations reveal improper head flashing laps and missing housewrap overlap at the top plate. One port shows wet sheathing in two locations, indicating a systemic drainage plane issue.
Repair: Remove siding across the affected elevation, correct housewrap and flashing continuity, replace damaged sheathing where necessary, and reinstall siding with properly sequenced flashing. Phasing may include temporary tarping or protective measures to keep the wall dry until the full repair occurs.
Scenario C — Window unit failure plus minor siding gaps
Observations: Interior condensation between panes and light staining at the exterior head of the same window. Non-destructive tests show low exterior moisture meter readings near trim.
Diagnostic sequence: The port shows intact flashing and dry sheathing, but the window sash has a visible gap and the IG unit has failed. The primary moisture path is through the window unit.
Repair: Replace the window or have the window serviced and then re-seal trim; minor siding adjustments suffice. This scenario demonstrates the importance of confirming whether the window or the wall is the primary cause.
Conclusion and next steps
Moisture near windows under vinyl siding can come from several sources: missing or misinstalled flashing, failing trim terminations, degraded sealant, window unit failure, or bulk water from roofs and gutters. A staged diagnostic approach — non-destructive checks, moisture-meter mapping, and selective inspection ports — helps homeowners in North Attleboro and Southeastern Massachusetts make informed choices about repair scope and cost.
Document conditions carefully with photos, moisture readings, and clear notes so proposals from contractors can be compared on equal terms. Prioritise repairs that restore the drainage plane and flashing before cosmetic work. When in doubt, a professional inspection that explains findings and shows the likely water path provides the confidence to choose a targeted repair instead of unnecessary full-wall replacement.
Frequently asked questions
Q: How reliable are pinless moisture meters for detecting hidden wet sheathing?
A: Pinless meters are a useful screening tool that detect moisture near the surface without penetrating materials. They help map suspect zones but are not definitive for deep framing moisture; combine meter readings with inspection ports and visual clues for reliable diagnosis.
Q: If the inspection port shows wet sheathing, does that always mean the siding must be fully replaced?
A: Not always. Wet sheathing indicates water has reached the assembly and often requires at least localized sheathing and flashing repair. Whether full siding replacement is necessary depends on the extent of damage, the continuity of flashing issues, and whether multiple areas show similar failure points.
Q: Can I rely on new caulk alone to stop the leak?
A: New caulk can temporarily stop small direct entries, but it should not be used alone when flashing or a sill pan is missing or installed incorrectly. Caulk over a systemic flashing problem often fails over time; fix the drainage plane first.
Have questions about your home’s exterior? Boss Services, Inc. can help you consider the next step. Contact our team, call 508-297-0635, or email bossservicesinc@comcast.net.