
Diagnosing water intrusion at sliding patio door sills: a Raynham, MA homeowner’s guide to flashing details, threshold repair, and when replacement is needed
If you’re finding damp carpet, stains at a sliding patio door, or water pooling at the threshold this spring or summer in Raynham, you’re asking the right first question: where exactly is water getting in, and can it be fixed without replacing the whole door? This article explains what to look for, how flashing and sill pans should work, common threshold and track failures, temporary mitigations you can use while you plan, and when a long-term repair or replacement is the pragmatic choice. The primary service that helps here is our window and door evaluation and repair work; read on to learn how a careful sequence of inspection and trades coordination prevents repeat leaks and limits project scope.
how water enters sliding door sills
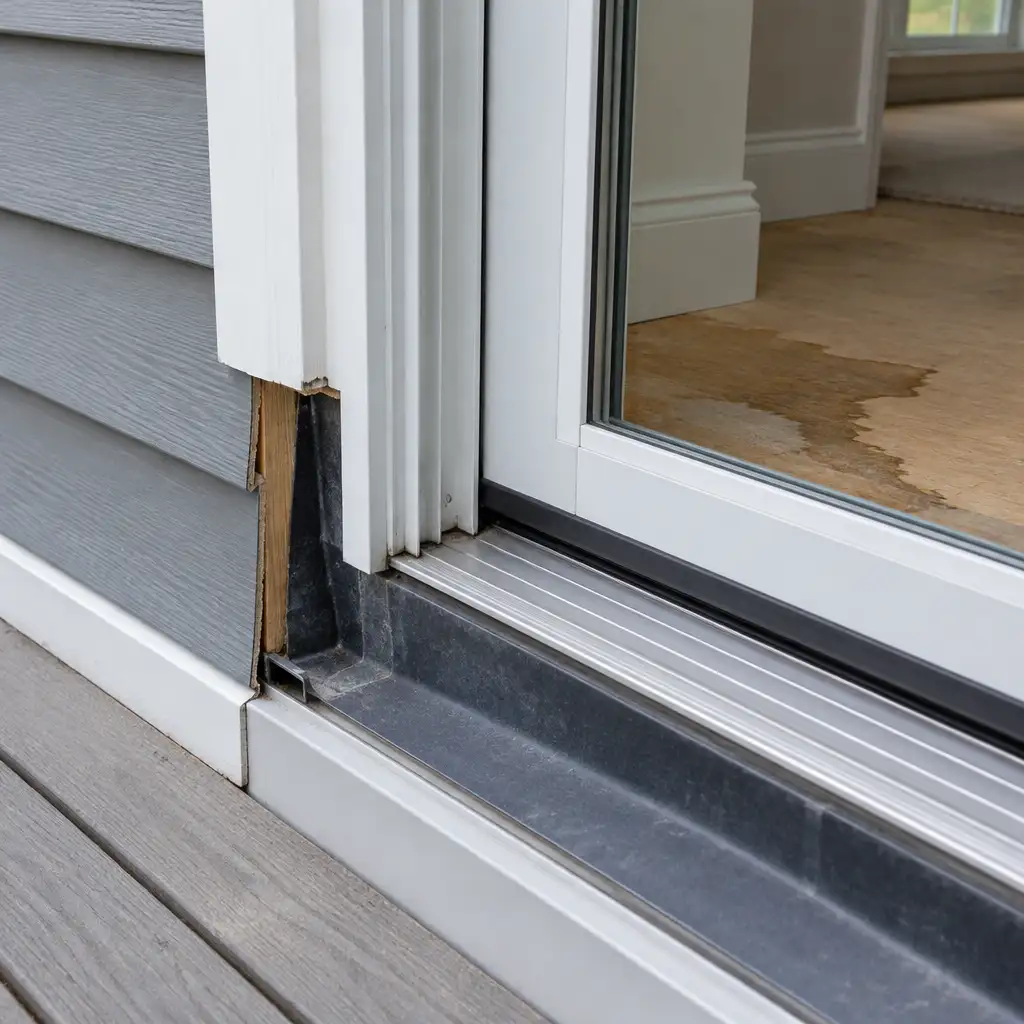
Understanding the most likely paths water takes helps narrow the diagnostic scope. Water intrusion at sliding patio door sills typically follows a few predictable routes: above the door (head and jamb leaks), through the sill itself (failed sill pan or no sill pan), at the jamb-to-siding interface where flashing is missing or incorrectly lapped, or through the threshold and track where weep holes are blocked or threshold seals have failed. Sometimes the leak source is not at the visible threshold but several inches higher where the flashing failed and allowed water into the wall cavity, which then follows framing and exits at the lowest point—the interior threshold.
Observable signs you can use to guide a focused inspection include:
- Interior staining pattern. Water stains that start at the threshold and rise a short distance often indicate a sill or threshold issue; stains higher up the jamb or head suggest flashing or head-liner problems.
- Soft or spongy subfloor near the door. This can mean long-term leakage; even a small drip over months will deteriorate floorboard edges and subfloor sheathing.
- Rust or corrosion in the track and rollers. Persistent water in the track corrodes metals and often points to shielded but not drained tracks.
- Exterior staining or streaks beneath the door. Look for discolored siding, settled dirt, or mildew below the threshold which indicates water flowing down and under the door exterior rather than from inside-out condensation.
- Pooling on the rainier side of the house. If the door faces prevailing winds and water pools outside near the door, that increases pressure on the threshold and can reveal inadequate drainage or missing end dams.
Seasonal patterns matter. Spring melt and heavy rain events combined with wind can aggravate small defects that are otherwise dormant in drier months. In Raynham, like other Southeastern Massachusetts towns, these seasonal cycles make it practical to inspect a suspect sill just after a heavy rain and again after a controlled hose test so you can compare conditions.
flashing, sill pans, and correct interface details
Flashing and sill pans are the primary defense against water getting past the exterior cladding and into the framing at an opening. A proper sill pan sits beneath the door threshold and redirects any infiltrating water back outside through weeps, into a drained track, or out past the exterior trim. There are multiple accepted ways to build a sill pan; the common element is a continuous, durable barrier that creates a positive slope to an exit point and integrates with the wall’s weather-resistive barrier (WRB).
Typical sill pan approaches include:
- Prefabricated metal or plastic sill pans. These factory-formed pans are shaped to match the door sill and often include built-in upstands and end dams. They perform well if installed with correct sealant and clamping, and if the exterior trim permits drainage.
- Field-formed membrane pans. A sheet of self-adhered flashing or a peel-and-stick membrane is formed into a pan at the rough opening. This is common with new construction or replacement installations where the contractor can construct the pan on the opening flange and extend the membrane over the WRB.
- Bedded pan with continuous flashing tape. In some retrofit situations the installer creates a sloped bed of sealant and then tapes the pan area to form a drainage path back toward the exterior.
Regardless of the material, key performance details are:
- Positive slope outwards. The sill pan base must slope slightly toward the exterior to promote drainage rather than retention.
- End dams at jambs. Upturned edges at the ends keep water from running off into the wall cavities. End dams should be integrated with jamb flashing and WRB.
- Integration with WRB and sill flashing. The pan should sit on top of or be adhered to the WRB and the WRB must lap over the sill pan where appropriate so water shed from the cladding does not run behind the pan.
- Weep or overflow provision. There must be a way for water to exit the pan—through the door track, a drainage slot, or a routed opening in the exterior trim—without letting pests or debris in.
Where these details are missing or incorrectly executed, water can sit in the pan or behind finish materials, causing rot of the sub-sill or framing. A frequent retrofit failure is when a sliding door is installed into existing siding without the siding being lifted and the WRB properly integrated; installers sometimes rely on surface sealant instead of a true waterproof pan, and seals age and fail.
Knowing whether a sill pan exists and how it is installed is central to diagnosis. You may be able to see flashing at the exterior if a small section of trim is removed, or an inspector may remove the interior stool and casing to probe the sub-sill condition. A moisture meter and probing the sill edge are standard evaluation steps used by professionals to reveal concealed rot.
thresholds, tracks, and common hardware failures
The threshold assembly and sliding track are mechanical systems that both keep water out and allow smooth operation. Over time, thresholds can fail due to wear, compression-set of seals, or accumulation of debris. Track channels are designed with drainage in mind; they commonly include small weep holes that daylight to the exterior to drain incidental moisture away.
Common threshold and hardware issues include:
- Blocked or missing weep holes. Leaves, mud, insects, and paint can block a track’s weep holes so water that would normally escape instead pools in the track and eventually overtops threshold seals.
- Compressed or missing threshold seals. Foam or rubber seals age, flatten, and lose compression. Once they fail the threshold no longer forms a consistent barrier to wind-driven rain.
- Damaged rollers and poor alignment. If the door does not seat correctly when closed—for example because rollers have worn or the door is out of square—the perimeter seals cannot compress evenly and leak paths can form.
- Corroded track metal. Persistent moisture in the track accelerates corrosion which changes drainage geometry and can maintain water inside the assembly.
- Improper threshold profile. Some aftermarket thresholds or low-cost replacements do not provide the same drainage geometry as OEM parts; an ill-fitting threshold can negate an otherwise good sill pan.
Inspecting the track and threshold gives quick clues. A stuck sliding panel, visible rust, or debris in the track reduces the likely repair scope if the underlying sill pan and flashing are sound. But if the threshold area has soft wood or the sub-sill is rotten, hardware repair alone will not stop water entering the structure.
diagnostic steps homeowners can take safely
For homeowners wanting to gather useful information before calling a professional, there are safe, non-destructive steps that identify likely leak locations. Don’t attempt work that requires removing glazing, dismantling the head flashing, or climbing on the roof; those are contractor steps.
Start with observation and simple tests:
- Interior inspection immediately after a rain. Note where stains appear, any odor of damp wood, and whether moisture is limited to the floor surface or extends into baseboards or adjacent carpet. Photograph the pattern for later comparison.
- Exterior look for staining, missing caulk, or gaps in trim. From the ground, check the door exterior at the head, jamb, and bottom. Look for gaps between door frame and siding, loose or missing trim, and deteriorated caulk—but remember that caulk alone is not a substitute for correct flashing.
- Check the track weeps and clear debris. Use a vacuum or a soft brush to remove visible debris from the track and locate the track weep holes. Do not poke aggressively into the weep holes with metal objects; a plastic straw or a gentle water flush is safer to confirm flow.
- Observe door operation and seals. Slowly close the sliding panel and look for even compression of the weatherstrip. If the door rocks or doesn’t seat, hardware adjustment may be required.
- Controlled hose test. If interior staining is intermittent and you want to confirm current leakage, perform a hose test with a helper: apply water to the head and jambs first for several minutes, then to the threshold and track, while someone watches inside. Keep water flow moderate; the goal is diagnostic, not to force water into every opening. If you find active leakage, photograph and time-stamp the observation for the contractor visit.
Limitations of homeowner testing: a hose test helps narrow the source but cannot replicate long-term accumulation or wind-driven rain events precisely. Also, some leaks only occur when the wall cavity is saturated from above; visual testing may misattribute the exit point to the source. Use homeowner tests to gather accurate notes and photos for a professional diagnosis rather than to definitively fix the issue yourself.
temporary mitigation vs long-term repairs
When a leak is identified, homeowners often want to know whether a quick, inexpensive fix will hold through the season or whether a full repair or replacement is inevitable. The answer depends on what the inspection reveals.
Temporary mitigations that can reduce water entry in the short term include:
- Cleaning and unblocking weep holes and track drainage. Keeping drainage clear often eliminates small leaks caused by surface water accumulation.
- Adjusting rollers and alignment. If the door doesn’t close evenly, adjusting wheel height or replacing worn rollers can improve seal compression and reduce leaks.
- Exterior caulk patches and small trim repairs. Sealing obvious gaps in trim or window-to-siding joints can reduce wind-driven rain entry, but this is a patch, not a substitute for a proper flashing detail.
- Temporary interior protection. Placing a removable sill pan tray or threshold gasket and using a moisture-tolerant runner can protect finishes while you plan a permanent fix.
Why temporary measures matter: they limit interior damage, reduce the urgency of emergency demolition, and buy time to coordinate the right trades. However, temporary fixes often fail within a season if the underlying flashing or sill pan is compromised. Excess reliance on caulk and surface patches without addressing the pan or flashing can lead to hidden rot that becomes more expensive to repair later.
Long-term repair options appropriate for a persistent sill leak include:
- Sill pan replacement or addition. Installing a properly integrated pan and creating durable drainage is the most direct fix when the existing pan is absent or failing.
- Flashing remediation at head and jambs. If water is entering above the door, repairing or adding head and jamb flashing and ensuring correct WRB overlap will stop migration into the wall cavity.
- Threshold and track renewal. Replacing a worn threshold with the correct OEM or equivalent profile and fixing rollers/track geometry restores the mechanical seal and drainage function.
- Localized sub-sill and framing repair. If rot is found, replacing the affected sub-sill and sheathing is necessary before reinstalling the door or pan to prevent recurrent problems.
- Full door replacement. When multiple elements fail, the sill and frame are badly deteriorated, or the unit has poor performance beyond leakage (drafts, difficulty operating), replacement may be the most cost-effective long-term choice.
Sequencing matters: if siding or trim must be removed to access flashing, plan those trades together rather than doing isolated repairs that require rework. That coordination is covered in the next section.
sequencing with siding, trim, and exterior flashing work
One common reason patio door leaks recur after repair is poor sequencing between the door work and exterior siding/trim/flashing trades. A proper repair often requires partial removal of siding or trim to expose the rough opening and integrate new flashing into the WRB. If a door or pan is installed without addressing the adjacent siding or wrap, the overlap that keeps water out will be missing.
Key coordination principles:
- Plan for access. The contractor may need to remove exterior trim, a piece of siding, or even a small section of cladding to tie new flashing into the WRB. Leaving the siding intact and trying to rely only on surface sealant is a common cause of future leaks.
- Match materials and tolerances. Different siding systems (vinyl, fiber cement, clapboard) have different trim and flashing needs. The flashing method should suit the cladding so the overlap and drainage are preserved.
- Coordinate with the siding contractor. If you have a siding contractor separate from the door installer, schedule them together. If the siding is older or near replacement, consider whether doing both at once reduces total labor and ensures a seamless detail.
- Allow for proper WRB restoration. After repairs, the WRB must be restored and lapped correctly over the new flashing so water sheds over the barrier rather than behind it.
Practical example of sequencing: suppose the sill pan is missing and rot is found at the sub-sill. The correct sequence is to remove the interior casing and threshold, temporarily stabilize the opening, remove exterior trim as needed, replace rotten sub-sill or sheathing, install the sill pan integrated with the WRB, reinstall exterior cladding or trim correctly lapped, then finish interior trim and threshold. Doing interior repairs first and leaving the exterior flashing unaddressed invites repeating the whole process.
Coordination also reduces surprises in Raynham homes where seasonal weather windows may limit exterior work. Scheduling during a dry period prevents weather-related rework.
repair vs replacement: decision factors
Choosing repair or replacement depends on the condition of the door and the surrounding structure, performance goals, and how much disruption you’re willing to accept. A pragmatic decision balances short-term budget realities with long-term risk of repeat work.
Factors that favor repair:
- Localized damage. If the problem is limited to a clogged track or a missing sill pan but the frame and glazing are in good condition, a targeted repair can restore function and stop leaks.
- Good frame and glazing performance. If the door seals, hardware, and glass perform well for energy and security, and you’re happy with the style, repair preserves the existing unit.
- Cost control. Repairs are usually less disruptive and less costly in the short term than full replacement.
Factors that favor replacement:
- Extensive rot or structural damage. When the sill, sub-sill, or framing requires significant replacement, the door’s frame may no longer be adequately plumb or square to accept repairs effectively.
- Repeated leaks despite prior repairs. If multiple attempts to stop leaks have failed, the unit’s interfaces with the wall may be fundamentally incompatible and replacement with a properly flashed opening is safer.
- Performance or operational problems. Doors that stick, have degraded glazing, or show high air infiltration might be poor candidates for repair-only strategies.
- Mismatch with energy goals or accessibility needs. Replacement affords the chance to upgrade to a low-threshold or thermally improved product if needed.
Sometimes a hybrid approach is best: repair the sill pan and surrounding flashing now to stop ongoing water entry and plan for replacement within a few years when budgets and timing align. That way immediate moisture damage is arrested while preserving options.
what to expect from a professional inspection and questions to ask
A contractor inspection should be methodical and transparent. Professionals will typically:
- Ask you to describe when and how you first noticed the problem.
- Perform an interior and exterior visual inspection, testing operation and seals.
- Use non-destructive tools such as a moisture meter and a small probe to identify soft wood or elevated moisture content at the sub-sill.
- Do a controlled water test when the source is unclear so they can observe where water enters in real time.
- Communicate findings and propose options with clear scopes: this might include a targeted sill pan installation, threshold and hardware repair, or a replacement estimate that includes flashing and siding coordination.
Questions you should ask the inspector:
- Will you check the sill pan and flashing, and what access will be needed? This clarifies whether siding or trim removal is part of the inspection or a later step.
- How will you confirm there’s no concealed rot after a repair? Ask about moisture testing, probing, or warranty for the repair work.
- If replacement is recommended, how will flashing and siding be coordinated? You want a clear sequence that avoids leaving the opening exposed or relying on caulk alone.
- Can you document the condition with photos and a written scope? A clear record helps you compare proposals and ensures the contractor understands the issue.
Responsible contractors will not promise definitive diagnosis without reasonable invasive inspection where indicated. If the repair scope is limited to hardware or track cleaning, make sure the inspection confirms no underlying framing damage exists so you don’t chase a temporary fix for a deeper problem.
next steps for Raynham homeowners
If you’ve documented recurring water at a sliding patio door sill in Raynham, a practical plan preserves interiors and clarifies long-term options. Steps we recommend:
- Document the problem. Photograph interior stains, the track, threshold, and the exterior cladding around the door after a rain or hose test. Note when the leak occurs and any recent weather events that correlate.
- Do basic maintenance safely. Clear track debris, confirm weep holes are open, and verify that the door closes evenly. These steps can often reduce leakage in the short run while you gather estimates.
- Schedule a professional inspection that includes a moisture check and water test. A thorough inspection will determine whether a sill pan or flashing repair will solve the issue or if localized framing repairs or replacement are needed.
- Plan trades coordination if exterior access is required. Because correct flashing integration often requires siding or trim removal, coordinating the door work with a siding contractor prevents rework and preserves the WRB.
- Compare written scopes, not just bottom-line estimates. Two contractors may propose different scopes: one may propose a surface repair with caulk and threshold; another may recommend removing trim to install a field-formed sill pan and repair sheathing. Choose the scope that addresses water management, not quick cosmetic fixes.
For detailed work that affects the house weather barrier and cladding, a windows and doors contractor who coordinates with siding and roofing trades reduces the chances of recurring leaks. If you’d like to learn more about our process for door assessment, repair, and replacement, see our window and door services page for an overview of the kinds of evaluations and installations we perform: Window and door installation and replacement. For location-specific information and to confirm we serve your neighborhood, visit our Raynham town page: Raynham. You can also browse examples of completed door and window projects in our gallery to get a sense of typical details and finishes: Windows and doors project gallery.
If you’d like an initial conversation about observed symptoms and a clear plan for a diagnostic visit, we can coordinate an inspection that minimizes invasive work and gives you options with clear trade-offs. We work with homeowners to preserve interior finishes where feasible, explain when siding access is required, and sequence repairs so flashing and WRB are integrated correctly—all with an eye toward limiting repeat problems.
frequently asked questions
Q: My sliding door leaks only during heavy wind-driven rain. Can I rely on caulking?
A: Caulking is a short-term barrier at best and will often fail sooner than expected under wind-driven rain. Proper flashing and a functioning sill pan are the permanent solutions. Caulk can be used temporarily to limit interior damage while you schedule a full diagnostic and repair.
Q: How do I know if the sill pan is missing without removing interior trim?
A: A moisture meter, a controlled water test, and probing near the threshold by a qualified inspector can strongly indicate whether a sill pan exists and how well it performs. In some cases a small exploratory removal of interior trim is the only way to confirm concealed rot; a professional will advise on minimally invasive checks first.
Q: If we replace the threshold and rollers, does that usually stop leaks?
A: Replacing worn thresholds and rollers improves door seating and drainage and can stop leaks when the sill pan and flashing are otherwise sound. If the underlying pan or flashing has failed or framing is rotten, threshold and roller replacement alone will not prevent future intrusion.
Have questions about your home’s exterior? Boss Services, Inc. can help you consider the next step. Contact our team, call 508-297-0635, or email bossservicesinc@comcast.net.