
Coordinating Roof, Siding, and Window Work for Stoughton Cape-Style Homes: Sequencing and Moisture Management
Homeowners in Stoughton often ask a practical question: If I need work on my roof, siding, or windows, should I do them together and in what order? This article explains the sequencing and coordination issues specific to Cape-style homes—how flashing, step- and counter-flashing, eaves details, and opening preparation affect each trade; when partial replacements make sense; and how to protect interiors and landscaping during staged exterior projects. We focus on decision-making and site management rather than a simple yes/no answer, so you can weigh tradeoffs and plan a smoother job.
why sequencing matters for cape-style homes
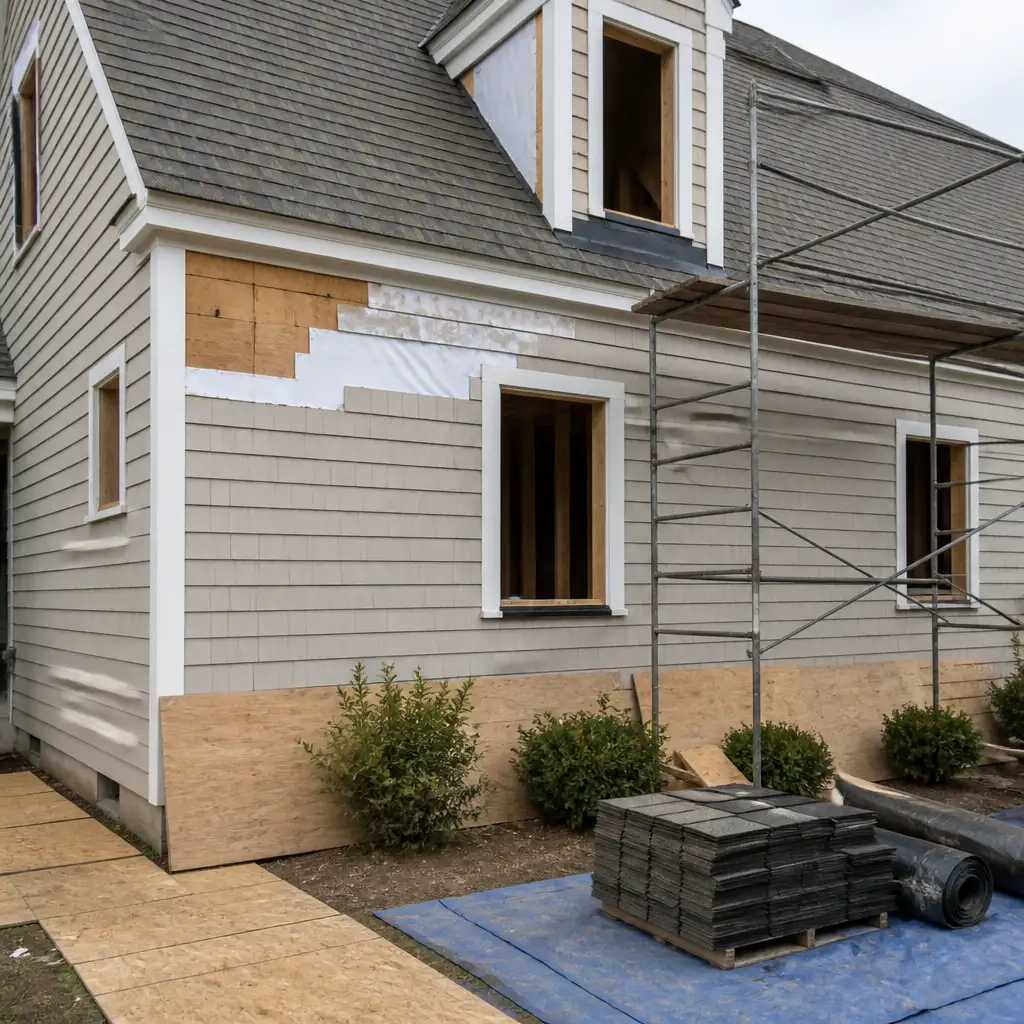
Cape-style homes—commonly one- to one-and-a-half-story houses with steep gable roofs, dormers, and multiple short roof-to-wall transitions—present a series of concentrated detailing challenges. The intersections where roof planes meet vertical walls or dormers, where gutters attach to narrow fascias, and where windows sit under eaves are all places moisture can enter if flashing or weather barriers aren’t correctly integrated. Because roofers, siding installers, and window teams each work on adjoining layers of the exterior envelope, the order of operations determines how those layers overlap and how easy they are to flash and seal correctly.
Sequencing affects four essential outcomes:
- Moisture control: Proper shingle and flashing sequencing prevents water from being driven behind siding or into wall cavities.
- Durability of interfaces: Correct overlaps between roof underlayment, housewrap, and window flashing reduce callbacks and hidden rot.
- Cost and disruption: Coordinated work can reduce re-work and limit how many times scaffolding or protective measures must be set up.
- Site protection: Thoughtful staging protects interior finishes and landscaping that could be damaged by falling debris or construction traffic.
Understanding those outcomes helps you make tradeoffs—spreading projects over time to manage budget versus completing them together to minimize repeated disruption.
observing conditions before you decide
Before choosing sequencing, get a clear assessment of the existing conditions. Each roof, siding, and window decision starts with observable clues that indicate whether a small repair, partial replacement, or full project is appropriate.
Key observations a qualified contractor will check include:
- Roof decking condition: If roof decking is soft or delaminated under existing shingles, flashing interfaces at walls and dormers are more likely to be compromised and may dictate replacing at least those roof sections.
- Flashing condition: Look for rusted metal flashings, loose step flashing at dormers, or missing counterflashing at chimneys—these failures are common sources of hidden leaks.
- Siding moisture staining or swelling: Stains or soft boards behind siding suggest leaks at windows, at the roof-siding junction, or from failed penetrations.
- Window performance: Water stains on interior trim, persistent drafts, or failed sills indicate the window opening or its flashing may be compromised.
- Attic and roof-assembly ventilation: Poor ventilation can accelerate shingle and deck deterioration and increase interior moisture issues tied to window replacements.
These observations guide whether you must prioritize one trade over another. For example, a roof with intact shingles but suspect window flashing may allow siding and window work first, while a roof with compromised decking usually means replacing the roof or at least addressing the roof-to-wall interfaces before replacing siding or windows near those intersections.
how roofing interacts with siding and windows
Every exterior system sits in layers. In typical good practice, the roof and its edge flashings create the first line of defense above where walls, siding, and windows meet. But those systems must be integrated so water sheds from roofing down and off cladding without entering openings.
Important interaction points include:
- Eave and rake details: At the eave, a drip edge and underlayment should extend correctly over the fascia to manage water flow into gutters. Rakes and gables where the roof meets a vertical wall or the face of a dormer require careful step flashing and sometimes counterflashing to seat under siding correctly.
- Dormer transitions: Cape homes often have dormers that change the roofline and create multiple short runs where step flashing must be installed at every shingle course along the dormer wall. If siding on the dormer is replaced without attention to how the step flashing is seated, water can wick behind the new cladding.
- Window head and sill details: Window head flashing and properly integrated housewrap and sill pans are essential. The head flashing should be installed so roofing or drip details above do not direct water into a window head if the siding is open at the top.
- Overlap sequence: A durable assembly typically has the roof underlayment and flashing tucked under the wall weather barrier (housewrap) where practical, or vice-versa in masonry conditions where counterflashing is required. That overlapping order is what sequencing work determines.
Because of these interactions, the contractor teams must coordinate exactly where they leave edges exposed, how they integrate flashing, and who completes final trim work. A lack of coordination can lead to repairs that look acceptable at first but leave small openings for moisture ingress.
common flashing details and trade interfaces
This section explains the specific flashing details that most affect sequencing decisions. Cape-style homes concentrate several of these details in a small vertical area—dormers, chimneys, and short eave runs—so each deserves attention.
step flashing where roof meets wall
Step flashing consists of short L-shaped pieces set at each shingle course where a roof abuts a vertical wall (for example, a dormer side). Proper step flashing should be installed so the vertical leg is behind the siding or trim and the horizontal leg covers the shingle course above. If siding is replaced after roof work, installers must remove and re-seat existing step flashing or install new flashing that ties into the siding weather barrier. That is why many contractors prefer the roof to be replaced first: the roofer can install step flashing that the siding crew then ties into, or both crews can work from a shared plan to leave flashings accessible.
counterflashing at chimneys and masonry
Counterflashing is used where roofing intersects masonry elements like chimneys. Typically, a base flashing is installed under the shingles and a counterflashing is embedded into the chimney mortar or stepped into the masonry. If you are replacing siding but not the roof, the counterflashing detail usually remains with the roof and chimney interface, and careless work at the siding plane near the chimney can compromise that sealed joint. Sequencing matters when masonry work or re-pointing is planned in the same area.
head flashings and window integration
Windows need a continuous path for water to drain outside the wall assembly—this is accomplished with sill pans, properly taped housewrap, and a head flashing above the window. If roofing work changes how the eave or overhang behaves above a window (for example, adding ventilation or changing drip-edge profile), the head flashing detail may need to be adjusted. In practice, window installers and siding crews must coordinate on the order of housewrap installation, window flashing tape, and the final trim application.
ice and water protection near eaves and valleys
In New England, eave and valley protection (an ice-and-water underlayment) is a common roof component. When replacing roofing in sections or repairing valleys that sit adjacent to vertical walls or windows, the placement of this underlayment affects how other trades access flashing. For instance, if a valley adjacent to a dormer is replaced, the roofer should ensure underlayment placement does not prevent the siding crew from sliding step flashing behind the siding. That often favors doing complicated roof-to-wall junctions before finishing siding in the same plane.
venting, soffits, and narrow eaves
Cape houses sometimes have narrow eaves and short soffits, which limit how ventilation and drip edges are installed. Replacing siding might reveal issues behind soffit cavities or require temporarily removing soffit or fascia for access. If roofing work is anticipated that alters fascia or replaces gutters, coordinating these tasks reduces repeated removal and refitting of trim pieces.
sequencing options with pros and cons
There is no single right answer for every Cape-style house, but there are common sequencing approaches. Below are typical orders of work, the practical reasons behind them, and the tradeoffs to consider.
option 1: roof first, then siding, then windows
Pros:
- Allows roofers to install full step flashing and underlayment details that siding can tie into without disturbing completed siding work.
- Reduces the risk that later roofing work will damage new siding or trim.
- Facilitates addressing decking and underlayment issues that might otherwise be hidden behind siding or window trim.
Cons:
- If windows are older and leaking, delaying window replacement might expose interior trim to moisture during roof work unless windows are temporarily protected.
- When new windows change head clearances or casing thickness, siding finish work might need rework after window installation.
This sequence is often recommended when roof decking or flashing issues are suspected or when the roof replacements involve dormer junctions that will affect siding installation.
option 2: windows (and openings) first, then siding, then roof
Pros:
- New windows can be installed and fully flashed to a fresh weather barrier before siding covers the wall, which is a clean, efficient way to seal openings.
- If windows are the primary concern (air leakage, moisture entering at head/sill), fixing them first reduces interior exposure while other exterior work proceeds.
Cons:
- If the roof work affects the eave or the wall plane above the window, later roof replacement may disturb window head flashing or require additional integration work.
- Installing windows first requires careful protection during subsequent siding and roofing phases.
This approach is sensible when windows are clearly the weakest link and the roof is in generally good condition or will be addressed only later.
option 3: siding first, then windows and roof
Pros:
- Replacing siding first can modernize the drainage plane and reveal any rot behind cladding that needs attention before windows or roofing are replaced.
- Siding replacement may be less disruptive to interior finishes than roof work and can be staged ahead of other trades.
Cons:
- If roof work is then performed, the roofer may need to expose or remove parts of the new siding to properly install step flashing, leading to rework costs.
- New siding installed without accounting for roof-edge flashings can make later roof-to-wall integrations more difficult.
This option is often chosen for cosmetic upgrades when the roof is not yet at the point of replacement and the homeowner prefers to address walls first. If you choose siding first, coordinate with roofing contractors to protect flashings and plan for possible cutbacks around junctions.
option 4: combined projects—roof, siding, and windows together
Pros:
- Completing all three trades in a single coordinated project minimizes repeated site setups, scaffolding, and protective measures.
- It ensures flashings and drainage planes are installed as a single integrated system, reducing the chances of missed interfaces.
Cons:
- Combined projects are usually a larger upfront cost and require more scheduling coordination between crews.
- Project duration may be longer in a single run, though overall disruption can be less than three separate mobilizations spread over time.
When budget and scheduling allow, a combined approach often delivers the cleanest long-term result because all interfaces are addressed at once and the trades work from a shared plan.
when partial replacements are appropriate
Partial replacements—doing only a section of roof, one elevation of siding, or a handful of windows—can be a reasonable way to manage budget or to address localized problems. The key is to understand the tradeoffs and to execute details that avoid creating new weak points.
partial roof replacements
Partial roof replacements make sense when damage is localized (for example, a small section around a valley or dormer) and the remaining roof is in good condition. For Cape homes, this can be complicated by the number of intersections; replacing a single dormer run may require re-flashing the entire dormer-to-roof junction to guarantee a watertight detail. A conservative rule is: if the roof decking or underlayment under the targeted area is suspect, consider expanding the scope so full flashing sequences and underlayment overlaps are continuous and consistent.
partial siding replacements
Replacing siding on one elevation or patching an area can work when underlying sheathing is sound. However, new siding panels should be integrated with existing flashing and trim, and seams must be sealed so water does not track behind the old cladding. When siding is replaced in areas that meet roof flashings or window heads, ensure that the flashing is accessible and can be reseated. Sometimes it is better to replace an entire elevation so seams fall at logical vertical control joints rather than in the middle of a wall plane.
selective window replacements
Replacing a subset of windows is routine. The main risk arises when windows near significant roof-to-wall intersections are swapped—the flashing and head details must match the surrounding weather barrier and adjacent siding to avoid creating a leakage path. A well-flashed window installation with a correctly integrated sill pan and head flashing will typically perform acceptably even if surrounding siding is older, but coordinate with siding plans if the siding will be replaced soon after.
protecting interiors, landscaping, and site safety
Exterior work can generate dust, debris, and falling material that threaten interior finishes, windows, shrubs, and garden beds. Good site protection preserves your home and reduces potential damage claims, and planning this protection is part of sequencing.
interior protection
When windows are replaced or when roofing work may cause vibration and dust, contractors should protect interior finishes. Common protections include covering floors with rosin paper at doors used by crews, taping plastic sheeting across window openings if glass is removed temporarily, and placing dust barriers at entries. If roof work is being done first, confirm with your contractor how they will secure attic openings, roof vents, and any penetrations to prevent dust infiltration into living spaces.
landscaping and hardscape protection
Protective measures for plantings and masonry are critical, especially for Cape homes with foundation plantings close to the house. Ask for plywood or thick protection boards placed over beds and walkways where materials may fall. For example, a roll-off dumpster or a staging area near a flower bed should be separated with plywood and protective coverings. If heavy equipment is used near lawns or paved surfaces, contractors should provide track pads or temporary ramps to limit surface damage.
jobsite containment and neighbour consideration
Noise, truck movement, and dumpster placement affect neighbours. A coordinated project that combines trades into a single timeframe typically concentrates disruption, but it also requires a clear site plan so equipment and material deliveries do not interfere with the neighborhood. Confirm staging areas, delivery windows, and where crews will park before work begins.
coordination best practices and questions to ask contractors
Effective coordination prevents overlapping responsibility gaps where no trade clearly owns a flashing detail. Use these best practices and contractor questions to clarify responsibilities before work begins.
assign flashing ownership
Ask which trade will install and finish each flashing detail. For example, will the roofer install step flashing and the siding crew tuck siding behind it, or will the siding crew apply counterflashing? Put the agreement in writing in the contract so there’s no later dispute.
establish a sequence and written scope
Request a simple written sequence showing the order of operations for the project—who comes first, who follows, and what visible sign-off the preceding trade will provide when their work is ready for the next crew. This prevents assumptions like “we’ll leave this edge exposed” that lead to exposed seams.
document existing conditions
Ask for photos or a brief inspection report that documents existing decking, sheathing, and visible flashing. If the work uncovers unexpected conditions, your contractor should provide a written change order that explains options and costs before proceeding.
set protection standards
Clarify how interiors and landscaping will be protected, who is responsible for cleanup, and how crews will handle material storage on tight yards common to Cape-style properties.
sample questions to ask
- “If we replace the roof first, how will you protect or re-seat step flashing where it meets the new siding?”
- “Who will be responsible for head flashing above windows, and how will it tie into the housewrap?”
- “If we choose to do partial roofing around a dormer, what steps will you take to ensure the new work ties into existing siding without cutting back recently installed trim?”
- “How will you protect foundation plantings and walkways during material deliveries and dumpster placement?”
example scenarios for Cape houses
Below are three realistic, distinct examples to show how sequencing and decisions play out for Cape-style homes in Stoughton. These are hypothetical situations intended to clarify tradeoffs, not descriptions of Boss projects.
scenario a — aging roof with sound siding
Situation: The roof is near the end of its service life; siding shows no soft spots and windows perform adequately. In this case, replacing the roof first is often the best approach. Doing so allows the roofer to install new step flashing at dormers and rake edges and to address underlayment and deck replacement if needed. After the roof is weather-tight, the siding crew can remove and reinstall trim where necessary and tie the siding weather barrier into the new flashing. This sequencing reduces the likelihood that new siding will be damaged by later roof work.
scenario b — leaking windows and older siding, sound roof
Situation: Several windows show water stains on interior trim, siding in those elevations is soft near windows, but the roof is generally in good condition. In this case, start with window replacements and proper flashing with sill pans and head flashings integrated into a new or existing housewrap. Replace or repair localized sheathing behind the windows as needed, then finish the siding around those openings. Because the roof is not being replaced, less risk exists of disturbing new window flashings from above; however, verify that roof-edge flashings over window heads are stable and won’t direct water into the new head flashing.
scenario c — combined dormer upgrades and curb appeal refresh
Situation: A homeowner wants to improve the look of dormers, replace shingles, and install new replacement windows in dormer openings. Because the dormer junctions involve repeated step flashing and tight integration between roofing, siding, and window openings, a coordinated project that combines roof, siding, and windows in the dormer area is often the best long-term choice. While larger up-front, it reduces the chance of rework and provides a single mobilization for scaffolding or lifts.
next steps and when to call a pro
Deciding whether to combine roof, siding, and window work depends on condition, budget, and tolerance for disruption. Here are practical next steps you can take:
- Arrange a visual evaluation that includes the roof decking, exterior sheathing behind siding if visible, and window flashing. A professional can identify hidden conditions that influence sequencing.
- Ask contractors to provide a clear project sequence and to identify who will be responsible for each flashing detail and for site protection measures.
- Request photo documentation before and after each trade completes their portion of work so gaps in responsibility are avoided.
- Consider grouping projects when multiple roof-to-wall intersections are involved—Cape-style dormers, in particular, often benefit from combined work so step flashing and siding tie-ins are undertaken as a single system.
We provide detailed evaluations and will discuss whether work should be staged or completed together for homes in Stoughton. If you want to review options for your house, start by learning about our residential roofing services, our siding replacement and repair, and our window and door installations. For local context, see our Stoughton town page at Stoughton.
faq
Q: If I can only afford one project this year, which do I prioritize—roof, siding, or windows?
A: Prioritise the system showing active failure signs: a leaking roof or soft decking is usually first because water entering from above can damage all other finishes. If the roof is sound but windows leak into interiors, address windows. A professional inspection can identify which failure will cause the most damage if delayed.
Q: Will replacing the roof first always reduce the risk of future leaks around windows and siding?
A: Replacing the roof first helps because it allows correct installation of step flashing and underlayment at roof-to-wall intersections. However, windows and siding still need proper flashing and a continuous drainage plane; roof replacement alone doesn’t guarantee repair unless those wall components are also correctly detailed.
Q: How can I protect my landscaping and interior while exterior work is underway?
A: Require contractors to provide plywood or protective pads over plantings and walkways, dust barriers and floor protection inside entryways, and a written cleanup plan. Confirm where dumpsters and staging areas will be placed so shrubs and hardscapes are not damaged.
Planning an exterior project? Contact Boss Services, Inc. to discuss your roofing, siding, or window and door needs. Request a free estimate or call 508-297-0635.