
Choosing Vinyl Siding Profiles and Trim for New England Weather: A Plainville, MA Buyer’s Guide
If you’re a Plainville homeowner asking, “Which vinyl siding profile and trim should I choose for New England weather and my house style?”, this article walks through the decision with practical, climate-aware guidance. We focus on common vinyl siding profiles—lap, Dutch lap, and board-and-batten lookalikes—explain trim choices, describe attachment and fastening considerations for wind and freeze–thaw cycles, and show how profile selection changes flashing and opening details. The objective is to help you pair durability and installation detail with curb appeal so you can ask the right questions before hiring a contractor or signing a contract.
This piece is written for homeowners in Plainville and nearby communities who are evaluating siding options, replacing damaged cladding, or planning a full re-side. We emphasize observable conditions, installation tradeoffs, and the practical steps a qualified siding contractor would take. For an overview of the services we perform, see our siding service page linked below.
How New England weather challenges siding
Plainville, like much of Southeastern Massachusetts, sees a wide seasonal range: cold, wet winters with freeze–thaw cycles; windy spring storms; humid summers; and repeated wet–dry transitions in shoulder seasons. Those conditions create three principal challenges for siding and trim:
- Thermal movement: vinyl expands and contracts more than wood or fiber cement. Repeated temperature swings—and direct sun on certain elevations—means panels must be allowed to move in their fastening system and at trim junctions.
- Wind loads: seasonal storms can produce gusts that try to pry siding away from its substrate. Proper nailing patterns, starter courses, and secure trim are essential for resistance to uplift.
- Moisture management: winter snow, ice dams, driving rain, and spring meltwater increase the importance of flashing, housewrap, sealed window sills, and ventilation behind the cladding so trapped moisture doesn’t degrade sheathing or framing.
These conditions don’t mean vinyl is a poor choice—vinyl is widely used in the region because it resists rot and requires low routine maintenance—but they do change installation priorities. In Plainville we focus on installation details that accommodate movement, shed water, and resist wind uplift while preserving the look you want.
Comparing common vinyl profiles
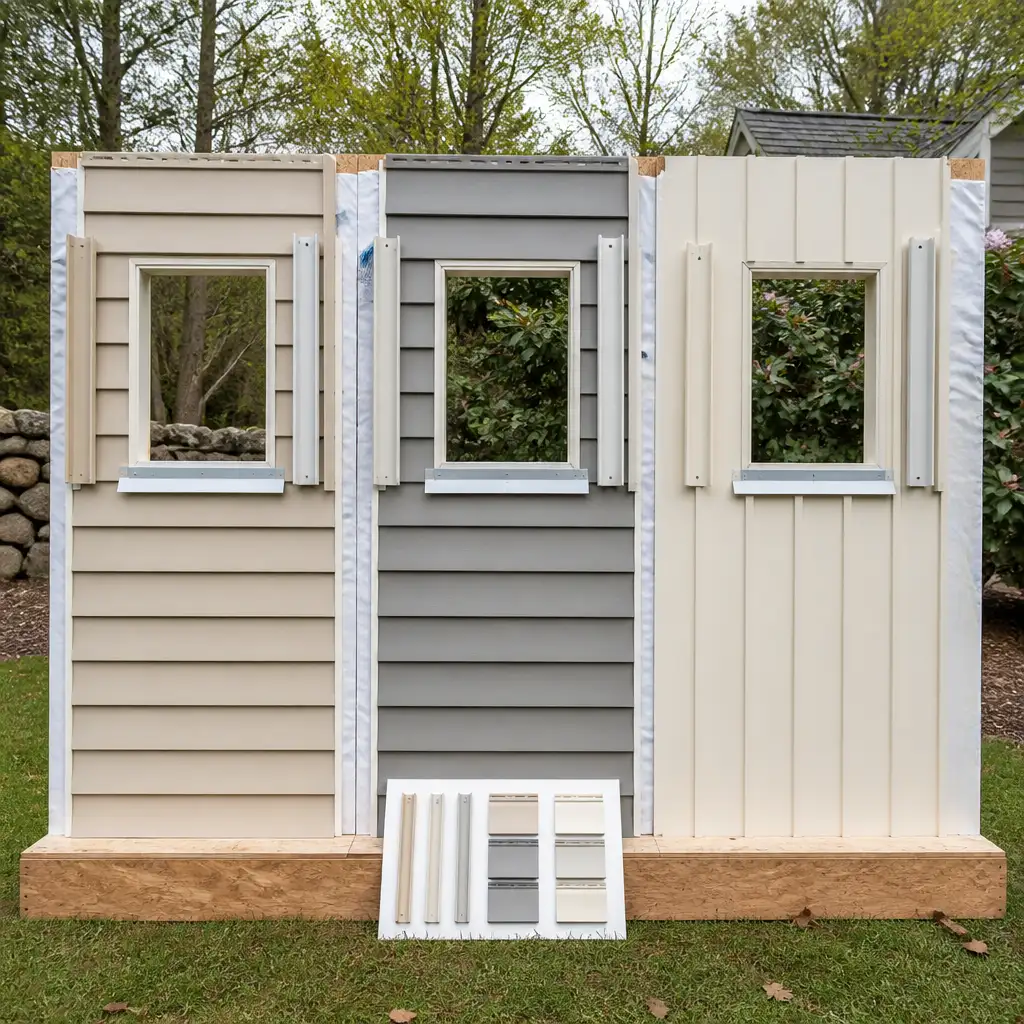
Vinyl siding profiles affect aesthetics, installation detail, and how seams and trim must be handled. Below we compare lap, Dutch lap, and board-and-batten lookalike profiles on the criteria most homeowners care about in New England: durability in weather, detail around openings, and how they influence flashing and trim work.
lap siding (traditional single and double 4″–6″ exposures)
Description and look: Lap siding is the classic horizontal, overlapping profile. Exposure widths vary—4″, 5″, 6″ are common—and panels may be single- or double-4″ styled for a tailored look. The overlap sheds water well, and horizontal lines suit colonial and cape-style homes that are common in Plainville.
Weather and durability considerations: Lap siding’s overlapping courses create a continuous water-shedding surface when installed with correct starter strips and interlocks. Because panels rest on the course below, wind uplift is resisted by the interlock plus the nails in the upper nailing hem, so accurate nailing in the center of the nailing slot matters. Thermal movement is handled by the manufacturer’s recommended free-nailing (leaving nails slightly loose so the panel can slide).
Detailing and flashing implications: Lap profiles make window and door flashing straightforward—the horizontal lines allow standard J-channel and sill pan approaches. However, because the courses overlap, any flashing behind the panel must be stepped and integrated with housewrap so water that gets behind siding can drain to the exterior. Lap siding also requires careful corner trim and starter flashing at the eaves to avoid wind-driven water working up under the first few courses during storms.
dutch lap (shadow line for depth)
Description and look: Dutch lap resembles lap siding but has a pronounced top edge or “nick” that creates a shadow line for added texture. It’s chosen when homeowners want the traditional horizontal look but with more depth and shadow definition, often used to give a slightly craftsman or farmhouse sensibility to a colonial form.
Weather and durability considerations: Dutch lap behaves like lap siding in terms of movement and wind resistance, but the profile’s rake can collect slightly more dirt and ice at the shadow line in freeze conditions. That’s a minor maintenance issue, not a performance failure, but installers often recommend a slightly tighter nailing approach at the top hem to keep the shadow lines consistent during wind events.
Detailing and flashing implications: Because the shadow creates small ledges, installers should pay attention to how J-channels and drip caps align with the shadow when trimming around windows and doors. Overlapping details must prevent a ledge from holding water; flashing behind these lines should be continuous and sloped to drain.
board-and-batten lookalikes (vertical panels and simulated battens)
Description and look: Board-and-batten lookalike vinyl attempts to mimic vertical wood siding with wide vertical panels and simulated battens. The vertical grain and shadowing deliver a farmhouse or modern-rustic aesthetic. Manufacturers offer both rigid vertical longboard panels and composite designs with snap-on battens.
Weather and durability considerations: Vertical profiles change how water moves across the wall. Water runs straight down without the added interlock benefit of horizontal overlaps, so flashing, J-channels at horizontal transitions, and top termination details become more critical. Freeze–thaw doesn’t move the panels any differently, but vertical profiles often require different clip-and-panel attachment systems to allow thermal movement and to prevent buckling. Wind uplift acts on a continuous vertical plane; edges and terminations must be mechanically secure.
Detailing and flashing implications: Around windows and doors, vertical siding often requires a combination of head flashings and properly integrated J-channel or receiver trims at the sill and head. If battens are snap-on, they must be secured so wind can’t pry them away. Vertical siding can complicate flashing at roof-to-wall transitions and multi-plane façades; installers need to plan staging so flashings are continuous under battens and overlap the weather-resistive barrier correctly.
Trim options and detailing
Trim is where profile choice meets architectural style and where installation details determine long-term performance. The right trim makes a siding system look intentional and shields vulnerable edges from wind-driven rain and ice. Below are common trim types and how they interact with profile choices.
corner posts
Vinyl corner posts provide a finished vertical termination and protect the siding edges. For lap and Dutch lap, corner posts are usually installed over the cut edges of panels, and they need to be deep enough to accommodate double 4″ exposures without creating gaps. For vertical and board-and-batten lookalikes, corner posts must receive the vertical panel ends cleanly and allow for movement. On corners where wind uplift concentrates, a mechanical fastening schedule that includes back-blocking or a nailer behind the corner is often used.
J-channel and receiver trim
J-channel is the primary trim used around windows, doors, and at horizontal terminations to receive the siding edge. Match J-channel depth and reveal to the siding profile to avoid visible gaps or odd shadows. Receiver trim, which accepts the panel edge into a channel, is often a cleaner option for vertical siding and for crisp transitions at band boards or roof intersections.
Fascia and soffit transitions
Where siding meets the roofline or soffit, use a proper starter course and top termination that integrates with roof flashing and gutter systems. For lap and Dutch lap, a vented soffit and a drip edge with starter strip is common; for vertical siding, a header trim or flashing that slips over the top of panels is preferred. The termination must prevent capillary rise of water and allow drainage behind the siding where appropriate.
Decorative trim and corner returns
Homeowners often choose thicker or simulated wood trim around entries and gables for visual weight. These decorative pieces must still be installed with movement and drainage in mind—caulk joints where required but avoid filling expansion gaps. Use through-fastening to solid blocking where required, and screen behind decorative trim if it creates a hidden cavity where debris could collect.
Attachment and fastening for wind and freeze–thaw
Attachment is the most technical part of siding work and the part that makes the difference in Plainville’s weather. Proper fastening addresses three simultaneous needs: allowance for thermal movement, resistance to wind uplift, and minimised stress on panels that can cause distortion in freeze–thaw cycles. Below are the practical fastening considerations a competent contractor will follow.
nailing pattern and slot positioning
Vinyl siding manufacturers specify nailing patterns: generally, nails should be centered in the nailing slot, not driven tight. Panels must be free to move laterally; a snug but not tight nail, plus leaving a small space between nail head and vinyl, accommodates expansion. Typical best practice includes fastening at every stud or specified spacing (often 16″ on center alignment with wall framing), but always follow manufacturer spacing for wind ratings. Misplaced or overdriven nails are a common cause of buckling and premature panel stress in cold weather.
fastener type
Use corrosion-resistant galvanized or stainless nails or screws sized to penetrate the substrate sufficiently—ideally into solid framing or blocking at corners and openings. Headed nails provide a larger bearing surface; screws can be used in certain trims but can restrict movement if fully seated. Where manufacturers permit, stainless steel staples are acceptable in low-wind conditions, but for Plainville storms nails or screws are more reliable.
starter and termination courses
Begin with a properly seated starter strip at the eave and base of walls. The starter establishes the first panel’s orientation and resistance to wind uplift. Top terminations—where panels meet rooflines, gables, or soffits—should use a reliable channel or J-clip that allows water to exit while preventing wind from getting a purchase point under the panel edge.
blocking and structural attachment
In areas that bear special loads—corners, window jambs, and door casings—solid blocking behind the siding gives secure attachment points for trim and prevents edge deformation. Blocking also helps with mechanical fastening of thicker trim pieces and with fastening at longer spans on vertical boards where clips may not be sufficient by themselves.
wind ratings and testing
Some vinyl products carry wind-rating data; a contractor should know and apply the correct fastening schedule to achieve the stated rating in practice. In the absence of product-specific ratings, follow conservative fastening with proper starter strips, interlocks, and attention to free-nailing protocols to help panels perform in gusty conditions.
How profile choice affects flashing around openings
Flashing is the line of defense where siding meets windows, doors, chimneys, and roof intersections. Profile choice alters how flashing is implemented, and improper integration is the most common source of leaks beneath vinyl cladding. Here’s how to think about flashing for each profile type and openings you’ll encounter.
general flashing principles
Regardless of profile, flashing must be continuous, direct water to the exterior, and be integrated with the housewrap or weather-resistive barrier. That means the flashing you expose under the siding should be secondary to a sill pan or membrane that does not rely on caulk alone. Flashing should be layered so that outer layers overlap inner layers in the direction water runs (shingle-style).
window sills and head flashings
For lap and Dutch lap: horizontal profiles allow flashing to be stepped under the siding courses. A pre-formed sill pan or properly taped sill shingle is recommended, with J-channel holding the panel edge at the jamb and head. At the head, a drip cap or head flashing that projects beyond the face of the siding helps direct water away and prevent staining or ice buildup at the top of the window opening.
For vertical/board-and-batten lookalikes: the sill pan must project out beyond the vertical panel and may require a receiver or a sill trim to accept the bottom panel edge. Head flashing should be continuous across the opening and may need to tuck behind the WRB with a hemmed drip edge. The vertical seam where the panel meets the jamb must be secured with a piece of J-channel or receiver that prevents water from working behind the batten.
doors and sliding doors
Doors typically receive a threshold and pan flashing; siding must be trimmed back to allow full access to the sill pan without creating a cuff that traps water. For thicker trim around entryways, ensure the trim terminates on a solid substrate and flashing overlaps the WRB before the siding receives its finish trim.
roof-to-wall transitions and soffits
Where a wall meets a roof, roof flashing must be continuous under the siding’s top termination. Use a Z-flashing or head flashing that prevents capillary action and ensures water drains over the roof edge or into the gutter. Vertical siding often needs a hemmed top-piece that engages a receiver flashing; horizontal siding can step flashing into the courses with care to maintain the overlap.
chimneys and penetrations
Chimneys, vents, and penetrations introduce complex geometry. Step flashing and counterflashing must be installed under shingles and behind siding in an integrated manner. For vinyl, maintain a clear separation between siding and hot elements and rely on metal flashings that prevent direct contact with the siding where heat or soot could damage it.
Aesthetic tradeoffs and styling advice
Profile choice is an aesthetic decision as much as a technical one. Below we cover how each profile interacts with architectural style and neighborhood character, and the visual tradeoffs you’ll face.
matching house style
Colonial, cape, and saltbox forms found in Southeastern Massachusetts tend to suit horizontal lap siding because it respects traditional proportions and the visual rhythm of historical examples. Dutch lap can add shadow and depth to otherwise flat façades without being historic in a literal sense. Board-and-batten lookalikes work well for farmhouse or modern-rustic conversions and for gable peaks where vertical emphasis is desirable.
scale and exposure
Wider exposures—6″ or 7″—give a more modern, expansive look and can visually shorten tall façades, while narrower exposures read as more traditional. On two- or three-story façades, consider mixing exposures (for example, wider on the first floor and narrower above) but have a clear band or trim line to break the change; otherwise the façade can look visually disjointed.
color and texture
Darker colors show heat-related expansion more, so in sunnier elevations choose mid-tone or lighter colors to reduce thermal cycling intensity. Textured, wood-grain vinyl can mimic painted wood without the maintenance, but texture can also obscure tight-fitting trim lines, so decide whether you prefer a crisp modern look or a softer, textured appearance.
mixed materials and accenting
Many homeowners combine vinyl with fiber cement or natural stone accents. Where materials meet, ensure flashing and termination details accommodate different expansion rates and thicknesses. Accent areas—porches, gable returns, and entry surrounds—are good places to use a contrasting profile or trim to create visual interest without complicating wall-wide installations.
Installation sequencing and moisture management
Installation sequencing—what goes on first and how trades coordinate—directly affects moisture performance. A vinyl re-side is rarely just siding: it’s an integrated wall system involving the WRB, window and door flashings, trim, and sometimes insulation or sheathing repairs. Here’s a practical approach.
1. inspect and prepare substrate
Before siding starts, inspect sheathing for rot, insect damage, or significant wetting. Replace or sister damaged framing and install solid blocking where trim will be mounted. We avoid assuming replacement; a careful assessment decides repair vs. replacement.
2. install or verify the weather-resistive barrier
Apply housewrap or a mechanically adhered WRB, ensuring it is continuous and integrated at corners and openings. Tape WRB seams and overlap in a shingle fashion so water flows over the barrier rather than into it. The WRB is the layer to which flashings are tied; it’s the most critical invisible layer of the cladding system.
3. flash openings before siding
Install sill pans, jamb flashings, and head flashings at windows and doors before the siding panels go up. For vertical siding, ensure the head flashing extends under the WRB by the recommended distance and that batten attachments do not perforate the flashing itself.
4. install starter courses and panels with correct fasteners
Install starter strips, then follow manufacturer panel sequencing and fastening schedules. Protect landscaping and plan for runoff from ladders and staging to avoid tracking soil onto newly installed panels. For mixed profiles, plan transitions so horizontal and vertical courses terminate into receiver trims or overlapping flashings correctly.
5. finish trim and seal per manufacturer guidance
Install corner posts, J-channel, and decorative trim with appropriate blocking and fastening. Use low-modulus exterior sealant only where recommended—sealant cannot replace proper flashing and should not be used as the primary water barrier. Allow for movement gaps at terminations.
Questions to ask your contractor in Plainville
When you’re getting quotes, use these questions to compare bids on equal terms. Answers should be specific, not generic.
- Which siding profile and exposure do you recommend for my house style and why? A good contractor will tailor the recommendation to building form, orientation, and the homeowner’s desired aesthetic while explaining technical tradeoffs.
- How will you fasten panels at corners, eaves, and openings to handle wind and thermal movement? Expect a description of nailing patterns, starter strip approach, and where blocking is used.
- How will you integrate flashings with the existing or new WRB and window sills? Look for mention of sill pans, taped WRB, and layered flashing rather than reliance on caulk alone.
- Do you intend to replace any sheathing or add insulation behind the siding? This affects cost and sequencing and may require addressing ventilation and vapor profiles.
- What maintenance will be needed after installation? Contractors should explain practical maintenance: cleaning, inspection after storms, and what to watch for at sealant joints and fasteners.
Maintenance and long-term performance
Vinyl siding is commonly chosen for lower routine maintenance than wood, but it still benefits from periodic care, especially in New England.
inspection schedule
Inspect siding annually and after major storms. Check for loose panels, missing trim, and sealant failures around penetrations. Look for signs of trapped moisture—discoloration or soft sheathing at window sills—which merits a professional check.
cleaning
Clean siding once a year with a mild detergent and garden hose or low-pressure washer. Avoid high-pressure washing that can force water behind panels or damage interlocks. Remove leaves and debris from horizontal trim ledges and gutters to prevent staining and ice buildup.
repairs and patching
Small damaged areas can usually be repaired by replacing individual panels. For larger areas or when underlying sheathing is compromised, staged repairs or full replacements may be recommended. Avoid temporary fixes that rely solely on caulk to patch water-managed construction issues.
when to consider replacement
Consider a full replacement when multiple panels are brittle, there’s documented sheathing rot, or the homeowner desires a different profile or improved insulation. Replacement offers an opportunity to correct flashing and WRB issues identified during inspection.
Making the final choice: balancing performance and curb appeal
Bring together three inputs: the house’s architectural style, the exposures and elevations most vulnerable to wind or sun, and your long-term priorities (low maintenance, traditional look, or a contemporary update). Here are practical scenarios to help you decide.
scenario 1 — traditional colonial wanting low maintenance
Recommendation: 5″ or 6″ lap with clean corner posts and modest crown trim. Why: lap preserves traditional proportion, sheds water effectively, and allows straightforward flashing and starter details. Ensure proper nailing and starter strip installation for wind resistance.
scenario 2 — farmhouse aesthetic with gable emphasis
Recommendation: horizontal lap on main walls, vertical board-and-batten lookalike in gables and porch returns. Why: mixing profiles can highlight architectural elements while keeping most of the façade easy to flash and install. Plan clear transition trims and ensure vertical panels have secure top termination and back-blocking where necessary.
scenario 3 — modern siding refresh with deeper shadow lines
Recommendation: Dutch lap or a wider-exposure lap paired with thicker trim at entries. Why: Dutch lap gives pronounced shadowing that reads as depth without changing overall siding strategy. Pay attention to shadow-line alignment around windows and doors so the appearance is crisp.
Whatever the scenario, confirm details in writing and specify product profiles, trim pieces, and the exact flashing approach in the contract so you and your contractor have the same expectations.
FAQ
Q: Will a vertical board-and-batten lookalike perform worse than horizontal lap in Plainville winters?
A: Not necessarily. Vertical systems perform well if installed with correct flashings, top terminations, and secure attachments. They require more attention at horizontal transitions (sills, band boards, roof intersections) because water will run directly down the plane; when detailed correctly they are climate-appropriate.
Q: How important is the choice of trim compared with the siding profile?
A: Very important. Trim defines edges, protects vulnerable terminations, and helps integrate windows and doors. The correct trim can make a modest siding profile look high-end and can prevent wind-driven moisture entry when installed with appropriate blocking and flashing.
Q: Can my contractor change siding profiles mid-project if we find underlying damage?
A: Changes are possible but should be managed through a documented change order. Underlying sheathing repairs may force a profile or trim adjustment to maintain proper flashing and attachment. Insist on a written plan for how changes affect sequencing, materials, and cost before work continues.
Have questions about your home’s exterior? Boss Services, Inc. can help you consider the next step. Contact our team, call 508-297-0635, or email bossservicesinc@comcast.net.