
Whole-wall flashing and starter strip choices for new vinyl siding on historic-style homes: an East Bridgewater, MA installation guide
If you own a historic-style house in East Bridgewater and are planning new vinyl siding, a key question is: what whole-wall flashing and starter details should be included to avoid hidden moisture while preserving period trim and profiles? This article explains whole-wall flashing concepts, starter strip options, and how to integrate flashing with historic-style trim and cladding profiles so you can inspect proposals, ask the right contractor questions, and plan a moisture-resilient install.
We focus on practical choices and tradeoffs for homeowners considering siding work on older homes—not a how-to for DIY crews—and we link to relevant resources where you can see our siding work and request an estimate. If you want a service overview first, see our siding replacement and installation page for context.
Basics of whole-wall flashing and why it matters
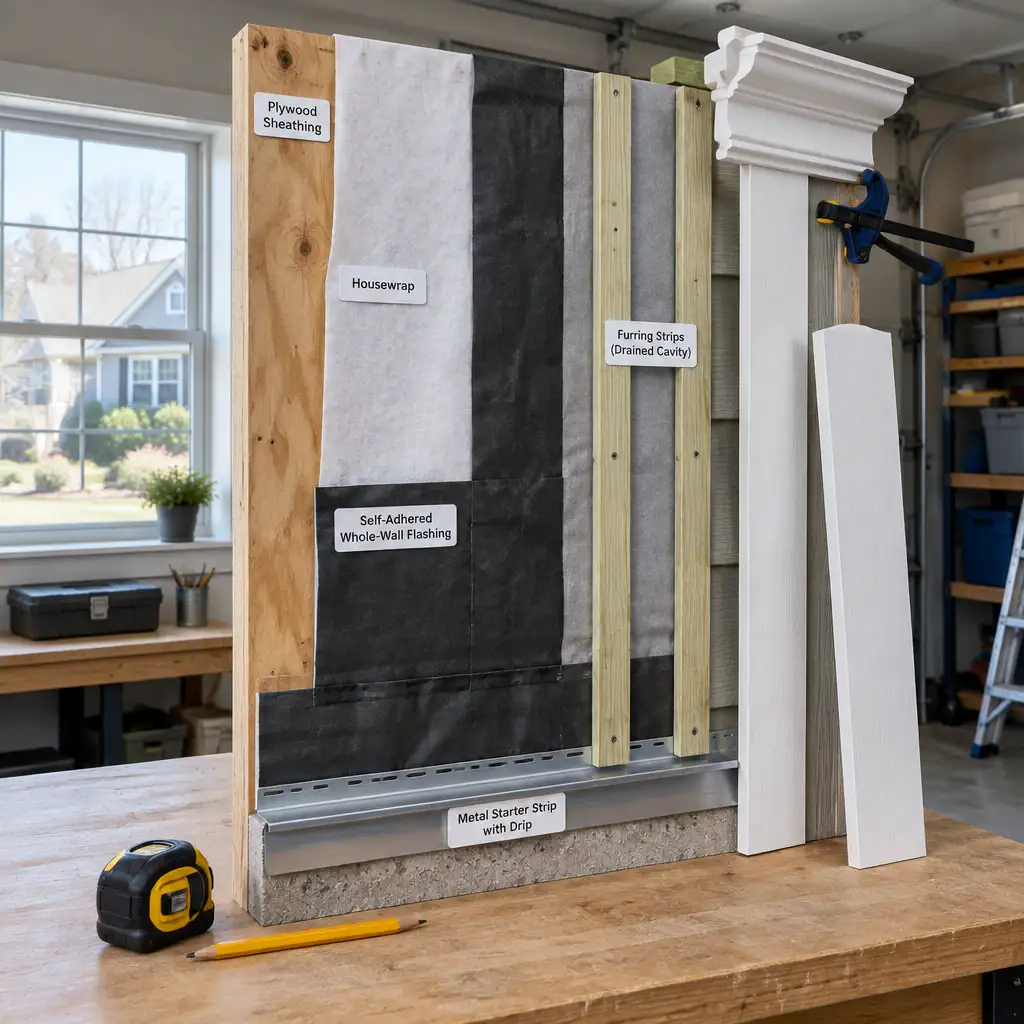
Whole-wall flashing is a continuous layer — typically a self-adhered membrane or layered sheet flashings — installed over the sheathing and under the cladding that manages bulk water and redirects it to the exterior. Unlike spot flashings that only protect window heads or chimneys, whole-wall flashing creates a continuous waterproof plane across broad wall areas and at transitions where water can otherwise penetrate and travel behind siding.
Why it matters on historic-style houses: Older homes often have deep trim, complex mouldings, and recessed openings that trap water if not detailed correctly. A historic-style profile can hide gaps where rain, wind-driven moisture, or ice melt collect. Whole-wall flashing helps create a reliable drainage plane behind the vinyl siding and under any preserved trim, reducing the risk of concealed rot or repeated repairs.
Whole-wall flashing also helps when the wall has multiple intersecting planes: bays, dormers, boxed cornices, or decorative corner boards. By establishing a continuous barrier integrated with the housewrap and trim, installers give water a defined path to exit rather than letting it wick into sheathing seams and framing elements.
Types of whole-wall flashing commonly used:
- Self-adhered membrane (peel-and-stick): applied directly to sheathing or over housewrap; provides durable adhesion and weather resistance when lapped correctly.
- Water-resistive barrier (WRB) plus layered flashings: housewrap or felt with metal L-flashings at critical transitions and self-adhered pieces around penetrations.
- Composite systems: factory-fabricated panels or integrated WRB assemblies combined with furring strips to create a drained cavity behind siding.
Choosing between these depends on the wall condition, historic trim preservation goals, flashing details at windows/doors, and budget. We’ll unpack how each option affects starter strip selection and trim integration below.
Starter strip options and when to use them
The starter strip is the first vinyl component fastened at the base of a wall to lock the first course of vinyl siding. While it seems simple, correct starter selection and placement are essential for straight courses, proper water shedding at the base, and secure anchoring where water might pool against foundations or porches.
Common starter strip types:
- Standard vinyl starter strip: a pressed vinyl receiver that holds the bottom interlock of the first siding course. It is economical and common where a clean, level base exists.
- Metal starter strip: typically aluminum or galvanized steel; provides a stiffer base, can be shaped for drips, and resists deformation on irregular substrates. Good where long-term rigidity is important or when installing heavier-profile siding.
- Sill pan or integrated flashing starter: a formed metal pan or self-adhered membrane that creates a drainage ledge at the base of exterior walls, commonly used where grade, porch connections, or adjacent paved surfaces could cause water to sit against the wall.
- Adjustable or furring-compatible starter: designed to work over furring strips or drainage channels, maintaining proper reveal when a ventilated cavity is required behind siding.
When you pair starter types with whole-wall flashing, think of the starter as the visible termination of the drainage plane. For example, if a self-adhered whole-wall membrane terminates at the foundation, the starter should allow that membrane to be lapped into it or sit on top of it so water can exit without getting trapped behind the starter piece.
Use a metal starter or formed sill pan where you need a positive slope or drip at the base. Vinyl starters are fine on straightforward walls that are level and well-drained, but they can deform under load or when gaps develop from house movement — a metal starter reduces that risk.
Integrating flashing with historic trim and cladding profiles
Historic-style homes often feature corner boards, crown cornices, wide casing around windows and doors, and layered mouldings. Preserving these details while adding vinyl siding requires careful flashing integration so the trim remains watertight and visually authentic.
Key integration strategies:
- Remove and reinstall trim when practical: For authentic trim pieces, removing and reinstalling them after the WRB and flashing are applied allows installers to flash behind the trim and maintain a continuous drainage plane. When removal isn’t possible, mock-up flashing behind trim or installing a trim-compatible flashing return can help.
- Use concealed metal flashing under mouldings: Thin aluminum or copper flashing can be tucked behind wooden or PVC trim elements without being visible, protecting the joint between trim and siding.
- Maintain historic sightlines: Select vinyl profiles and starter placements that preserve historical reveals and shadow lines. That sometimes means using a custom-shaped starter or a recessed J-channel to avoid altering the visual proportions of a cornice or window surround.
- Create a drained cavity where paint-enclosed cavities exist: Many historic homes have layered cladding and small ventilation gaps. Adding thin furring strips and creating a drained cavity behind the vinyl siding helps water drain and allows the wall to dry to the exterior rather than holding moisture against old trim and sheathing.
When owners want to keep period corner boards or boxed eaves, a detail we often recommend is to install the whole-wall flashing and housewrap first, then reattach the trim to furring strips that bridge the drainage cavity. That also allows you to flash behind the trim with a self-adhered membrane and install a neat shadow gap so the trim reads correctly against the vinyl face.
Critical flashing placements and overlap rules
Flashing location and laps determine whether the system will shed water under real weather. On historic-style homes with complex geometry, these placements are especially important.
Essential placement areas:
- At all horizontal transitions: under window heads, at porch roofs, at the base of projecting bays, and under cornices.
- Along vertical transitions: where new siding abuts chimneys, masonry quoins, or an older clapboard return.
- At corners and returns: step-flashing detail or continuous corner flashing under corner boards.
- At the base of the wall: where foundation meets cladding and where the starter strip will anchor the first course.
Overlap rules the contractor should follow:
- Flashings should be lapped shingle-style: higher layers slipped over lower ones so water always runs over, not under, the seam.
- Window and door head flashings must be lapped into the WRB above and turned down a minimum recommended distance into the jamb assembly; side flashings should extend into sill pans or drainage cavities.
- Where self-adhered membrane meets metal flashing, the membrane should be continuous beneath the metal and extend beyond the metal termination to maintain adhesion and continuity.
On an older house with step-ups and cornices, installers should draw temporary lines and test-fit flashings to confirm each lap before fastening starter strips and siding. This is a small upfront time investment that prevents later water entry behind ornate trim or at concealed butt joints.
Inspection points before and during installation
Homeowners should use a simple checklist to confirm that the flashing and starter proposals address real moisture risks. When a contractor prepares a bid, ask for clear descriptions and, ideally, photos or a diagram showing the intended laps and terminations.
Pre-installation inspection items:
- Confirm the existing sheathing is sound. Whole-wall flashing is not a cure for rotten sheathing — replacing or repairing sheathing before flashing preserves the integrity of the drainage plane.
- Ask whether the proposed flashing system requires trim removal to ensure a continuous plane behind mouldings.
- Review where the housewrap or WRB will be lapped into window and door trim — temporary mock-ups or small sample sections can be enlightening.
During installation inspection items:
- Verify self-adhered membranes have good adhesion to the substrate and consistent laps (commonly 2–4 inches minimum per manufacturer instructions).
- Check that starter strips are level and that the first siding course sits plumb; crooked starters cause cumulative misalignment up the wall.
- Confirm terminations at the base are sloped or include a drip detail; discuss how the installer will route membrane to the foundation or a drainscreen to prevent water pooling.
- Ensure fastener placement allows siding to float (not overdriven) so thermal movement doesn’t stress flashings or seals.
Remember that an exterior inspection from the ground will miss many concealed laps. Rely on a contractor who documents the work during installation with photos of the WRB, membrane laps, and starter placement, or schedule a short mid-project walkthrough to see exposed layers before siding goes up.
Common installation mistakes and why they fail
A number of recurring installation errors lead to premature failures or concealed moisture paths. Understanding these helps you evaluate a bid and spot potential shortcuts during the project.
Frequent problems:
- Improper laps: Flashing laps installed the wrong way or with insufficient overlap allow wind-driven rain to work under the seam. The remedy is proper shingling of layers and adherence to manufacturer lap recommendations.
- Siding butted to trim without flashing: Where siding or starter strips butt against decorative trim without flashing behind, water trapped at the joint can saturate trim ends and sheathing. Best practice is to flash behind trim or use a backstop flashing so water drains outward.
- Starter installed over uneven substrate: An unlevel starter leads to misaligned courses and gaps at returns and corner trims. Leveling with furring or selecting an adjustable starter is a better approach.
- Failure to create a drained cavity: Installing vinyl directly over multiple paint layers or old clapboards without a drainage gap can trap moisture. A thin furring strip to create a drainage plane reduces rot risk and helps siding dry.
These mistakes are common because installers under schedule pressure sometimes skip time-consuming step flashings or don’t remove trim. Insist on details in writing and ask for references who had similar historic-style work completed.
Project sequencing and coordination with windows, doors and roofs
Flashing is not an isolated task—successful siding projects coordinate with window installations, door flashings, and roof-to-wall transitions. Poor sequencing leaves gaps that are hard to correct once siding is installed.
Typical sequencing for a comprehensive job:
- Replace or repair sheathing and trim as needed. Address rot and settle framing before installing WRB or flashing.
- Install WRB/housewrap across the wall. Tape seams and ensure continuity into window/door rough openings.
- Apply whole-wall self-adhered membrane or specified flashing at challenging intersections. Tie membrane into roof flashings and window head flashings.
- Install window and door flashings and sills. Confirm sill pans are integrated with the wall drainage plane.
- Mount furring strips where a drained cavity is used. This step sets the proper reveal for historic trim and siding returns.
- Fasten starter strips, J-channels, and then siding courses. Trim is reinstalled or fitted into flashings as a last exterior step.
Coordination with roofing is especially important at wall-to-roof intersections (dormers and eaves). Installers must ensure step or counter-flashing overlaps the wall membrane correctly, and that any gutter or soffit return does not trap water against the flashing terminations.
Material choices and long-term performance considerations
Materials for the flashing and starter impact longevity, movement tolerance, and compatibility with historic trim materials. Here are factors to weigh.
Self-adhered membrane vs. housewrap:
Self-adhered membranes perform well at transitions and can act as a continuous air and water barrier when properly applied; they adhere directly to sheathing even where existing paint remains. Housewraps provide a breathable WRB over larger areas and can be easier to inspect and repair, but they depend on proper taping and mechanical fastening. In many installations you’ll see both used together: housewrap over the main field with self-adhered at critical junctions.
Metal vs. vinyl starter:
Metal starters resist creep and deformation and offer formed drip details; vinyl starters are cost-effective and visually unobtrusive. For long runs or locations where siding meets masonry or concrete, metal starters paired with a drained membrane termination are robust choices.
Furring strips and cavity creation:
Thin pressure-treated furring creates a ventilated gap that helps walls dry and prevents direct contact between trim and vinyl. That small investment reduces the chance of trapped moisture and extends both trim and siding life.
Compatibility with historic trim: When wood mouldings are preserved, choose fasteners and trim attachment systems that avoid penetrating the whole-wall membrane unnecessarily. Use blocking and furring to support trim while preserving the drainage plane behind it.
Questions to ask your contractor for an East Bridgewater job
Use this checklist to compare bids and avoid misunderstandings. A qualified contractor should answer these clearly and not treat them as bargaining chips.
- What whole-wall flashing system are you proposing? Ask whether it’s self-adhered membrane, a layered WRB approach, or a composite system, and why that choice suits this house.
- Will you remove and reinstall existing trim? If preserving historic mouldings is important to you, confirm whether removal is required and how the trim will be flashed and reattached.
- How will the starter strip tie into the flashing and foundation termination? Request details and a diagram showing how the drainage plane exits at the base of the wall.
- Are you creating a drained cavity? If so, what thickness of furring and how will trim be attached?
- Can you show example photos of similar historic-style projects you’ve completed? Ask to see a gallery of comparable details—this helps you visualize the outcome. You can browse our siding project gallery for examples of details and finishes.
- How will window, door and roof intersections be flashed and tested for continuity? Expect a clear description of sequencing and inspection photos on request.
- What fasteners and movement allowances will you use for the vinyl siding? Fasteners should allow the siding to float; overdriven nails or screws negate design movement and can stress flashings.
- Will you document the exposed WRB and flashing layers during installation? If you want photos or brief on-site checks while the membrane is exposed, confirm that in advance.
When reviewing bids, look for written detail rather than a one-line “install flashing” entry. A good bid spells out materials, approximate laps, and whether trim removal is included.
Next steps for homeowners in East Bridgewater
If you’re planning an update, start with a focused assessment: inspect visible trim and sheathing soft spots, note intersecting roof lines, and bring a set of photos to contractor visits. Ask prospective contractors to walk the elevation with you and point out where they will place whole-wall flashing and which starter strip they recommend.
Suggested approach:
- Request a condition assessment rather than an immediate full replacement estimate. That lets you understand trouble spots and prioritize work without unnecessary replacement.
- Compare at least two proposals that describe flashing details and starter choices in writing, and include the option to create a drained cavity where beneficial.
- Ask for references or gallery images of similar historic-style projects. Use the visual evidence to confirm the contractor’s experience with trim-sensitive installs.
- When you’re ready, request a written scope that includes removal/reinstallation of trim (if required), WRB and whole-wall membrane specification, starter type, and photo documentation during the exposed phase.
For more on hiring and what to expect from an exterior siding contractor in Southeastern Massachusetts, review our main siding contractor resource. If you are in East Bridgewater and want a town-specific discussion about your house, our team covers local projects and conditions—see the East Bridgewater page linked earlier for details on local service areas.
FAQ
Q: Do I always need whole-wall flashing when installing vinyl siding on a historic house?
A: Not always. The decision depends on wall condition, complexity of trim and transitions, and previous moisture history. Whole-wall flashing is strongly recommended where the wall has complex intersections, active water entry history, or where you plan to preserve ornate trim that would trap moisture. A qualified contractor should evaluate the wall and recommend whether a continuous membrane, targeted flashings, or a combination is most appropriate.
Q: Which starter strip is best if I want to preserve a deep historic baseboard and cornice lines?
A: In those cases, a metal starter or a custom-formed starter with a recessed profile is often better because it provides a firm, low-profile termination that can be shaped to maintain historic sightlines. Combining that with furring to set the siding plane and flashing tucked behind the baseboard preserves the visual detail while ensuring a proper drainage path.
Q: How can I confirm the contractor properly lapped flashings at windows and roof intersections?
A: Ask for a pre-siding walkthrough when the WRB and flashings are exposed, or request progress photos showing the head, jamb, and sill flashings with their laps. The laps should be shingled (top layers over lower layers), and window head flashings should be integrated with the WRB above. If you’re uncomfortable inspecting yourself, ask the contractor to explain the laps and how water will be routed to the exterior.
Have questions about your home’s exterior? Boss Services, Inc. can help you consider the next step. Contact our team, call 508-297-0635, or email bossservicesinc@comcast.net.