
Detailing siding and trim to resist wind-driven rain at outside corners: a Foxboro, MA builder’s checklist
Many Foxboro homeowners ask, “my corner trims get water driven in during storms—how should the siding be detailed to stop this?” This article focuses on that exact concern. We explain why outside corners are especially vulnerable to wind-driven rain, review practical detailing options—corner trim profiles, furring, integrated flashings, and taped joints—and provide a contractor-focused checklist you can use to evaluate proposals for robustness in high-exposure conditions. The guidance is for homeowners in Foxboro and nearby Southeastern Massachusetts considering repairs, replacements, or specification checks for siding and trim work.
why outside corners are vulnerable
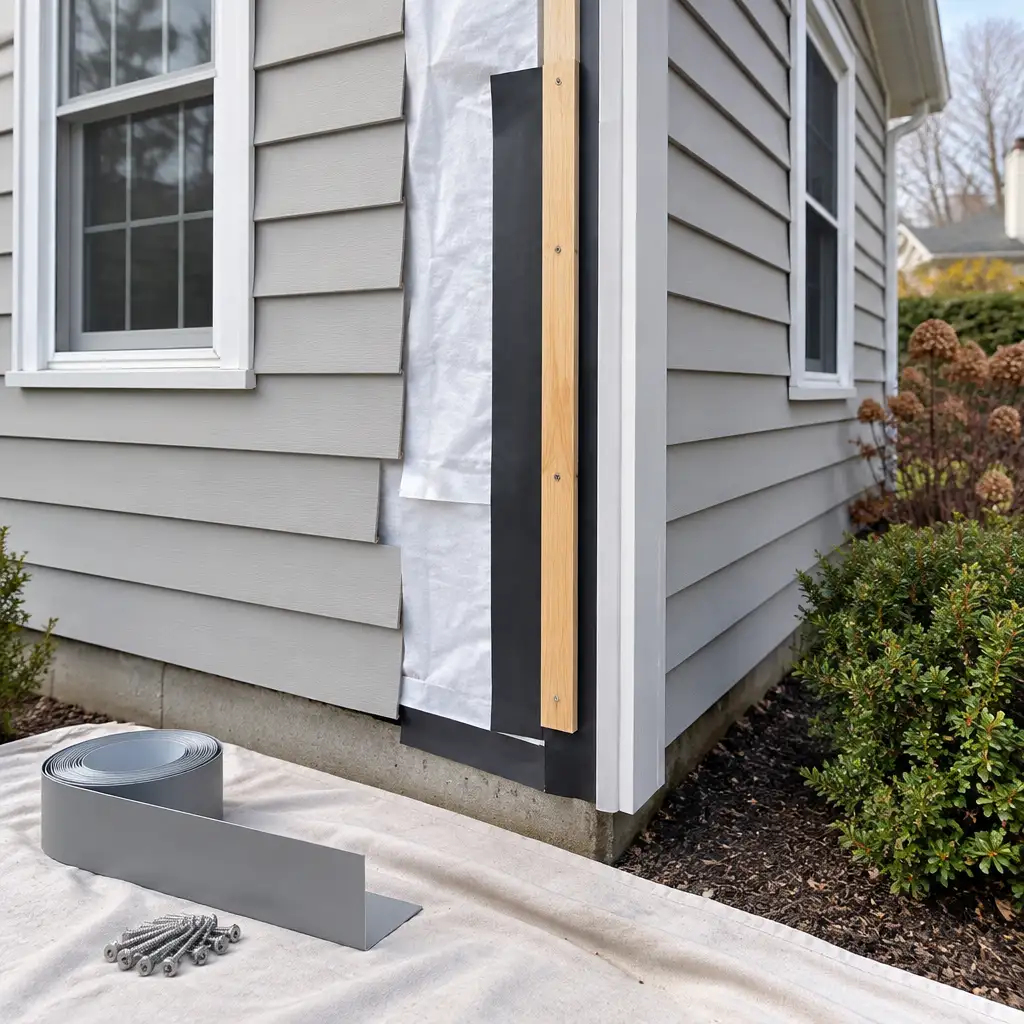
Outside corners concentrate several factors that increase the risk of wind-driven rain intrusion:
- Geometry and flow concentration. Wind-driven rain follows airflow; corners create accelerated, turbulent airflow that drives water into narrow vertical junctions where siding, trim, and flashing meet.
- Vertical laps and seams. Siding courses, corner trims, and vertical butt joints create vertical paths where water can migrate downward or be wicked inward if not properly sealed and drained.
- Pressure differentials. Fast-moving wind near corners reduces exterior pressure locally and can force water through gaps and under sealing materials that might otherwise hold under normal rain.
- Sequence of trades and finishes. Corners are often finished late in the siding sequence; mistakes or shortcuts (insufficient flashings, poor fastening) can go unnoticed until a storm reveals them.
In Foxboro’s spring and storm seasons, these factors combine with frequent gusts and shifting storm angles. The result is that even small detailing gaps at an outside corner can become repeat leak sources unless the detail intentionally manages both bulk water and incidental moisture.
common failure modes observed at corners
Understanding how corners fail helps you evaluate proposals and site work. The common modes include:
- Lack of continuous flashing behind trim. Trim backed against sheathing without a vertical flashing or membrane creates a path for water to bypass the siding lap and reach sheathing.
- Siding pulled tight against trim without a drainage gap. When siding sits flush against trim with no air gap, water driven into the seam can bridge into the wall rather than draining to the face.
- Butt-joints exposed to direct spray. Vertical butt joints in engineered siding materials or unsealed trim ends can wick moisture into the wall cavity.
- Improperly lapped housewrap or misaligned flashing tape. Housewrap laps and flashing tapes that terminate on the face of trim or are left discontinuous at corners will not divert water around the corner.
- Fastener rust and movement. Corroded or wrongly sized fasteners can loosen trim over time, opening gaps where wind-driven rain penetrates.
- Sill and foundation interface failures. Water that tracks vertically down a corner can enter at the foundation or at window and door corners if not intercepted.
Each failure mode points to a different remediation or specification: improved flashing, increased ventilation, revised trim profiles, or combined systems that reject and drain water away from the wall assembly.
detailing options overview
Contractors generally use a combination of the following strategies at outside corners to resist wind-driven rain. No single tactic is universally correct; proper protection depends on material, substrate condition, exposure, and how the corner integrates with adjacent openings and rooflines.
- corner trim profiles that shed and keep seams away from direct spray
- furring and drained cavities to create a pressure-equalized and ventilated space behind cladding
- integrated flashings—metal or self-adhered membranes—installed continuous behind trim and lapped into the WRB (weather-resistive barrier)
- taped joints and seam treatment to seal weaknesses where two materials meet
Below we look at each option and practical installation considerations for Foxboro homes.
corner trim profiles: pros and cons
Corner trim is often the homeowner-visible piece of the puzzle. Different profiles influence how water is shed and how easy it is to flash behind the trim.
full-width corner boards (traditional corner boards)
Traditional corner boards—continuous wood or composite boards that cover the siding edge—are visually familiar and straightforward to install. Their effectiveness depends on the backing and flashing strategy:
- Pros: simple aesthetic, easy to replace individual boards, compatible with multiple siding types.
- Cons: if installed tight to the siding and sheathing without a vertical flashing or gap, they can trap sprayed water and allow it to enter at the trim-to-sheathing seam.
- Installation note: always provide an accessible flashing plane behind the corner board—either a metal L-flashing or a self-adhered vertical membrane continuous with the housewrap.
interlocking manufactured corner pieces (vinyl or engineered trim)
Prefabricated corner pieces for vinyl or engineered siding often conceal the siding edge and provide a mechanical interlock. Their success varies with fit and sealing:
- Pros: aesthetic uniformity, quick install, fewer exposed fasteners.
- Cons: many depend on precise siding locking and can leave a narrow vertical cavity that traps driven rain if there’s no drainage path.
- Installation note: add a thin back-priming flashing or apply a vertical face seal inside the pocket before installing the manufactured corner to prevent water migration behind the cladding.
projecting return profiles (drip and deflection trim)
Trims with projecting returns (small overhangs or drip lips) deflect direct splash and encourage water to fall clear of the joint. They’re particularly useful where roof or deck spray is a factor.
- Pros: passive shedding reduces the amount of water reaching the vertical seam.
- Cons: returns must be detailed with flashings behind them to avoid creating a concealed cavity that fills slowly and drains poorly.
- Installation note: pair a return profile with a continuous vertical flashing lapped into the WRB and fasten using stainless or hot-dip galvanized fasteners into a structural substrate.
recommended acceptance criteria for trim selection
- Trim profile that creates a minimum 3/16″ to 1/4″ deflection or reveal between siding edge and trim face to reduce face-driven water contact.
- Visible access for a vertical flashing to be installed behind the trim at the time of installation.
- Fasteners selected for exterior exposure (stainless or hot-dip galvanized) and installed so heads are set but not overly countersunk.
furring and back-ventilation strategies
Creating a drained and ventilated cavity behind cladding is one of the most effective ways to manage incidental moisture and equalize pressure so wind-driven rain is less likely to be sucked through seams.
why a drained cavity helps
A small air gap (typically 3/16″ to 3/8″ or greater, depending on product) behind siding does three things:
- provides a space for water that does penetrate to run down to a flashing and exit point rather than entering the sheathing;
- reduces capillary bridging between cladding and sheathing, preventing wicking;
- helps equalize air pressure behind the cladding, reducing the suction that pushes rainwater through small openings.
practical furring options
Options include rigid furring strips, integrated rainscreen channels built into underlayments, or proprietary rainscreen products. For retrofits, thin vertical furring strips (e.g., 1×3 or 1×2 treated and shimmed) are commonly used to create the gap while keeping the build-up modest so trim and window returns remain compatible.
installation details to watch
- Fastener lengths must account for the added furring depth—screws should penetrate framing by an acceptable length without splitting the furring or wall sheathing.
- Drip edges and bottom termination details must include weep points or scuppers so any accumulated water can exit the cavity at grade or a sill flashing.
- Ventilation openings at tops and bottoms of bays should be unobtrusive but continuous so the void can dry naturally.
integrated flashings and pan systems
Flashing is the line of defense that intercepts water before it reaches sheathing. At outside corners, the goal is to install a continuous waterproof plane that carries water away from the corner and integrates into the housewrap or WRB.
metal L-flashing vs self-adhered membrane
Two common choices are formed metal L-flashing and self-adhered membrane flashing. Each has advantages:
- Metal L-flashing—durable and visible, good for traditional trim. It must be lapped correctly over the WRB and terminated into the wall cavity where possible. Soldering is not typical; lap sealants and mechanical termination are used.
- Self-adhered membrane—provides continuous adhesion to sheathing and can be wrapped and lapped into the WRB to form a monolithic plane. It conforms well to irregular substrates and provides a strong seal at exposed verticals when installed with proper pressure and temperature precautions.
critical laps and terminations
For either approach, pay attention to:
- vertical laps must be shingled with weather-resistive barrier laps (overlap from top to bottom) so water always sheds outward;
- intersections with windows, doors, and rooflines must be integrated—flashing that stops at the corner face but is not lapped into adjacent flashings invites leaks;
- fastener penetrations through membrane flashings must be sealed or placed outside the active drainage plane; where fasteners are necessary, use compatible washers and sealants.
corner pan concept
At highly exposed corners, contractors sometimes form a vertical pan flashing—an internal vertical channel under the corner trim that collects water and drains it to the sill or lowest termination point. When done correctly (self-adhered pan wrapped into WRB with an overflow path), this approach is robust because it intentionally accepts water and directs it out of the assembly.
taped joints and seam treatment
Tape is a modern, cost-effective way to seal vulnerable seams, but it’s not a universal cure. Properly selected and installed tape can provide reliable protection at manufactured trim joints, butt seams, and at the interface between trim and siding.
what tape does well
- It creates a simple secondary barrier where mechanical interlocks or shiplaps may leave narrow gaps.
- When lapped correctly over the WRB and behind trim, it prevents water from following the face plane into the sheathing.
limits and installation cautions
- Tape performance depends on substrate cleanliness, temperature during installation, and correct lap geometry. Improper adhesion or edge lifts are common failure points.
- Tape should be compatible with adjacent materials (vinyl, metal, wood, composite). Some tapes react chemically with certain plastics or touch poorly to aged painted surfaces.
- Use tape as part of a layered approach: taped seams plus vertical flashing plus a drained cavity provide resilience in severe exposure.
contractor-focused acceptance checklist
The following checklist is written for homeowners to use when reviewing contractor proposals or inspecting work in progress. It emphasises specific, verifiable items rather than vague promises. Use it to compare bids and to make final acceptance decisions after installation.
pre-installation items to require in the proposal
- Proof that the contractor will remove and inspect existing corner sheathing where visible rot, staining, or suspicious seams exist; proposals should note remediation steps if sheathing replacement is needed.
- Specification of the wall WRB (housewrap brand/type) and how all corner flashings will tie into it; require the WRB to be continuous and lapped in shingled fashion at corners.
- Clear statement of the flashing approach at outside corners: metal L-flashing, self-adhered membrane, or vertical pan system, including material types and thicknesses.
- Detail drawings or written descriptions showing how the corner flashing ties to adjacent window/door flashings and to the foundation/soffit terminations.
- Confirmation of fastener types, lengths, and corrosion resistance for both trim and siding (stainless or hot-dip galvanized where appropriate).
- Statement on whether a drained cavity or furring will be installed behind siding at corners; if yes, specify gap depth and ventilation points.
installation checkpoints you can verify visually
During work or at practical inspection points, request the contractor expose or show the following details before cover-up. These are short, objective checks:
- Visible continuous vertical flashing behind the corner trim before the trim is fully seated; the flashing should be lapped into the WRB by at least 2″ and the WRB should overlap the flashing when forming the drainage plane.
- Housewrap or WRB seams at corners should be shingled (upper piece lapped over lower) to shed water outward, not toward the seam.
- Where self-adhered membrane is used, it should be firmly adhered with no fishmouths, wrinkles at critical laps, and pressure-rolled into place; temperature limits for adhesion should have been respected.
- Siding termination: siding edge should not be tight to trim with no gap. There should be a small reveal or a back-blocking/furring strip to create a drainage path behind the siding edge.
- Fasteners should be set flush and not overdriven; visible screw/ nail heads should match the specified corrosion-resistant type.
- Sill and foundation termination at the bottom of the corner should show a continuous sill pan, scupper, or weep that provides an obvious exit path for water collected in the cavity.
post-installation acceptance tests
After installation, you can ask the contractor to demonstrate the corner detail without staging a destructive test. Reasonable verifications include:
- Visual confirmation that vertical flashings are continuous behind trim all the way to the lowest termination and are lapped into the WRB.
- If a drained cavity was specified, check the presence of ventilation openings and visible weep/weep-screen at the bottom termination (these can be discreet but should be present).
- Check for proper integration at adjacent windows and doors—flashing tapes or membranes should be visible and lapped correctly at corners where those elements intersect.
- Request documentation or photos of concealed work taken by the contractor before full closure—many professional crews photograph critical flashings and wall details as part of quality assurance.
acceptance language to include in the contract
To avoid disputes, include a short acceptance clause that ties visible performance to the scope:
“Acceptance will require demonstration of continuous corner flashing installed behind trim and lapped into the WRB, use of specified corrosion-resistant fasteners, and provision of drainage/weep termination at the cavity bottom. Concealed work will be photographed and provided to the homeowner prior to final cover-up.”
repair vs. replacement: making the call
Deciding between repair and full replacement is a common dilemma. The right choice depends on the extent of damage, the existing assembly, and long-term risk appetite.
when repair is reasonable
- Localized rot or staining limited to a small corner area where sheathing and trim replacement can be isolated and flashed properly.
- Where the existing siding and WRB are in generally good condition and the failure is clearly linked to a missing or improperly installed corner flashing that can be corrected.
- When homeowners prefer to preserve existing materials for aesthetic reasons and the repaired detail will meet the layered protection standards discussed earlier.
when replacement is the safer choice
- Widespread soft or delaminated sheathing, multiple stain lines, or patterns that suggest water has traveled behind siding over several courses.
- When the current WRB or underlying systems are aged, compromised, or unknown—replacement gives the opportunity to install up-to-date membranes, flashing, and a drained cavity.
- If the projected longevity of the repair is short relative to expected remaining service life of adjacent materials, replacement may be more cost-effective in the long run.
how we evaluate scope without needless replacement
We assess moisture content with meters, remove limited panels to inspect sheathing, and trace stains to identify the source path. Sometimes a targeted replacement of corner sheathing, a new vertical flashing, and a revised trim profile resolves the issue without replacing entire walls. Where the wall assembly is broadly suspect, we recommend staged replacement that prioritizes the most exposed corners first.
sequencing and interface with windows, doors, and roofs
Corner detailing does not exist in isolation. Proper sequencing ensures that flashings at windows, roofs, and other abutting elements are integrated with corner flashings to form an uninterrupted drainage plane.
key interface rules
- Top-to-bottom shingling: always lap upper WRB and flashing materials over lower materials so water sheds outward.
- Window and door flashings should be installed before final corner trim closure so corner flashing can be lapped over them where they meet.
- Where a roof eave or dormer meets an outside corner on a gable, flashing should be continuous and accounted for in the detail drawings so no gaps appear where horizontal and vertical flashings cross.
common contractor sequencing errors to watch
Watch for these issues in proposals and on-site:
- Installing corner trim before window flashing is fully integrated, forcing later crews to terminate flashings at the face rather than behind the trim.
- Applying siding J-channels over unsealed WRB edges at corners rather than lapping WRB into the corner flashing first.
- Failing to coordinate fastener selections when adding furring—shorter nails intended for siding only may not hold through the added backing into framing.
pricing and scope drivers
Several factors influence project quotes for robust corner detailing; these are useful for homeowners to understand when comparing bids.
exposure and building geometry
Taller homes, open exposures to prevailing winds, and multiple outside corners or complex intersections raise material and labor costs because they require more flashing material, greater access considerations, and careful sequencing.
condition of existing sheathing and WRB
If sheathing is sound and the housewrap is continuous, corrective work focuses on flashings and trim. If sheathing or WRB needs replacement, costs rise due to demo, sheathing replacement, and resealing of adjacent penetrations.
choice of materials and finish
Self-adhered membranes, high-quality metal flashings, and proprietary rainscreen systems cost more initially but reduce long-term risk. Trim materials—painted wood, composite, PVC—have different lifecycle costs and installation tolerances that affect price.
access and staging
Scaffolding, safe access on higher elevations, and any protective measures for landscaping increase labor time and costs. Projects requiring careful preservation of historic trim or finishes require additional craftsmanship.
testing and verification on-site
After installation, reasonable verification can increase homeowner confidence without destructive testing:
- Visual verification—confirm that flashings are continuous, WRB laps are correct, and weeps/weep screens are present.
- Photographic documentation—request photos of concealed steps taken prior to full cover-up; many contractors provide these as part of quality control.
- Targeted water testing—in some cases, contractors will perform localized water testing (controlled spray) at a repaired corner to show how water is shed. This should be modest and not used to simulate full-storm conditions.
Remember: no small-scale test perfectly replicates a violent storm, but these checks demonstrate workmanship and correct layer integration.
next steps for Foxboro homeowners
If your corner trims are letting in water during storms, use this practical sequence:
- Document the problem: take photos showing leak stains, timing, and the corner location during and after storms. Note which storms produce the issue (wind direction matters).
- Request a moisture assessment: hire a qualified siding/ exterior contractor to inspect sheathing and WRB; avoid asking for a guess over the phone without some visual review.
- Ask for a work scope that follows the checklist above: continuous vertical flashing lapped into WRB, drained cavity if practical for your siding type, corrosion-resistant fasteners, and integration with adjacent window/door flashings.
- Compare proposals on the basis of specified materials and the documented flashing detail rather than price alone. Require photographic proof of concealed work where practical.
- Schedule during drier months if possible for installation of self-adhered membranes (adhesion is temperature-sensitive), but don’t delay emergency repairs where active leaks threaten structural materials.
For specific installation examples and to see how professional siding projects are finished, browse our siding work in the project gallery: Siding project gallery. To learn about our siding services and evaluation approach, see the main siding page: Siding repair, replacement and installation. If you are in Foxboro and want a local assessment, visit our town page for details about service in your area: Foxboro.
frequently asked questions
Q: How can I tell if water is entering at the corner or from somewhere else nearby?
A: Trace staining patterns and timing. Water driven in at a corner often creates vertical stain lines down sheathing or around adjacent window sills and is most noticeable during high-wind storms. A qualified contractor will remove limited siding sections to confirm the source and will use a moisture meter to check sheathing and framing.
Q: Will installing a larger corner trim board fix the problem?
A: Not by itself. A larger trim may change the path of splash water, but without a continuous flashing and a way for any intercepted water to drain, the larger trim can create a concealed trap. Effective solutions combine an appropriate trim profile with flashing, drainage, and correct WRB integration.
Q: Should I require a drained cavity at every corner on my house?
A: A drained cavity is a very effective measure, especially on exposed elevations, but it may not be necessary at every corner depending on siding type and overall exposure. Ask your contractor to specify where a rainscreen or furring will be installed and why—priority is typically given to the most exposed sides and complex intersections where wind-driven spray is highest.
legal disclaimer text
Have questions about your home’s exterior? Boss Services, Inc. can help you consider the next step. Contact our team, call 508-297-0635, or email bossservicesinc@comcast.net.