
Integrating new vinyl siding with existing stone or brick accents: flashing, reveals, and finish details for Bridgewater, MA homes
Many Bridgewater homeowners ask a practical question: how will new vinyl siding work around my existing stone or brick accents? The short answer is that vinyl siding can be integrated cleanly and durably with masonry, but the success of that integration depends on careful detailing around flashing, reveals, mortar joints, and the building’s drainage plane. This article explains the common issues you’ll encounter, the detailing we recommend, trade coordination to anticipate, and the visual choices that help old masonry and new siding look like they belong together without compromising the wall system.
why detailing matters
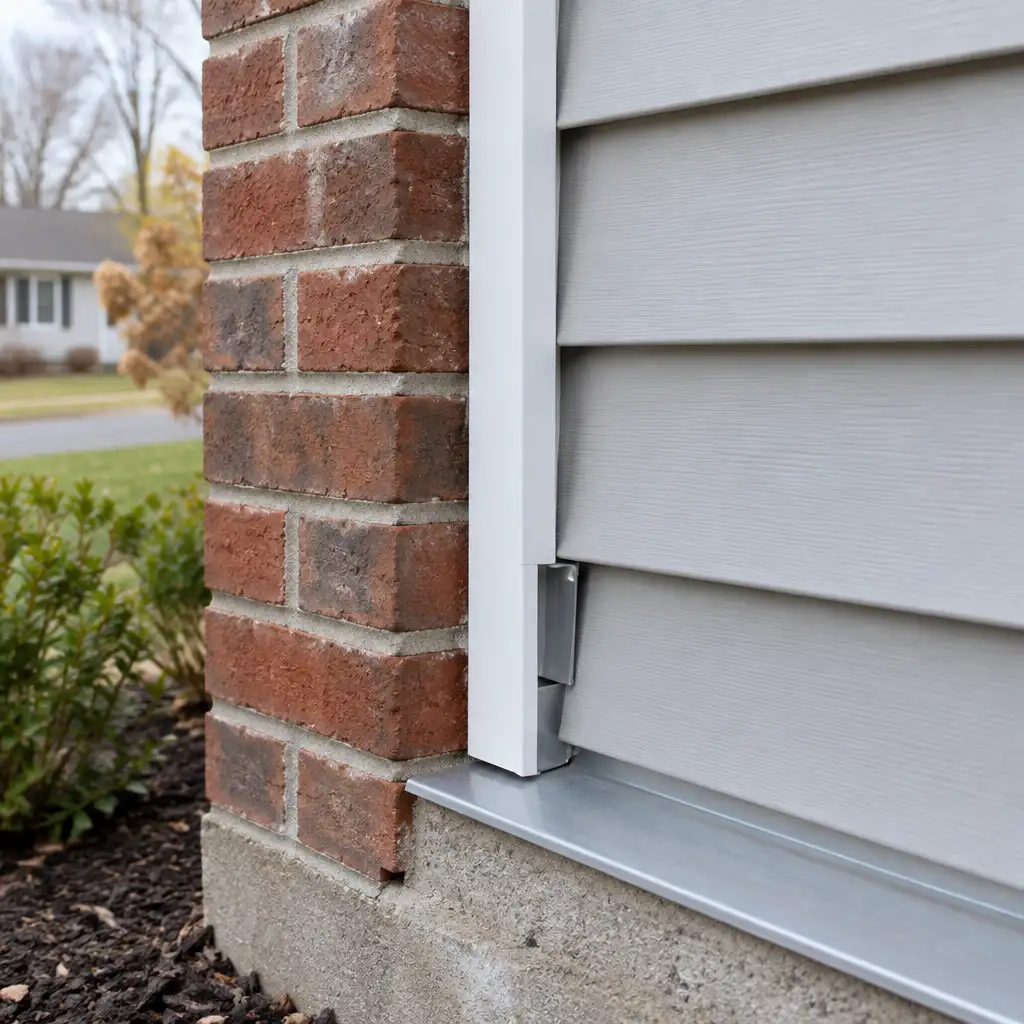
When you replace siding adjacent to stone or brick accents, the key issues are moisture control and differential movement. Brick and natural stone are porous and respond differently to temperature and moisture than vinyl siding. If they’re not integrated correctly, you risk trapped water, accelerated mortar deterioration, staining, or compromised insulation performance. Beyond technical risks, poor detailing creates visible gaps, uneven reveals, and mismatched sight lines that undermine the appearance of both materials.
For Bridgewater homes, New England freeze-thaw cycles, wind-driven rain, and seasonal humidity swings make these details more important than in milder climates. A contractor evaluating your project should be thinking in terms of a continuous drainage plane: make sure water that gets behind the siding or masonry has a clear, directed path out of the wall instead of into concealed assemblies.
initial inspection and what to look for
Before any material is removed, a careful inspection sets the right scope. Typical inspection items include:
- Condition of mortar and brick/stone: look for loose bricks, crumbling mortar, efflorescence (white powder), or displaced stones.
- Existing flashing details: are there visible step flashings, cap flashings, or is the connection improvised with caulk?
- Sheathing and WRB condition behind the siding (if accessible): water stains, soft sheathing, or mould indicate previous moisture migration.
- Window and door interfaces near masonry accents: misaligned trim can create multiple small leaks.
- Roof-to-wall and foundation interfaces near the masonry: these control the majority of water flow around a wall.
We recommend documenting these observations with photos and notes. If mortar or brick problems are present, a mason or qualified contractor should assess whether tuckpointing or partial rebuilding is needed before siding work begins.
understanding material interfaces: masonry vs vinyl
To plan details, understand how each material behaves:
- Brick and stone are heavy, stiff, and porous. They can absorb and transmit moisture; mortar joints are a common path for water. Masonry movement is typically minor but can occur at control joints, corners, or where supporting substrates shift.
- Vinyl siding is lightweight, flexible, and installed in interlocking horizontal courses. It expands and contracts with temperature; fastening slots allow movement. Because vinyl is non-absorbent, water that reaches the interface must drain away instead of soaking into the siding.
These differences mean designers must provide a transition that respects masonry’s mass and porosity while preserving vinyl’s need for a ventilated drainage plane and allowance for thermal movement.
flashing techniques for masonry-to-vinyl interfaces
Flashing is the technical backbone of a reliable siding-to-brick integration. The goal is to create a continuous, well-drained path that prevents water from entering concealed framing. Below are the common flashing types and how we use them at the masonry interface.
step flashing where siding abuts a masonry return
When siding runs up against a vertical brick or stone return (for example, a brick chimney or a stone corner), step flashing is typically fitted course-by-course between the siding and masonry. Each flashing piece is slipped behind the siding course and lapped over the course below, directing water down to the next flashing and ultimately to the weep screed or a termination point.
Key installation points:
- Use corrosion-resistant metal (galvanized or stainless) sized appropriately for the lap of the siding and the masonry setback.
- Soldering is rarely needed; the water path is created by overlapping pieces carefully.
- A shingle-style approach—flashing overlapped in a downhill sequence—prevents water from tracking back into the wall.
through-wall and head flashing
Where the siding meets the top of a brick veneer or a stone cap, through-wall flashing or head flashings should be installed behind the veneer or at the mortar bed to collect moisture and guide it outside through weep holes. When accessible, these flashings serve as a last line of defense behind the masonry.
At the siding junction, a counter-flashing or cap flashing can be used: a metal L-profile turns the water away from the masonry face and onto the siding’s drainage plane. The counter-flash also protects the top edge of siding trim pieces from direct saturation.
z-flashing and drips for horizontal transitions
Horizontal transitions—where a band of stone or brick meets siding along a course—often use Z-flashing or a purpose-made interlock profile. A Z-flash is set into a mortar joint or under a cap and provides a drip edge that prevents water from running back onto the siding. For vinyl siding, ensure the top edge of the siding course can accommodate a Z-flash without binding the siding’s movement.
terminations and backdam detail
Where the masonry ends and siding begins, a termination detail with a backdam reduces the chance of capillary wicking. A small upward leg (backdam) formed in the flashing and backed with a compatible sealant keeps water from tracking behind flashing into the sheathing. Avoid relying solely on caulk; use mechanical flashing plus a sealant for redundancy.
considerations for mortar-socketed flashings
If flashings are to be tucked into mortar joints, the joint must be reconstructed or raked with a consistent depth to accept the metal. Improperly seated flashings will be bypassed by water, so this is a point where mason and siding trades must coordinate the work sequence.
reveals, trim, and finish details
Reveals and trim define the visual junction between masonry and siding. They also protect vulnerable edges. Typical approaches include:
- Trimboard or J-channel margin: a rigid trimboard can be installed against the masonry to provide a plumb surface for siding J-channel to lock into. This hides minor irregularities in the masonry edge and creates a consistent reveal line.
- Flush reveal using cellular PVC or composite trim: where you want the siding to sit nearly flush with the brick face, a shaped PVC reveal can provide an engineered, stable edge that resists rot better than wood in wet conditions.
- Shadow lines and offsets: small offsets (1/4″–3/4″) or shadow gaps can make transitions appear intentional rather than patched. These details help mask small depth differences between masonry and siding planes.
When designing reveals, consider how the siding’s expansion will move against the trim. Use slotted nails, compressible backer, or flexible gaskets in the J-channel to allow movement without visible gaps or buckling.
managing mortar and joints
Mortar joints are the weak point of a masonry-to-siding interface. They permit water entry and are prone to cracking on older walls. Before siding installation, address the following:
- Tuckpointing or repointing: replace deteriorated joints to restore the mortar’s weather-resistance and provide a clean bed for flashings and terminations.
- Weep holes and venting: brick veneer walls are usually built with a cavity and weep holes at the base. Make sure these weeps are clear so collected water can exit. Where masonry accents sit above grade or along a band, add discreet weep outlets where appropriate.
- Sealants and movement joints: use a high-quality, paintable exterior sealant that’s compatible with both masonry and the vinyl trim substrate. Reserve sealant for small gaps and movement joints; do not use it as a substitute for flashing or mechanical terminations.
When mortar rehabilitation is necessary, schedule it before siding is removed or installed. The time for masonry work is usually at the start of the project so that final flashings and trim can be set to the finished masonry surface.
moisture management and the continuous drainage plane
Integrating siding and masonry must protect the wall’s drainage plane. That means installing a weather-resistive barrier (WRB) and managing how water moves across or behind different materials.
wrb and overlap coordination
Vinyl siding typically installs over housewrap or another WRB. When adjacent to masonry, the WRB should be terminated under the masonry flashing or lapped over the flashing in a way that preserves the downward flow of water. In other words, keep the WRB shingle-lapped so water running on the masonry surface flows outside the WRB, not behind it.
weep screed and lower-terminals
At the base of the siding run where masonry meets foundation or where a brick band ends, install a weep screed or similar termination that provides an exit for water and protects the edge of the vinyl. For framed walls behind masonry, the sill and bottom flashing must be sloped and drained to the exterior.
drainage plane continuity across materials
Imagine the wall as a single plane: any transition between materials is an opportunity for water to cross that plane. The housewrap, flashings, weep holes, and siding termination must all be planned so that water travels downhill and outward, not sideways into wall cavities.
installation sequence and coordination
Trades coordination is critical. Here is a typical recommended sequence for a siding replacement project that ties into existing masonry details:
- Pre-construction inspection and documentation; identify mortar or veneer repairs required.
- Masonry repairs and repointing where necessary; allow mortar to cure per mason’s recommendations.
- Install or repair through-wall flashing and any embedded metal flashings in mortar beds.
- Install WRB and flashing at the siding plane, lapping properly to masonry flashings.
- Fit J-channels, trimboards, and any reveal details against the finished masonry face.
- Install vinyl siding courses with step and head flashings integrated as the siding progresses upward.
- Final sealants at small gaps, inspect weeps and terminations, and perform a water test where practical.
This order prevents rework and reduces the risk of sealed-in moisture. Communication between the mason and siding crews about flashing heights, mortar joint depths, and trim placement is essential.
aesthetic choices: blending old masonry and new siding
Beyond weatherproofing, homeowners care about how the new siding complements existing brick or stone accents. Consider these approaches:
- Colour coordination: pick siding and trim colours that either complement or deliberately contrast the masonry. Warm brick tones pair well with neutral siding palettes; a dark trim can frame both materials attractively.
- Proportion and reveal alignment: align horizontal siding courses with masonry coursing or window sills to create visual continuity. Deliberate alignment looks intentional; small mismatches do not.
- Material echoing: use accessories—like a narrow band of composite or stone veneer—at a height to echo the masonry band and visually tie the two materials together.
- Texture and shadow: choose siding profiles that read well next to rough masonry. A clapboard or double 4″ profile provides a subtle shadow that won’t compete with textured stone.
Photographs of the existing elevation help a contractor propose details that respect the house’s architecture. While full matching is rarely possible, thoughtful reveals and trim can make additions look cohesive.
planning questions and a homeowner decision checklist
Before you commit, use this checklist when discussing the project with a contractor. These questions help uncover hidden issues and ensure you understand the tradeoffs.
- Has the mortar and masonry been recently inspected, and are any tuckpointing or stone repairs required before siding work?
- What flashing materials and profiles will you use at the masonry junctions, and can we see mock-up details?
- How will the WRB be lapped where it meets masonry flashings? Can the contractor show a continuous drainage path on a drawing?
- Where will trim and J-channels terminate, and how will they accommodate siding movement?
- Will any masonry be removed or rebuilt to accept properly seated flashing, and which trade is responsible?
- If the masonry is a structural veneer or a chimney, do any additional clearances or supports need to be considered?
- How will we handle mortar color and joint profiles if partial repointing is necessary to accept flashings?
- Can the contractor provide examples in a gallery or show previous projects with similar details?
These are practical items; they are not intended to be exhaustive. A contractor experienced in vinyl siding and masonry interfaces should be able to walk you through a detail drawing and propose a sequencing plan that minimizes risk.
maintenance and long-term inspection
Once the job is complete, simple inspections every 12–24 months catch developing problems early. Key items to check include:
- Clear and unobstructed weep holes and drainage paths at masonry bases and band courses.
- Sealant condition at movement joints—look for cracking or adhesive failure.
- Any staining or efflorescence on masonry that could signal redirected water.
- Vinyl siding attachment: ensure siding remains free to move and is not bound by paint or excessive caulk.
- Trimboards or exposed wood: check for rot where trim meets masonry and replace with rot-resistant materials if decay starts.
Because masonry can hide slow leaks, take action at the first sign of discoloration or mortar softening. A timely minor tuckpointing job or re-seating a flashing costs far less than repairing sheathing or structural framing damaged by long-term moisture intrusion.
conclusion and next steps
Integrating new vinyl siding with existing stone or brick accents on a Bridgewater home is a practical, achievable project when you follow a few core principles: establish a continuous drainage plane, use properly lapped flashing and terminations, preserve the siding’s need for movement, repair masonry before final trim placement, and coordinate trades to follow a clear work sequence. Careful reveals and trim choices let you blend old and new materials without creating visible seams or moisture traps.
If you’re planning a siding replacement project around masonry accents, gather photographs of the elevation and note any obvious mortar damage or staining. Bring those to a consultation so your contractor can assess whether tuckpointing, flashing upgrades, or additional details are needed before siding begins.
When you’re ready to explore options or arrange an on-site evaluation, we can help you review the detailing options and provide a recommended sequence for the work that protects your home’s wall system while achieving the look you want.
To learn more about our siding services or to view examples, see our siding repair, replacement and installation page and browse the siding project gallery. For Bridgewater-specific information, visit our town page at Bridgewater.
frequently asked questions
Q: Will adding siding next to brick force me to replace the brick or stone?
A: Not necessarily. If the brick or stone is sound and mortar joints are intact, proper flashing and trim can integrate the new siding without replacing the masonry. If mortar is deteriorated or bricks are loose, targeted tuckpointing or partial repair is advisable before siding work begins.
Q: Can I just caulk the gap between siding and masonry?
A: Caulk alone is not a durable long-term solution. Sealant can be part of a termination detail, but mechanical flashings, properly seated trim, and a continuous drainage path are required to manage water effectively. Over-reliance on caulk often leads to concealed moisture problems.
Q: How do we manage thermal movement where vinyl meets rigid masonry?
A: Designers allow movement by using slotted fastening, compressible backers, flexible gaskets, and trim profiles that do not clamp the siding. Properly installed J-channels and reveal profiles accommodate expansion and contraction while maintaining a neat visual line.
Have questions about your home’s exterior? Boss Services, Inc. can help you consider the next step. Contact our team, call 508-297-0635, or email bossservicesinc@comcast.net.