
Inspecting corner boards, returns, and rake trim for hidden rot behind vinyl siding: a Canton, MA homeowner’s checklist
If you live in Canton and you’re wondering, “How do I check my house corners and trim for hidden damage behind the siding?”, this article walks through a safe, practical, homeowner-facing inspection process focused specifically on corner boards, returns, and rake trim where moisture commonly hides behind vinyl siding. We explain what to look for from the ground, what tools and observations matter, how contractors diagnose sheathing or trim rot, and sensible repair sequencing that limits unnecessary wall-system exposure.
This guidance is for homeowners planning to evaluate symptoms, decide whether a localized repair might be enough, or prepare for a professional assessment. The primary service that covers this work is siding repair and replacement; for more on full-service siding work, see our siding repair and replacement overview linked later in the article.
why inspect corner boards, returns, and rake trim in canton?
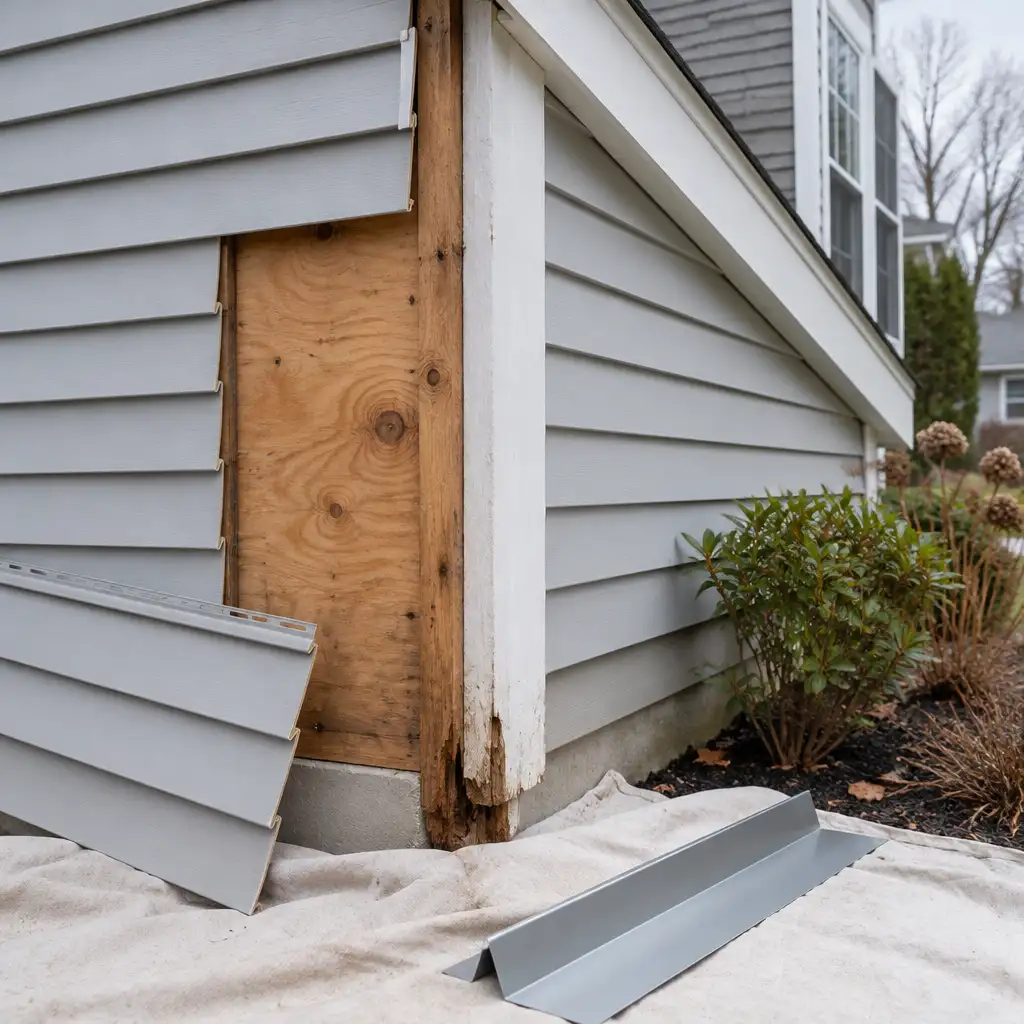
Corner boards, returns, and rake trim are small parts of your exterior but they play a disproportionate role in weatherproofing. On homes with vinyl siding, these trim elements are often installed over sheathing or over a thin corner post, and the snug vinyl courses and trim profiles can hide moisture paths for months or years before symptoms appear. In Canton’s seasonal climate—where freeze-thaw cycles, spring storms, and heavy snow can push water into weak points—small failures at corners and rakes commonly develop into wider sheathing or framing decay if left unchecked.
This article focuses on exterior trim assemblies that typically sit at vertical transitions (corners and returns) and roofline edges (rake trim), and it explains the inspection cues you can safely check from the ground, how a contractor will verify hidden damage, and the sequencing trades use to limit how much siding has to be removed during repairs.
what to expect from a visual pre-check (from the ground)
Begin every inspection from a safe vantage: ground level, stable footing, and binoculars if you need a closer look at higher eaves. The goal is to identify visible clues that suggest water intrusion behind trim rather than to pry materials open.
Common early clues visible from the ground include:
- staining or discoloration on vinyl panels near corners or rakes;
- bulging, bowed, or wavy siding courses adjacent to trim;
- trim that sits proud of siding lines, is cracked, or shows hairline separation at joints;
- loose or missing caulk at trim joints or where trim meets the soffit and fascia;
- paint peeling on wooden corner boards where they remain exposed;
- nail pops, loose fasteners, or visible gaps at returns where rooflines intersect walls.
Why these matter: Siding itself is usually tolerant of a little moisture, but when trim or flashing fails, water can reach sheathing and framing. Visible signs are your signal to investigate more closely or call a contractor for a formal moisture assessment.
tools and preparation for a closer look
For a homeowner inspection that goes beyond the first visual sweep, gather a few simple, safe items. Avoid climbing on ladders unless you have proper experience and assistance; many useful checks are ground-accessible.
- Binoculars: A modest pair (7–10x) helps evaluate eaves, rake edges, and returns safely from the ground.
- Moisture meter (optional): A low-cost pin or pinless meter can indicate elevated moisture where siding is removed or at small exposed trim edges. Use only if you know how to interpret readings and where the meter contacts directly relate to exposed material.
- Flat screwdriver or small pry bar: For gently checking the tightness of trim seams and looking for soft spots at the base of corner boards. Use minimal force and stop if you meet resistance that could damage finishes.
- Flashlight: Bright handheld light to peer into shadowed returns, under eaves, and behind overhanging trim at ground level.
- Camera or phone: Photograph locations, angles, and any marginal gaps to show a contractor. Note date and location for each photo.
Prepare with safety in mind: wear gloves and eye protection for any probing, avoid roof ladders or unsupported heights, and consider hiring a professional where elevation, complex flashing, or suspected structural rot is present.
step-by-step homeowner inspection checklist
This checklist is arranged for safe, escalating inspection—from a distance to limited, non-destructive probing. Use it to form a reasoned decision about whether you can watch a minor problem or should arrange a professional inspection.
1. perimeter walk: note patterns and exposure
Walk the perimeter of your house, ideally on a dry day with good light. Record each corner condition and take photos. Ask: Are issues concentrated on one side of the house? Is there roof runoff, a clogged gutter, or heavy tree cover that keeps an area damp? These environment notes are essential when you call a contractor.
2. document visible dye, streaks, and discoloration
Look for vertical streaks or discolored plumes that trail down from the rake or corner trim. Stains often follow water paths where flashing fails or where the overlap between siding and trim gaps over time. Capture close photos of any streaks and where they begin under the eave or roofline.
3. check alignment and reveal gaps
Vinyl siding can expand and contract; small gaps are normal where panels meet trim. Problems appear when gaps are excessive or when the siding pulls away from trim. Note gaps wider than about 1/8 inch, visible twisting at corner posts, or consistent separation along an entire corner—these suggest a fastening or substrate problem rather than a single loose panel.
4. probe low and safe areas for softness
At ground level or on a short, well-secured step-stool, use a screwdriver or awl to press gently at the base of corner boards or at the return where the roof meets the wall. Soft, crumbly wood or a screwdriver that sinks easily are strong indicators of rot. Stop probing if you encounter large voids or structural collapse risk and call a professional.
5. examine trim-to-soffit and trim-to-fascia junctions
Rake trim lives where wall and roof edges meet; failures frequently occur at the trim-to-soffit and trim-to-fascia junctions. With binoculars or from a safe elevated vantage, inspect the joint lines for missing caulk, pinched or split flashing, or gaps where water could run behind the trim. Note any loose or rusting fasteners visible from below.
6. inspect returns and mitered corners
Trim returns—the short lengths of trim where the rake meets the gable or where a cornice turns back into the wall—are fabrication points where tiny gaps can leak. Look for cracked miter joints, paint failure at miter junctions, and any evidence of insect activity which can coincide with damp, decayed wood.
7. evaluate siding termination at corners
Assess how the siding terminates into the corner assembly. A common installation uses a corner post that the siding locks into; other times, installers leave a wooden corner board behind the vinyl. If the siding does not fully engage the corner post or if the corner post is nailed in a way that traps water, the sheathing beneath can be exposed to prolonged moisture.
8. look for secondary symptoms inside
Check interior rooms adjacent to suspicious exterior corners for staining, peeling paint, or musty odors. Moisture that tracks down sheathing can show up on interior plaster or drywall. If you notice interior signs near a corner, arrange a professional check promptly.
9. seasonal timing
Late spring and early summer—after thaw and heavy spring rains—are good times for inspections because persistent wet patches that winter masked are more visible. Conversely, summer drought can temporarily hide moisture problems. In Canton’s climate, inspect after major storms and again once in the growing season.
10. record and organize findings
Create a short checklist or spreadsheet with photos and locations. Categorize issues as “watch”, “repair soon”, or “professional evaluation required.” This documentation helps a contractor estimate repair scope and prevents missed symptoms during follow-ups.
common causes of hidden rot at corners and rakes
Understanding why water reaches these trim assemblies helps you put inspection observations into context. Below are the typical failure modes we see that allow moisture to penetrate behind vinyl siding and into trim or sheathing.
improper or missing flashing
Flashing is essential where the roofline meets a wall and where the rake and returns create changes in plane. If original flashing is absent, improperly lapped, or corroded, water running off the roof can be driven behind the trim and soak the sheathing. Flashing details must direct water onto the exterior face of the siding, not behind it.
trim and siding fastening that traps water
Nails placed too close together, without proper sealant, or using non-corrosion-resistant fasteners can create small entry points for water. Over time, trapped water softens wood trim or sheathing and can lead to rot beneath apparently intact vinyl courses.
poorly formed returns and miter joints
Returns and mitered corners are intersection points. Without backer boards, drip edges, or through-flashing, these junctions can collect water. Passive drainage within these returns is often poor, allowing water to remain in contact with trim longer than elsewhere.
gutter and downspout overflow
Overloaded or clogged gutters can spill water onto roof edges and into the rake and return area. Splash-back and steady runoff are powerful drivers of localized moisture intrusion even when the siding appears intact.
ice dams and freeze-thaw action
Where heat loss from attics allows snow to melt and refreeze along the rake, ice dams can push water under shingles and along rake trim. Repeated freeze-thaw cycles can also open small gaps in trim joints and expose sheathing to moisture entry.
inadequate housewrap and drainage plane
Modern wall systems include a continuous housewrap or drainage plane behind siding. If the housewrap is absent, torn, or overlapped incorrectly at corners, water that gets behind the siding may not be channeled out efficiently, increasing the risk of prolonged wetting.
age and material deterioration
Wood trim naturally degrades over time. Old corner boards or returns not back-primed or properly flashed are more vulnerable. Vinyl itself can deform with age and permit channeling of water into trim seams if installation tolerances were not observed.
how contractors diagnose sheathing and trim rot
When a homeowner requests an assessment, experienced contractors use a focused, evidence-based approach that isolates the problem while avoiding unnecessary exposure of the wall system. Here’s how a typical diagnostic sequence flows.
1. document existing conditions and environment
A contractor starts much like you did: perimeter walk, photos, and environmental notes. They look at roof run-off, gutter function, siding terminations, and historical repairs to build a hypothesis about where water traveled.
2. targeted siding removal
Rather than removing entire walls, contractors open small test sections—typically a few courses of siding and the associated corner trim. This controlled access reveals the condition of the corner post, sheathing, and any underlying flashing. The goal is to evaluate how deep rot extends and whether adjacent framing is affected.
3. moisture mapping
Using pin or pinless moisture meters, technicians map moisture content on exposed sheathing, framing, and the back of the trim. Elevated readings across an area suggest ongoing leaks and may indicate that a larger repair zone is necessary.
4. probing and structural testing
Where soft spots appear, contractors probe with screwdrivers or small pry bars to determine the thickness of decayed material and whether load-bearing elements are compromised. If framing members are affected, they evaluate whether sistering, partial replacement, or more extensive structural work is needed.
5. inspection of flashing and flashing termination
Open access lets contractors check for proper step flashing, kick-out flashing at roof-to-wall intersections, drip edges at rake, and whether housewrap has been lapped correctly. Flashing deficiencies are often the root cause and are corrected as part of the repair sequence.
6. diagnostic report and scope definition
After inspection, a contractor should provide a clear explanation of findings: what was removed during the diagnostic, the condition of sheathing and trim, the recommended repair scope, and whether nearby areas should be tested. The report will note whether repairs can be limited to a small zone or if a larger siding removal is the prudent choice.
repair sequencing to minimize wall-system exposure
One of the homeowner’s primary concerns is avoiding a full siding replacement when a small repair will suffice. Good repair sequencing protects the house while keeping removals minimal. Below is a practical sequence used by contractors to fix corner- and rake-related rot behind vinyl siding.
step 1 — temporary protection and preparation
Before removing siding, contractors install temporary weather protection such as tarpaulins or peel-and-stick flashings over the work area to prevent rain ingress during the repair. They also plan access and material staging to minimize the time that wall sheathing is exposed.
step 2 — remove vinyl courses and original trim
Remove the smallest number of siding courses necessary to expose the trim and sheathing. Vinyl siding is typically removable in panels; careful detachment preserves reusable material and limits the demolition footprint.
step 3 — assess and remove damaged trim and sheathing
Contractors cut out only the compromised trim and sheathing. If the corner post or sheathing has limited rot, they may replace only the damaged boards and sister structural members rather than replacing entire studs or sheathing sheets. In more advanced cases, a larger patch of sheathing or framing replacement is required.
step 4 — correct flashing and drainage details
Before closing the wall, install or repair flashing, back-dam trim edges, and add kick-out or step flashing where roof intersections occur. Adding or repairing a continuous housewrap lap around the corner helps maintain a reliable drainage plane.
step 5 — install replacement trim (primed or rot-resistant materials)
Where wood trim is used, contractors recommend back-primed or pressure-treated wood, or composite/HDPE trim where suitable. Proper back-priming, caulking of joints, and correct fastening techniques reduce the chance of repeat failures.
step 6 — reinstall siding with proper terminations
Siding panels are re-installed with correct reveal, fastener spacing, and engagement into corner posts. When necessary, installers replace the local siding courses with matching profiles and colours, ensuring thermal movement allowances are respected.
step 7 — finish caulking and clean-up
Final work includes paint or finish to exposed trim, caulking of joints with an appropriate exterior sealant, and clean-up of the work area. Contractors will typically leave documentation of what was replaced and any warranty terms that apply.
temporary protection and preventive steps you can take
If you uncover a small issue or are awaiting repair, simple temporary steps reduce further damage:
- place a short-length tarp over exposed sheathing if siding is removed; secure without creating pressure sinks;
- clear gutters and downspouts near affected corners to reduce overflow;
- trim back overhanging branches that shade the wall and slow drying;
- apply exterior-grade caulk to small, accessible joints at the base of corner boards (do not seal over active leaks);
- avoid painting over soft or degraded trim—address rot first.
These measures are temporary. Proper repair and flashing correction are required to eliminate the underlying cause of recurring moisture.
questions to ask a contractor during an inspection
When you arrange a professional evaluation, clear questions help you compare proposals and understand the trade-offs between localized repair and more extensive work. Consider asking:
- Which areas did you open for diagnosis, and what did you find under each exposed section?
- How far does the rot or elevated moisture extend horizontally and vertically from the visible problem?
- Can the repair be limited to this small area, or do you recommend removing adjacent siding to confirm sound sheathing?
- What flashing upgrades will you install to prevent recurrence, and how will those integrate with the roofline or gutter system?
- Which materials do you recommend for replacement trim and why (painted wood vs composite)?
- Can you show photos of the diagnostic stage and the finished repair for my records?
- What are the steps you’ll take to protect the house during work (temporary weather barrier, sequencing)?
Requesting a written scope that outlines what will be removed, replaced, and finished is reasonable and helps avoid surprises when work begins.
example scenarios and decision guides
Below are hypothetical examples to illustrate how findings drive repair choices. These are not case studies of Boss projects; they are representative decision guides for homeowners in Canton.
scenario a — shallow rot at a single corner board
Visible paint failure and softness localized to a single corner board; adjacent siding is tight and shows no staining; moisture meter indicates normal readings on sheathing. Likely approach: remove the corner board and a single course of siding to confirm sheathing condition. If sheathing is sound, replace the corner board with back-primed wood or composite trim, correct any flashing detail, and reinstall siding. This is a limited repair often completed quickly.
scenario b — staining along rake with elevated moisture readings
Stains trail from the rake down several siding courses; moisture meter reveals elevated moisture in sheathing along the affected run. Likely approach: remove multiple siding courses along the rake for a moisture map. Replace sheathing where readings and probing show decay, install corrected flashing at the rake, and replace trim with a rot-resistant material. Because several courses are affected, the repair footprint is larger and the crew will stage weather protection carefully.
scenario c — interior staining near a corner and soft framing
Interior plaster near an exterior corner shows staining and a contractor finds soft framing on probing. Likely approach: more extensive remediation may be required, including selective framing member replacement and an expanded siding removal to access and repair structural elements. This scenario calls for a qualified contractor with carpentry skills and careful sequence planning.
final steps and next actions for Canton homeowners
If your inspection turned up red flags—soft trim, persistent staining, or elevated moisture readings—arrange a professional evaluation rather than attempting major repairs yourself. For homeowners in Canton who need siding-focused work, seek a contractor who documents diagnostic openings, moisture mapping, and the flashing and drainage solutions they’ll implement.
To learn more about the range of siding services and what full repairs involve, see our siding repair and replacement page. If you’d prefer to start locally, our Canton town page describes the communities we serve and provides contact options.
Before booking work, gather your inspection photos, notes about observed conditions and timing (for example, if staining appears after heavy rains), and any interior signs. These details let a contractor provide a more accurate initial assessment and help prioritize repair sequencing to limit how much siding must come off.
faq
Q: How much siding usually needs to be removed to check a corner board?
A: Often a few siding courses adjacent to the corner board are sufficient to reveal sheathing and trim condition. Contractors prefer to open the minimum area needed for a reliable assessment, but the exact number depends on how far discoloration, soft spots, or elevated moisture readings extend.
Q: Can I replace rotten corner boards myself without touching the siding?
A: If rot is strictly limited to an exposed wooden corner board and the siding termination remains solid, a careful DIY replacement is possible. However, you should only proceed if you are confident the sheathing behind the trim is dry and sound. When in doubt, have a pro inspect before closing the wall—hidden sheathing rot is the common pitfall.
Q: What trim materials resist rot best at rakes and corners?
A: Back-primed, kiln-dried wood helps when painted and maintained. For lower-maintenance options, high-density polyethylene (HDPE) composite trim or PVC-based trim are more rot-resistant in wet conditions. Proper flashing and installation details remain the most important factors regardless of material choice.
Have questions about your home’s exterior? Boss Services, Inc. can help you consider the next step. Contact our team, call 508-297-0635, or email bossservicesinc@comcast.net.