
Deciding between sill/jamb repair and full window replacement for rotted exterior sills in Plainville, MA
If your window sill is soft and peeling, you’re asking an important, practical question: can the sill or jamb be repaired, or does the whole window need replacement? This article lays out a step‑by‑step decision framework for homeowners in Plainville, MA, explaining how to evaluate the extent of rot at sill and jamb assemblies, common repair techniques (including epoxy consolidants and dutchman repairs), when a full unit replacement is the more reliable choice, and how to budget, sequence, and protect interior finishes during work. We focus on observable conditions, likely causes, realistic intervention options, and the questions you should ask a qualified contractor.”, “weight”: 1
initial observation and why it matters
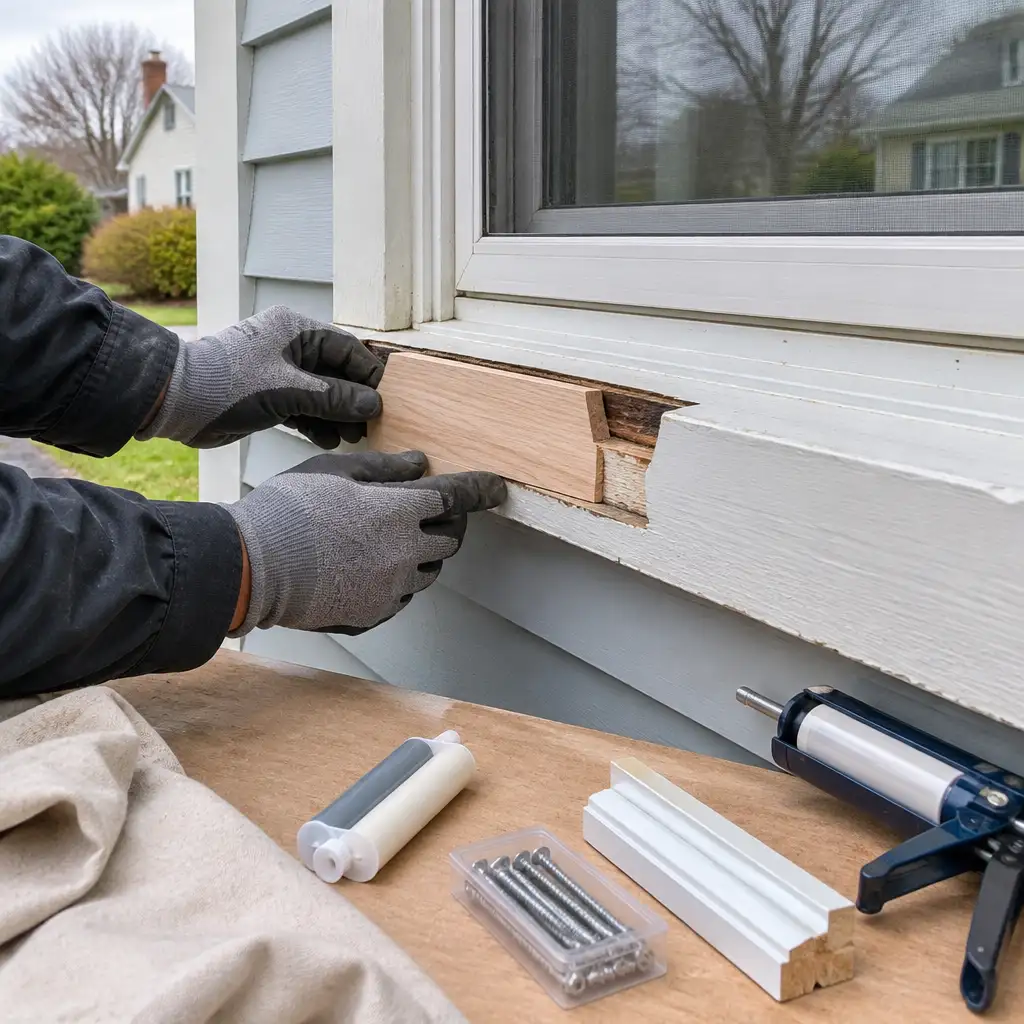
Start with what you can safely see from inside and outside the home. Surface signs such as peeling paint, soft or spongy sill wood, visible gaps at the sash, or water stains on the interior wall are important clues, but they only tell part of the story. Why this initial step matters:
- Visible damage is often the tip of the problem. Rot commonly starts where flashing or paint failed and then travels into concealed framing and the jamb assembly.
- Deciding between a localized repair and a full replacement hinges on whether the damage is limited to the sill face or whether it extends into the jamb, rough opening, or structural framing.
- Knowing what to expect lets you plan for protecting finishes, timing the work with other exterior projects, and budgeting for likely outcomes rather than just the best‑case estimate.
As you look, note the following specific observations and record them (photos and short notes help when you contact a contractor):
- Is paint blistered or peeling only on the sill or also up the jambs?
- Is the sill soft to the touch when pressed with a screwdriver or probe?
- Is there sagging, separation between the sash and jamb, or visible shrinkage gaps?
- Do you see staining, mould or mildew on the interior wall under the window?
- Are neighbouring windows showing similar problems (suggesting a common flashing or roof drainage issue)?
how a qualified contractor assesses rot
A careful contractor will combine visible inspection with selective probing and diagnostic tools to determine the extent of material loss. Here are the standard steps you should expect during a thorough assessment:
1. Exterior and interior visual survey
The inspector checks paint, caulk joints, trim profiles, sill drip details, and any visible flashing. Inside, they look at trim condition, paint, and drywall or plaster staining beneath the window.
2. Probe testing and moisture readings
Probing with a small screwdriver or awl helps map soft wood. A moisture meter shows long‑term wetness trends; readings alone don’t prove rot but highlight areas that held moisture. Expect the contractor to note both probe depth and moisture readings rather than relying on either in isolation.
3. Partial removal of trim or cladding when needed
To see the full jamb and reveal hidden rot, a contractor may remove a small section of interior trim or an exterior trim piece. This is a controlled step: the goal is to reveal conditions under the finish without causing unnecessary damage. If trim removal is proposed, ask how they will protect and label pieces for reinstallation or replacement.
4. Assessing the rough opening and adjacent framing
Sill rot can travel into the rough opening sill plate, cripple studs, or sheathing. The contractor should evaluate the framing to determine whether the opening still provides a solid bearing surface for a replacement window or patch repair.
5. Document findings and repair options
A good assessment will produce a clear, written scope with photos showing what was found, the recommended repair or replacement, and the risks and downsides of each option. It should explain how the proposed work addresses the moisture source, not just the visible rot.
repair techniques: epoxy consolidants and dutchman patches
When rot is limited and the surrounding framing is structurally sound, targeted repairs can restore a sill or jamb without replacing the entire window. Below are the most common, durable repair approaches and when each is appropriate.
epoxy consolidants and fillers
Epoxy consolidants are two‑part systems designed to penetrate soft wood, replace lost fiber, and form a stable substrate for shaping and repainting. Typical uses include:
- where decay affects the outer layers or localized sections of the sill but the underlying wood remains largely intact;
- when a smooth surface is needed after removing friable material and before repainting;
- as part of a composite repair combining patched wood and epoxy to create an integrated, sealed surface.
What to expect from an epoxy repair:
- the contractor removes all loose, degraded material until they reach sound wood;
- an appropriate consolidant is applied to penetrate and harden the remaining fibers;
- where larger voids remain, a structural epoxy filler or putty is applied and shaped to match the original profile;
- after curing, the repaired area is primed and painted to restore the drip edge and weather protection.
Benefits: epoxy repairs preserve original trim, can be cost‑effective, and work well for limited damage. Limitations: epoxies don’t address underlying moisture drivers, and they require sound substrate to bond to. They are not ideal where the sill has lost most of its cross‑section or where the jambs and frame are soft.
dutchman (scarf) repairs and partial replacement
A dutchman repair replaces a decayed portion of a member with a fitted new piece of wood. This is often used for sill faces, end blocks, or short spans of jambs. There are two common forms:
- face‑repair (patching the front profile of the sill) — remove the rotten face and fit a new wood section that matches the original drip and slope;
- scarf‑splice or full‑length partial replacement — where the sill is repaired with a longer scarf that restores strength across a larger portion of the member.
What to expect with a dutchman:
- the rotten portion is cleanly cut out back to sound wood;
- a new, pressure‑treated or rot‑resistant wood piece is shaped to fit and bonded with structural adhesive and stainless fasteners;
- the repair is primed and painted and the drip detail re‑established;
- where the jamb interface is affected, the new piece is carefully sealed and flashed to shed water away from the joint.
Advantages: dutchman repairs restore original profiles and can be nearly invisible when done well. They preserve the existing window and interior trim. Drawbacks: they require carpentry skill, and if the decay extends deeper than anticipated, what begins as a dutchman can escalate to larger repairs or replacement.
combination repairs and structural reinforcement
Often the best long‑term fix is a combination: remove decayed wood, use epoxy consolidant to stabilize remaining fibers, install a dutchman patch for profile and drainage, and add flashing or composite sill pans to prevent recurrence. In situations where the sill support is compromised but the frame is sound, contractors may reinforce the sill with sistered lumber or a new sill plate tied into the rough opening.
when to choose repairs
Repair is most sensible when these conditions apply:
- rot is isolated to the sill face or the outer portion of the jambs;
- the underlying framing and rough opening are structurally sound;
- the window is otherwise functional (sash operation, glazing, hardware intact) and energy performance is acceptable;
- you want to preserve original trim or historic details that would be costly to replicate.
limits of repair: when full window replacement is needed
Targeted repairs are not always the economical or durable solution. There are clear scenarios where replacing the full window unit provides a safer, longer‑term outcome:
1. decay extends into jambs, head, or rough framing
If probing and inspection reveal that rot has penetrated the jambs beyond repairable depth or that the rough opening sill plate or structural framing is compromised, a full unit replacement that includes repair of the opening becomes the prudent choice. Replacing only the sill in that scenario may be a temporary fix that leaves hidden weakness in the structure.
2. multiple failure points and moisture management problems
When the causes of water intrusion are systemic — failed exterior flashing, missing sill pans, rot at several windows, or roof/siding drainage that directs water to openings — replacing multiple windows allows for coordinated upgrades: correct flashing details, integrated sill pans, and exterior trim that sheds water properly. Sometimes doing a single repair without addressing the larger moisture path is a losing bet.
3. severe sash or frame distortion
Windows with warped, swollen, or distorted frames often cause sash misalignment, poor sealing, and chronic drafts. If the sash cannot be adjusted or rebuilt to seal properly, replacement restores operation and can improve energy performance. Even if the sill could be patched, the window may still leak or stick.
4. recurring rot or maintenance history
If the window has required repeated repairs in the past, replacement may lower the total lifecycle cost. A one‑time larger investment can avoid repeated small jobs that cumulatively cost more and disrupt interiors multiple times.
5. glazing, hardware, or energy reasons
When windows have failed seals, broken glass, or non‑repairable hardware, these issues may justify full replacement. Replacement also makes sense if you’re planning to upgrade the unit for improved insulation or to install a window type that better suits the opening.
budget drivers and project priorities
Homeowners often ask for dollar ranges. The company brief prohibits inventing specific price points, so instead this section explains the elements that drive cost and the tradeoffs to consider when budgeting for sill/jamb work in Plainville.
primary cost drivers
- scope of visible and hidden damage: limited repairs are less expensive than opening and rebuilding a rough opening or replacing multiple members.
- access and staging: ground‑access work differs from second‑story jobs that require scaffold, boom lift, or careful drop cloths to protect landscaping and finishes.
- materials and finish requirements: the choice between pressure‑treated lumber, rot‑resistant species, composite sill pans, and high‑quality exterior trim affects material cost.
- labor skill and time: dutchman splices and careful trim preservation are time‑intensive carpentry tasks; epoxy consolidation also requires meticulous prep and cure time.
- coordination with other trades: if the window sits within a wall scheduled for siding replacement, integrating the window work can reduce duplicate access costs; similarly, roofing or flashing work above the opening may need sequencing.
how to prioritise repairs
Use the following priorities when budgeting:
- Address active leaks and structural risk first — if water is entering, stop the leak before cosmetic paint repairs.
- Stabilise and protect interior finishes next — temporary weather‑proofing and interior protection can avoid secondary damage during a multi‑step repair.
- Consolidate related exterior projects — coordination with planned siding, roofing, or gutter work can lower total disturbance and improve long‑term performance.
sequencing, access, and protecting interior finishes
One of the homeowner’s main concerns is limiting interior disruption and preserving trim. Proper sequencing and protection make a big difference in upheaval and final appearance. Below are recommended practices and what to expect on the job.
preparation before any removal
- move furniture and cover surfaces with drop cloths; remove window treatments and small items from sills.
- if interior trim will be removed, expect the contractor to label and pack pieces carefully for reinstallation or to document profiles for replication if replacement is necessary.
- discuss dust‑control measures up front — containment sheeting, doorway zipper systems, and HEPA vacuums reduce airborne dust and paint chips.
trim removal vs. in‑place repair
When the damage is limited to the exterior face of the sill, many repairs are possible without removing interior trim. For deeper repairs, partial trim removal is often required. Ask your contractor how they will:
- label trim pieces for exact reinstallation;
- protect painted edges from chipping;
- match paint and finish to minimise visible differences after reinstallation.
protecting finishes when installing a replacement window
Full replacement typically requires removing interior stops and possibly casing. A conscientious crew will:
- store salvaged trim on padded racks if it is to be reused;
- install temporary covers to keep rain and pests out during the work;
- use felt or foam pads to protect sills and floors from tools and materials;
- prepare finishing caulk, primer, and paint touch‑ups to restore the interior appearance after the replacement.
minimising multiple finish transitions
If you are planning paint or trim work inside, schedule those finish steps after the carpentry and exterior painting so you do fewer coats and touchups. Coordinating the sequence reduces downtime and the number of distinct trades working in your home.
coordinating with siding, roofing, and exterior work
Window sills and jambs sit at the interface of several exterior systems. Addressing them in isolation can be wasteful unless you confirm that surrounding systems won’t reintroduce moisture. Consider these coordination points:
siding transitions and flashing
Where the window meets siding, correct flashing and a proper sill pan are essential. If siding is being replaced or is aged and loose, it’s often efficient to coordinate window repair/replacement with siding work so that flashing, trim, and weeps are installed as part of a single dry system. See our siding page for guidance on planning coordinated exterior projects: Siding repair, replacement and installation.
roof and gutter drainage above openings
Check how roof runoff, gutters, and downspouts direct water near the window. A contractor will examine the roof‑to‑wall junction and nearby flashings to ensure the window opening won’t be constantly re‑exposed to moisture after repair.
timing with larger exterior renovations
When you have multiple planned upgrades, prioritise work that improves weather protection first: roof, flashing, and critical siding work, then windows. This sequencing reduces the chance of damaging newly finished elements and ensures water management is fixed before cosmetic touches are applied.
questions to ask your contractor and a homeowner checklist
Below is a concise checklist to use during phone calls and on‑site visits. It helps you compare bids and ensures you get clear answers rather than vague assurances.
inspection and scope questions
- Exactly which part(s) of the sill or jamb are rotten? Ask them to show or document with photos.
- Will you need to remove interior trim or exterior cladding to fully evaluate the damage?
- Are there signs that the rough opening or adjacent framing is affected?
- Do you recommend a repair (describe the technique) or replacement of the full window? Why?
method and materials questions
- What specific materials will you use for the repair or replacement (sill pans, flashing, wood species, primers)?
- How will you ensure the new or repaired sill sheds water (drip, slope, and flashing details)?
- If you propose epoxy, what brand/type and what perimeter prep and cure times are required?
project management and finishes
- How will you protect interior finishes and landscaping during the work?
- Who will perform the interior and exterior finish painting? Is touch‑up included?
- If the work reveals larger damage, how will changes be documented and priced?
warranty and follow up
Ask about the workmanship warranty for the specific repair or replacement. We recommend confirming the duration and the scope in writing. It’s reasonable to request a clear statement about what the warranty covers and how follow‑up service is scheduled.
three hypothetical scenarios to illustrate decisions
The following short, hypothetical examples show how the assessment and decision process works in practice. These are illustrative only and not descriptions of any Boss Services project.
scenario a: surface sill rot, intact framing
Observation: peeling paint and soft wood limited to the exterior sill face; sash operates fine; no interior staining. Assessment: probing reveals sound wood 1–1.5 inches behind the surface. Recommendation: a dutchman face repair combined with epoxy consolidation and a new exterior primer and paint. Benefits: preserves original sash and interior trim, restores the drip detail, and limits cost and disruption.
scenario b: deep sill rot with sill plate involvement
Observation: soft sill that collapses under light pressure, interior staining near baseboard, and moisture meter high near the sill plate. Assessment: rot extends into the rough opening sill plate. Recommendation: remove the window, repair or replace the rough opening sill plate, install a proper sill pan, and reinstall the window or install a replacement unit depending on the frame condition. This sequence addresses the structural support and future leak risk.
scenario c: multiple windows and systemic moisture
Observation: several windows around one façade show similar sill paint failure and signs of leakage after storms. Assessment: the roof‑to‑wall flashing and sill pan details are inadequate and may be directing water to multiple openings. Recommendation: a coordinated plan to upgrade flashing and sill pans across affected windows, with replacement windows considered if frames are aged or distorted. Coordinated work reduces long‑term maintenance and prevents repetitive small repairs.
final recommendations and next steps in Plainville
To summarise the decision framework for homeowners in Plainville:
- Begin with careful documentation of visible signs: photographs, notes on soft areas, and any interior staining.
- Arrange for a qualified contractor to perform a targeted assessment with probing, moisture readings, and controlled trim or cladding removal if necessary. Expect a written scope that explains why a repair or replacement is recommended.
- If rot is limited to the sill face and the rough opening is sound, consider durable repairs such as dutchman patches and epoxy consolidation combined with corrected flashing.
- If rot reaches the jambs, rough sill plate, or has led to sash/frame distortion, plan for opening repairs or full window replacement to restore structure and long‑term weather resistance.
- Coordinate the work with any planned siding, roof, or drainage improvements so the moisture problem is fixed at its source rather than patched temporarily.
- Ask clear scope, materials, protection, finish, and warranty questions before choosing a contractor, and make sure the work plan includes interior protection and documented finish restoration.
When you are ready to move from inspection to a written plan, consider starting with a local contractor who understands Southeastern Massachusetts exterior conditions and the sequencing required to protect interior finishes. Our window and door specialists evaluate both repair and replacement options and explain the tradeoffs so you can make an informed choice. Learn more about our window and door services here: Window and door installation and replacement, and see examples in our project gallery: Windows and doors project gallery. For Plainville homeowners, our local town page provides information about the area we serve: Plainville.
faqs
Q: My sill paint is peeling but the wood feels only slightly soft—can I wait until spring to have it fixed?
A: If moisture is active—visible staining after storms or interior dampness—delay increases the risk that rot will spread. If the softness is minor and there are no signs of active leaks, you may be able to schedule non‑urgent repair, but arrange an inspection first so the contractor can advise on short‑term protections like temporary sealing and interior monitoring.
Q: How long does an epoxy sill repair take compared with replacing the full window?
A: Epoxy repairs require careful preparation, application, and cure time; they are typically a multi‑step job that can span a few days including curing and finishing. Full window replacement involves removal, possible structural repairs, weatherproofing, and finishing and can take longer depending on access and whether interior trim is being preserved or replaced. Your contractor should give a clear timeline for each option in the written estimate.
Q: Can historic windows be preserved with dutchman repairs without losing their character?
A: Yes. Skilled carpentry repairs like dutchman patches are commonly used to preserve historic sash and profiles while restoring weather resistance. Preserving character requires careful matching of profiles, paint systems, and trim preservation. Discuss preservation goals with your contractor so they can document and protect original elements during the repair.
Have questions about your home’s exterior? Boss Services, Inc. can help you consider the next step. Contact our team, call 508-297-0635, or email bossservicesinc@comcast.net.